
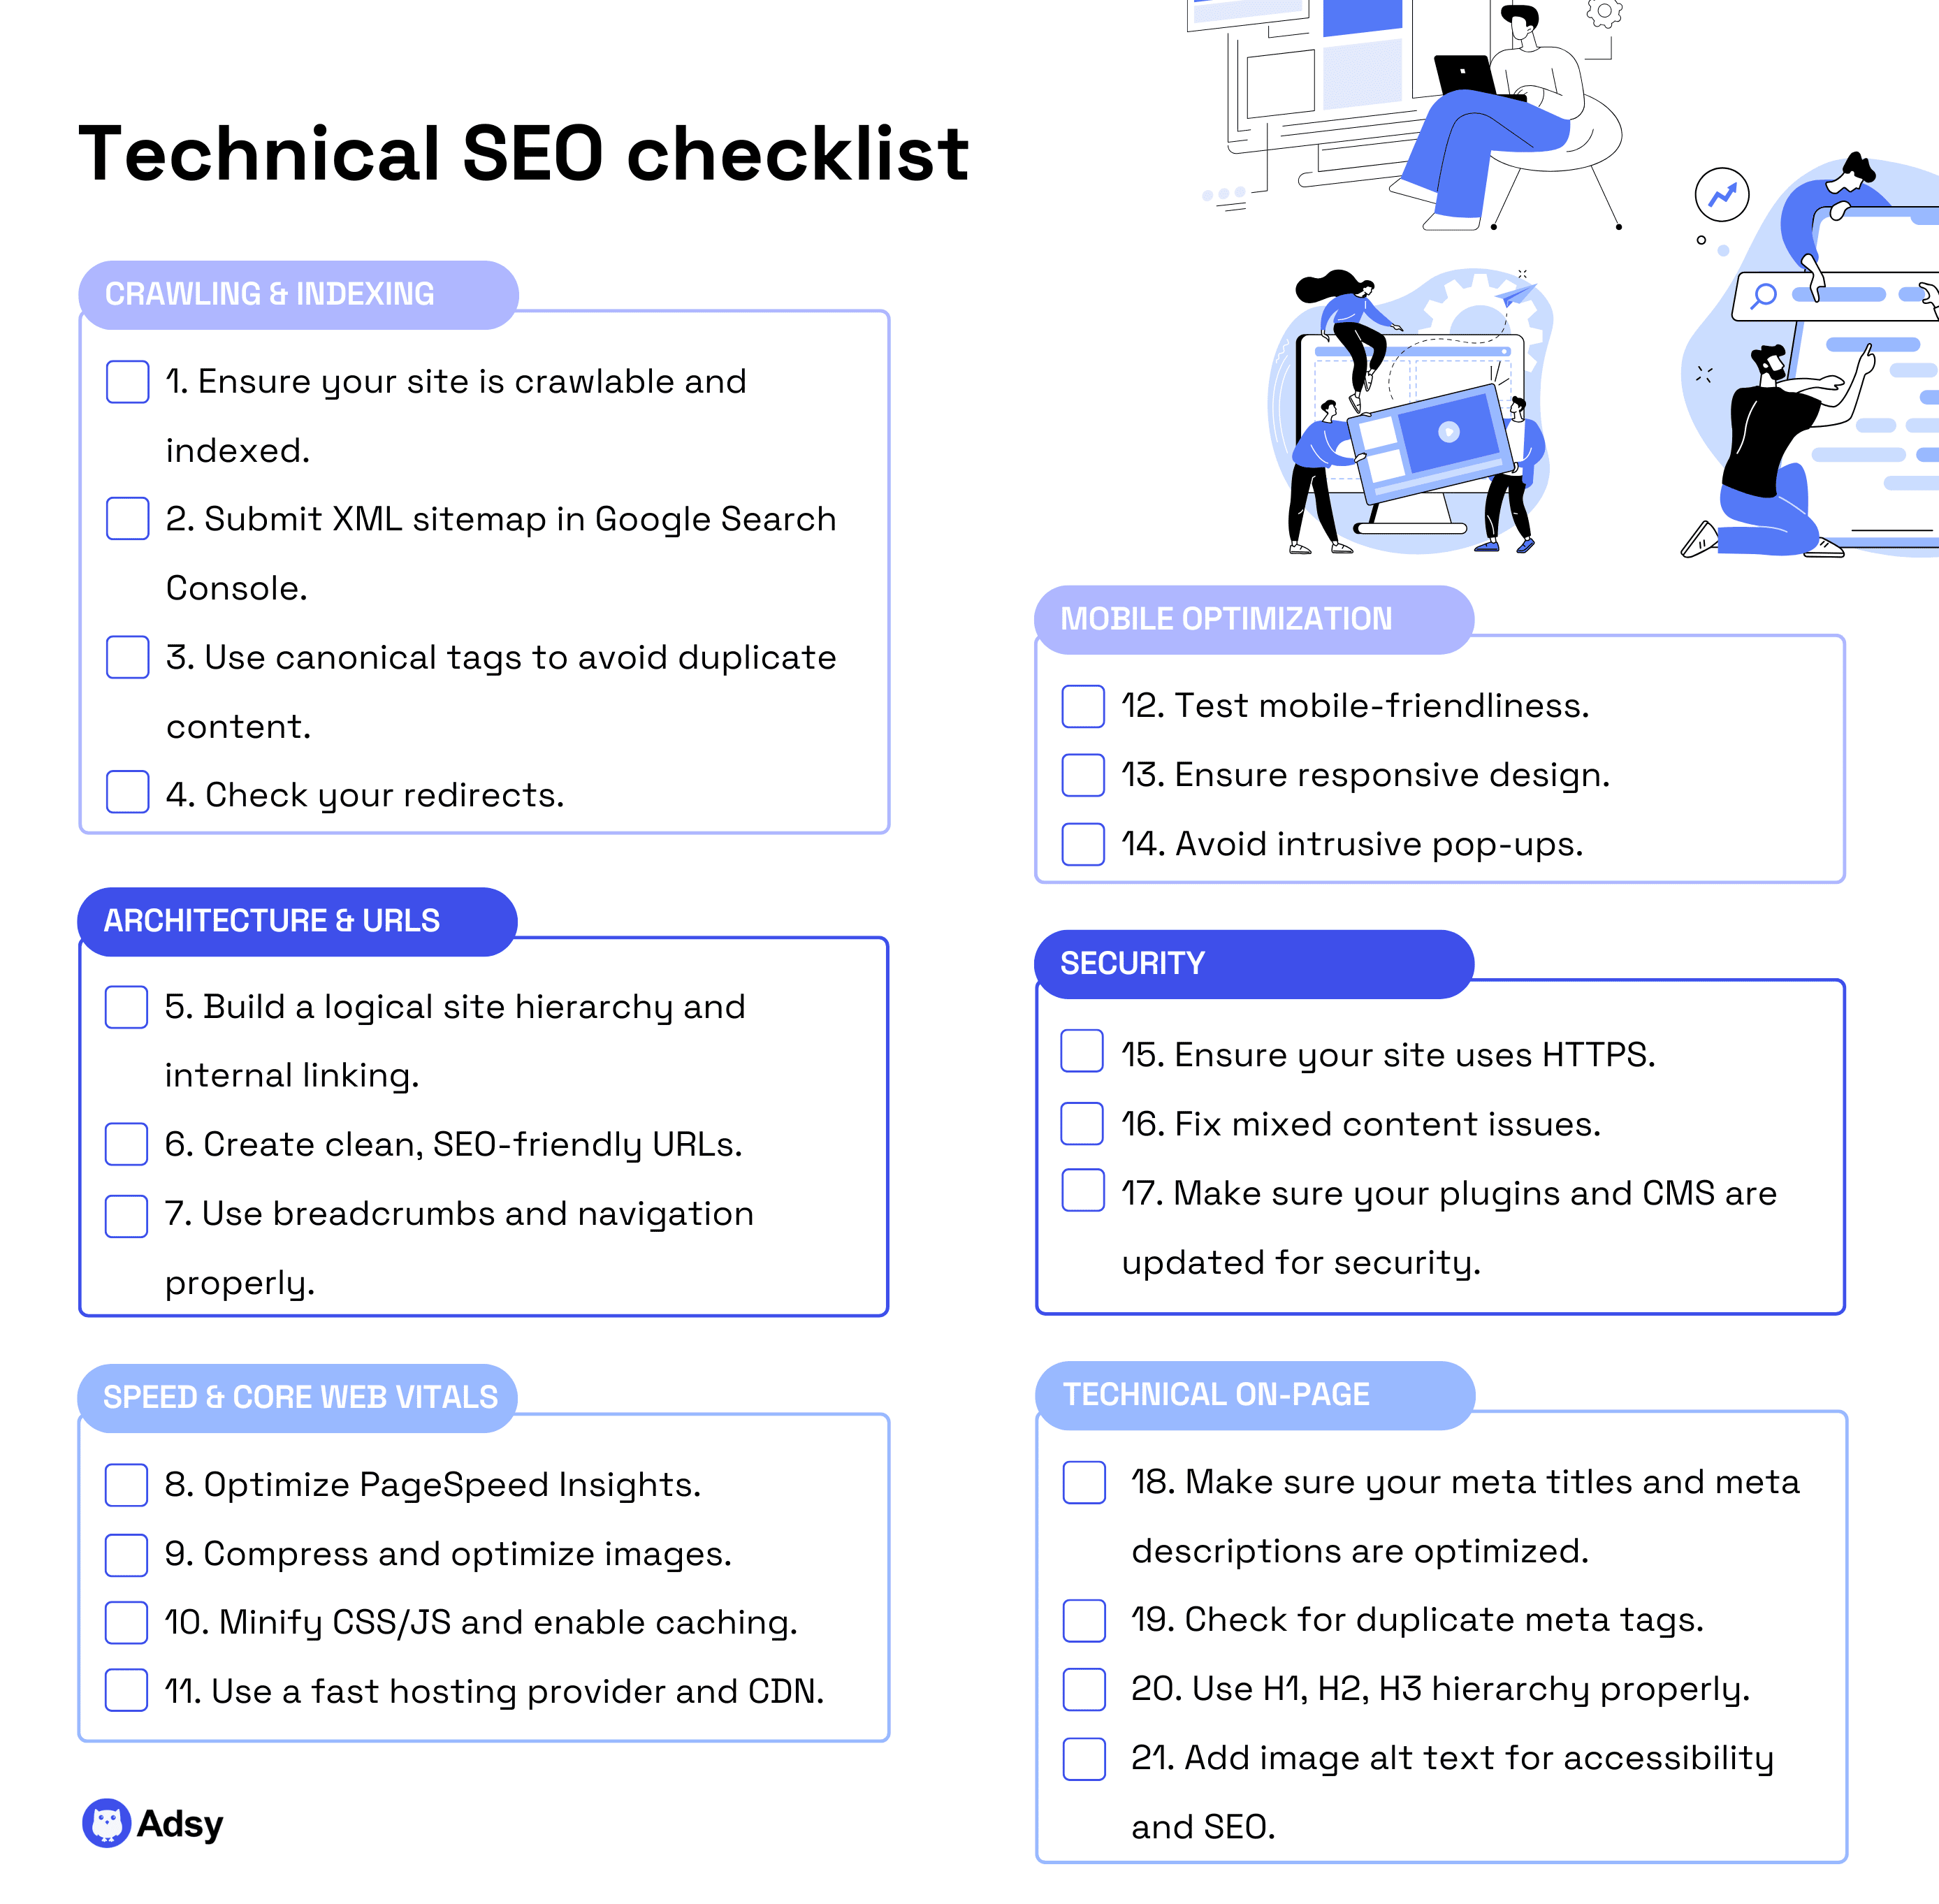
Technical SEO Checklist: Everything You Need to Fix and Improve Your Site
Most times when people hear SEO, their minds immediately jump to content marketing.
But SEO is far more than content.
You can have the best blogs in the world, but if your website doesn’t load fast or has some other technical issue, people will simply bounce back as soon as they land on your page.
And guess what? Google notices these things.
Technical SEO is what helps you make sure that search engines discover your content and properly index it.
Still, if you're new to this part of optimization, it can be complicated, maybe even scary at first. So, we’ve compiled a handy technical SEO checklist for you.
In this guide, we’ll cover:
- All the major technical optimization components.
- And how you can work with each to improve your website’s performance.
Let's jump right into it.
Crawling and indexing
Search engines are like librarians.
Before they can recommend your book (aka your site), they need to know it exists and figure out what it’s about. Besides, they have to put it on the right shelf.
This is exactly what Google does when it crawls, indexes, and ranks your page.
So, if you are serious about your technical search engine optimization strategy, you have to start with crawling and indexing. No matter how boring this sounds.
Without fixing this part, your pages won't even show up in search results. So, trying to optimize anything else will be absolutely pointless.
Where do you start, then? First things first:
1. Ensure your site is crawlable and indexed
You are going to need Google Search Console to confirm that your pages are both crawlable and indexable.
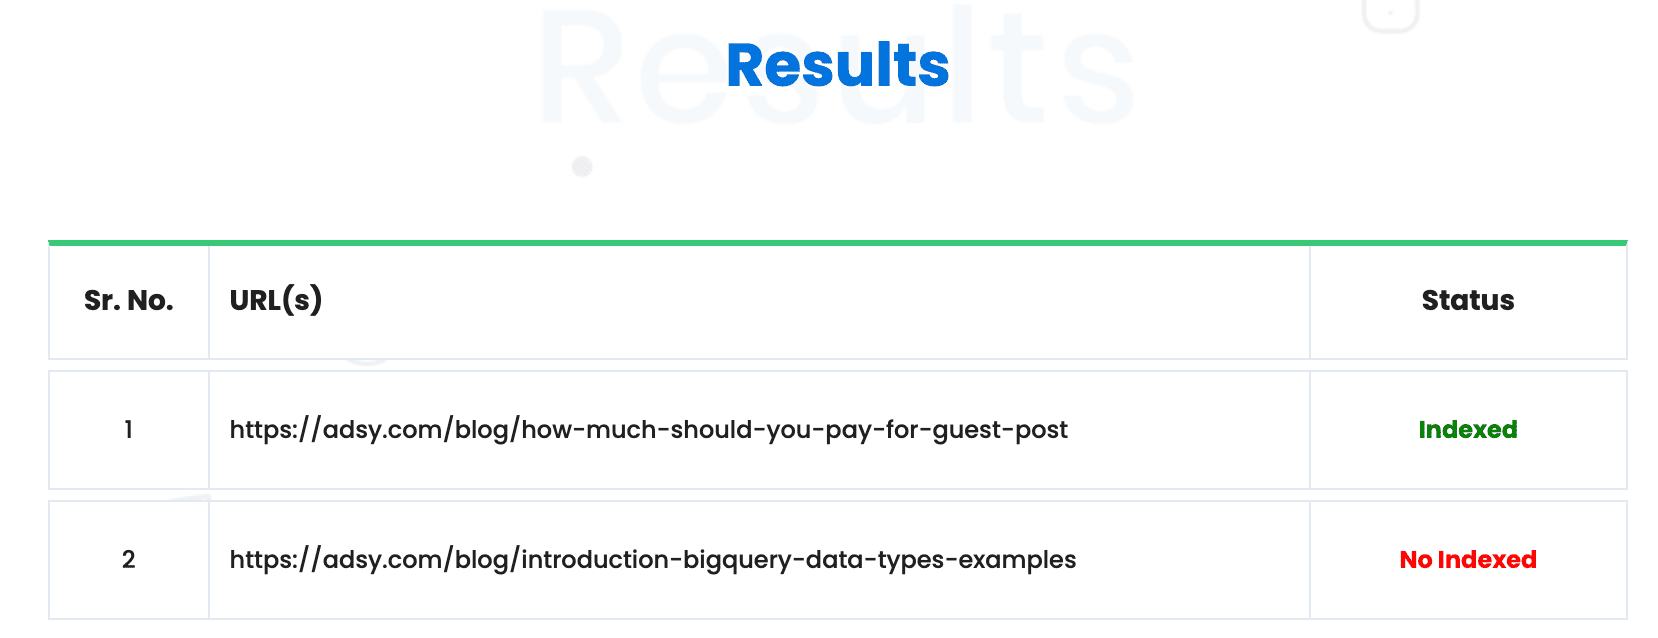
All you have to do is open the GSC, click on Pages on the left side of the menu. And you’ll see which pages are indexed and which are not.
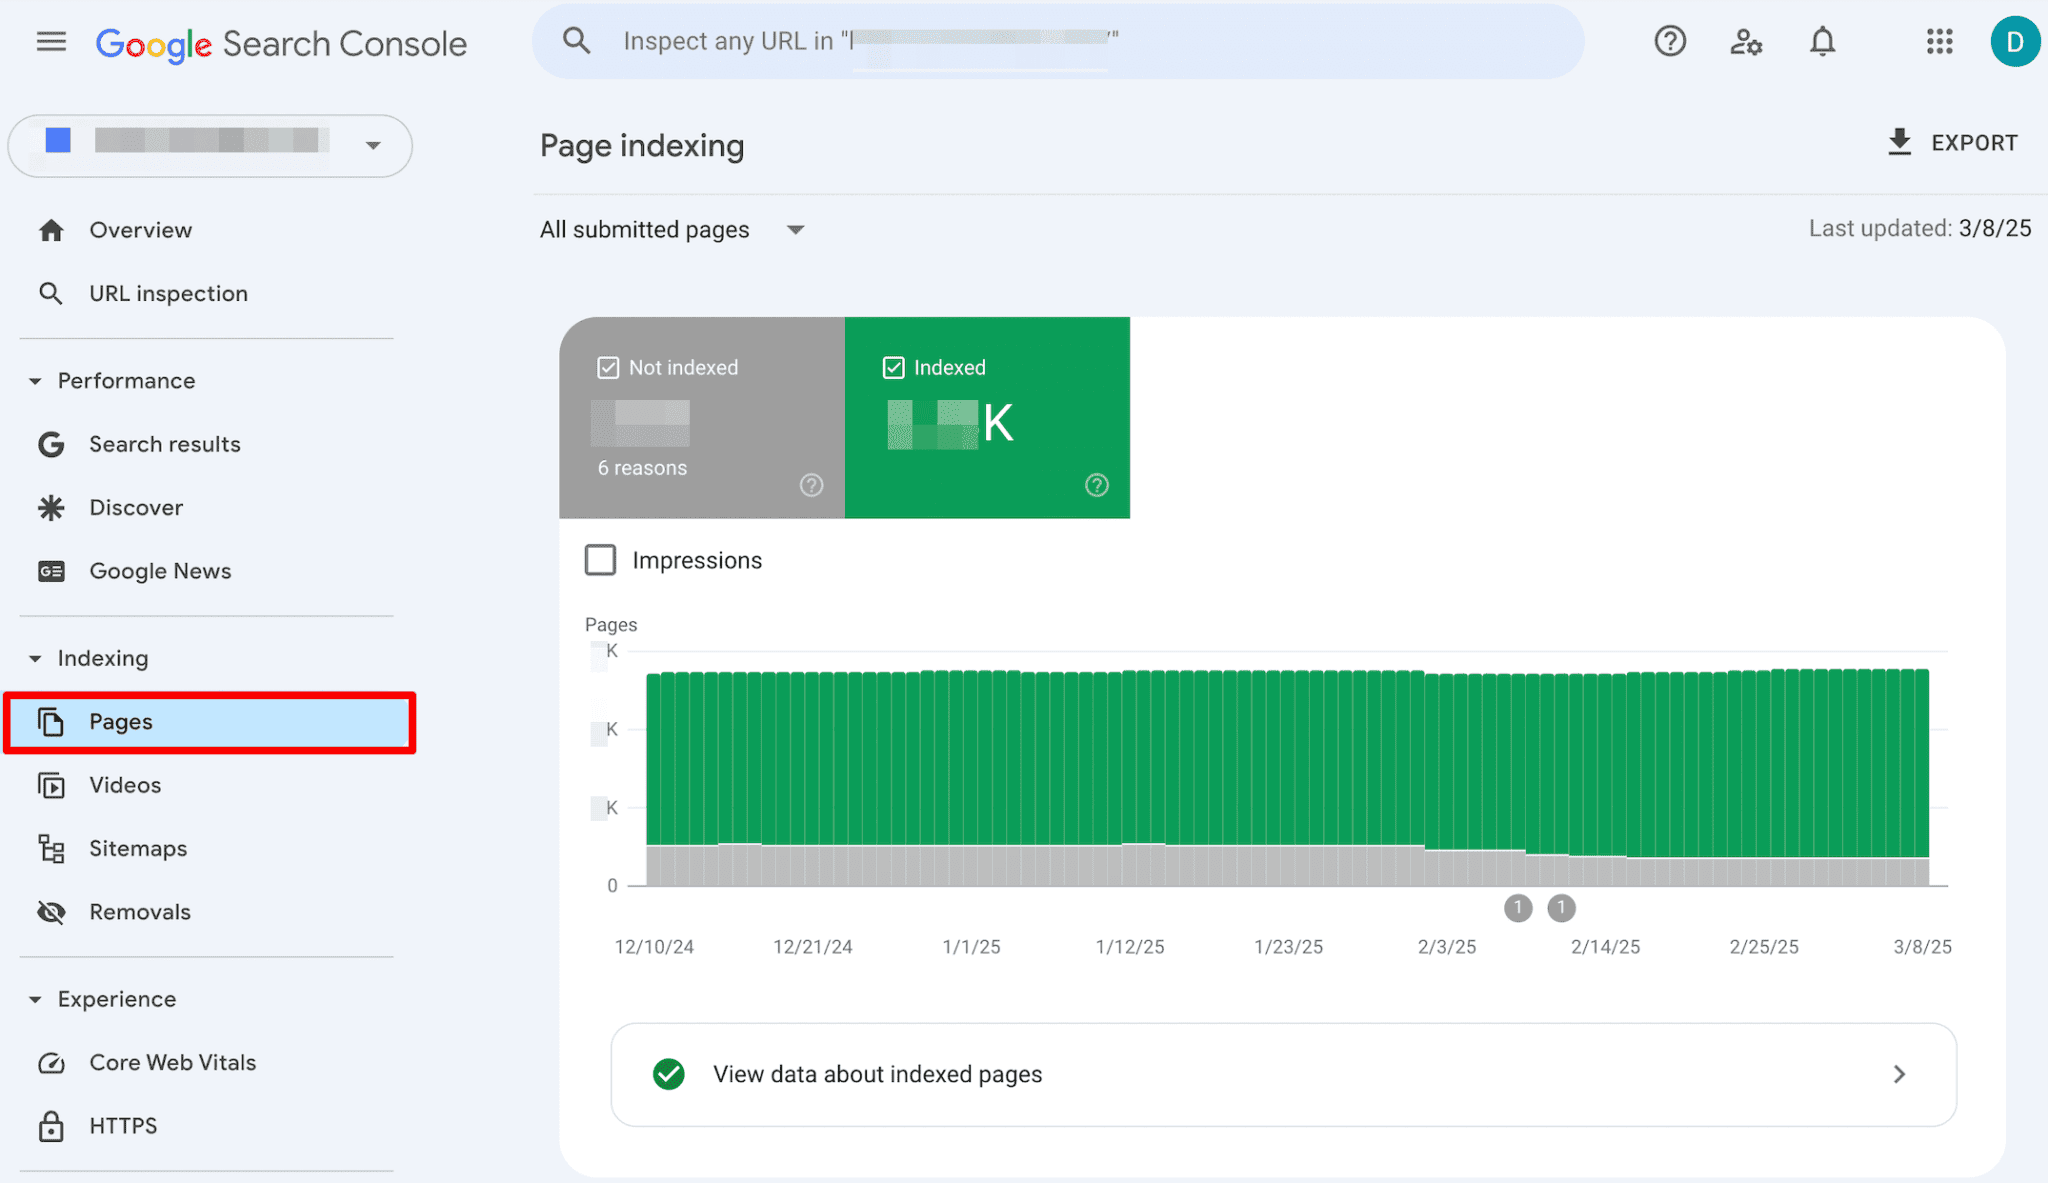
Source: SE Ranking
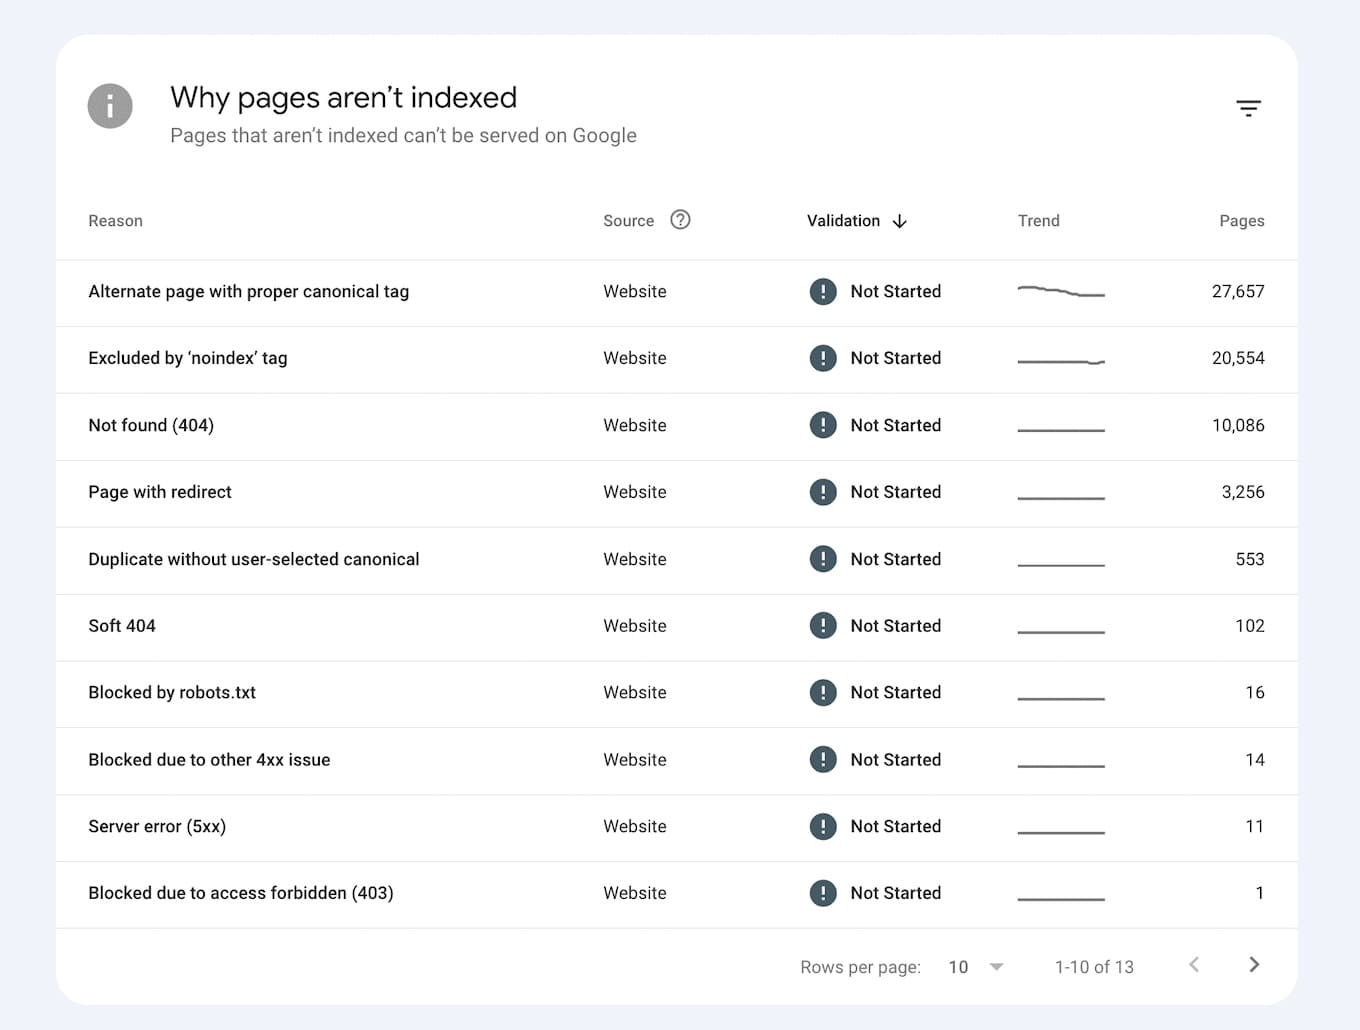
Logically, the indexed ones will be green and the non-indexed ones will be grey. When you click on the grey ones, you’ll see exactly why those pages aren’t indexed. There can be multiple reasons for that.
Source: SE Ranking
When you see a list of issues, we recommend doing the following:
- Go through each of them and check what pages aren’t indexed by mistake (because it’s okay to “hide” some pages from Google bots).
- Fix the issues you need.
- And click on the validate button to let Google crawl those pages again.
Some of the fixes might require you to optimize the content (especially if the page was already crawled before).
Sometimes, though, you might have a robots.txt file specifically instructing Google not to crawl those pages. Maybe even a noindex tag that tells it not to add the page to SERPs.
Either way, you need to check that and, if needed, fix it.
And the good news is that the GSC tool is free, so you don’t have to worry about breaking the bank by paying for yet another SEO platform.
But if you don’t want to use GSC, there is an alternative method (two, in fact):
- One way to check is to type site:yourdomain.com/your-specific-page in Google and see if the page comes up. If it doesn’t, then it’s a clear sign the page is not indexed, and now you need to fix it.
- Alternatively, you can use any index checker tool and just enter your URLs. In a couple of seconds, the software will let you know whether your page is indexed.
Source: Duplichecker
Both of these solutions are perfect if you want to check the indexing of the pages that don’t belong to your domain. For example, if you publish articles on other sites, you can’t access those pages from GSC. But these two options work.
Yet, if you’re checking your own website, none of these methods will show the exact reason for your indexing issue. So, you’ll need to use GSC or any other SEO site audit tool anyway.
And if you post new content often, make sure that regular index checks are really high on your SEO technical checklist. Otherwise, Google won’t really “see” your content.
2. Submit XML sitemap in Google Search Console
SEO is often about making Google’s job easier.
And your XML sitemap is almost literally a cheat sheet for Google. Don't make crawlers guess where everything is. Just hand them a clean list of URLs you want indexed.
In other words, an XML sitemap helps search engines find and understand your website structure. So, it's a very big part of technical SEO basics that you should get right.
Thankfully, it doesn't take much time at all to submit your XML sitemap.
All you have to do is:
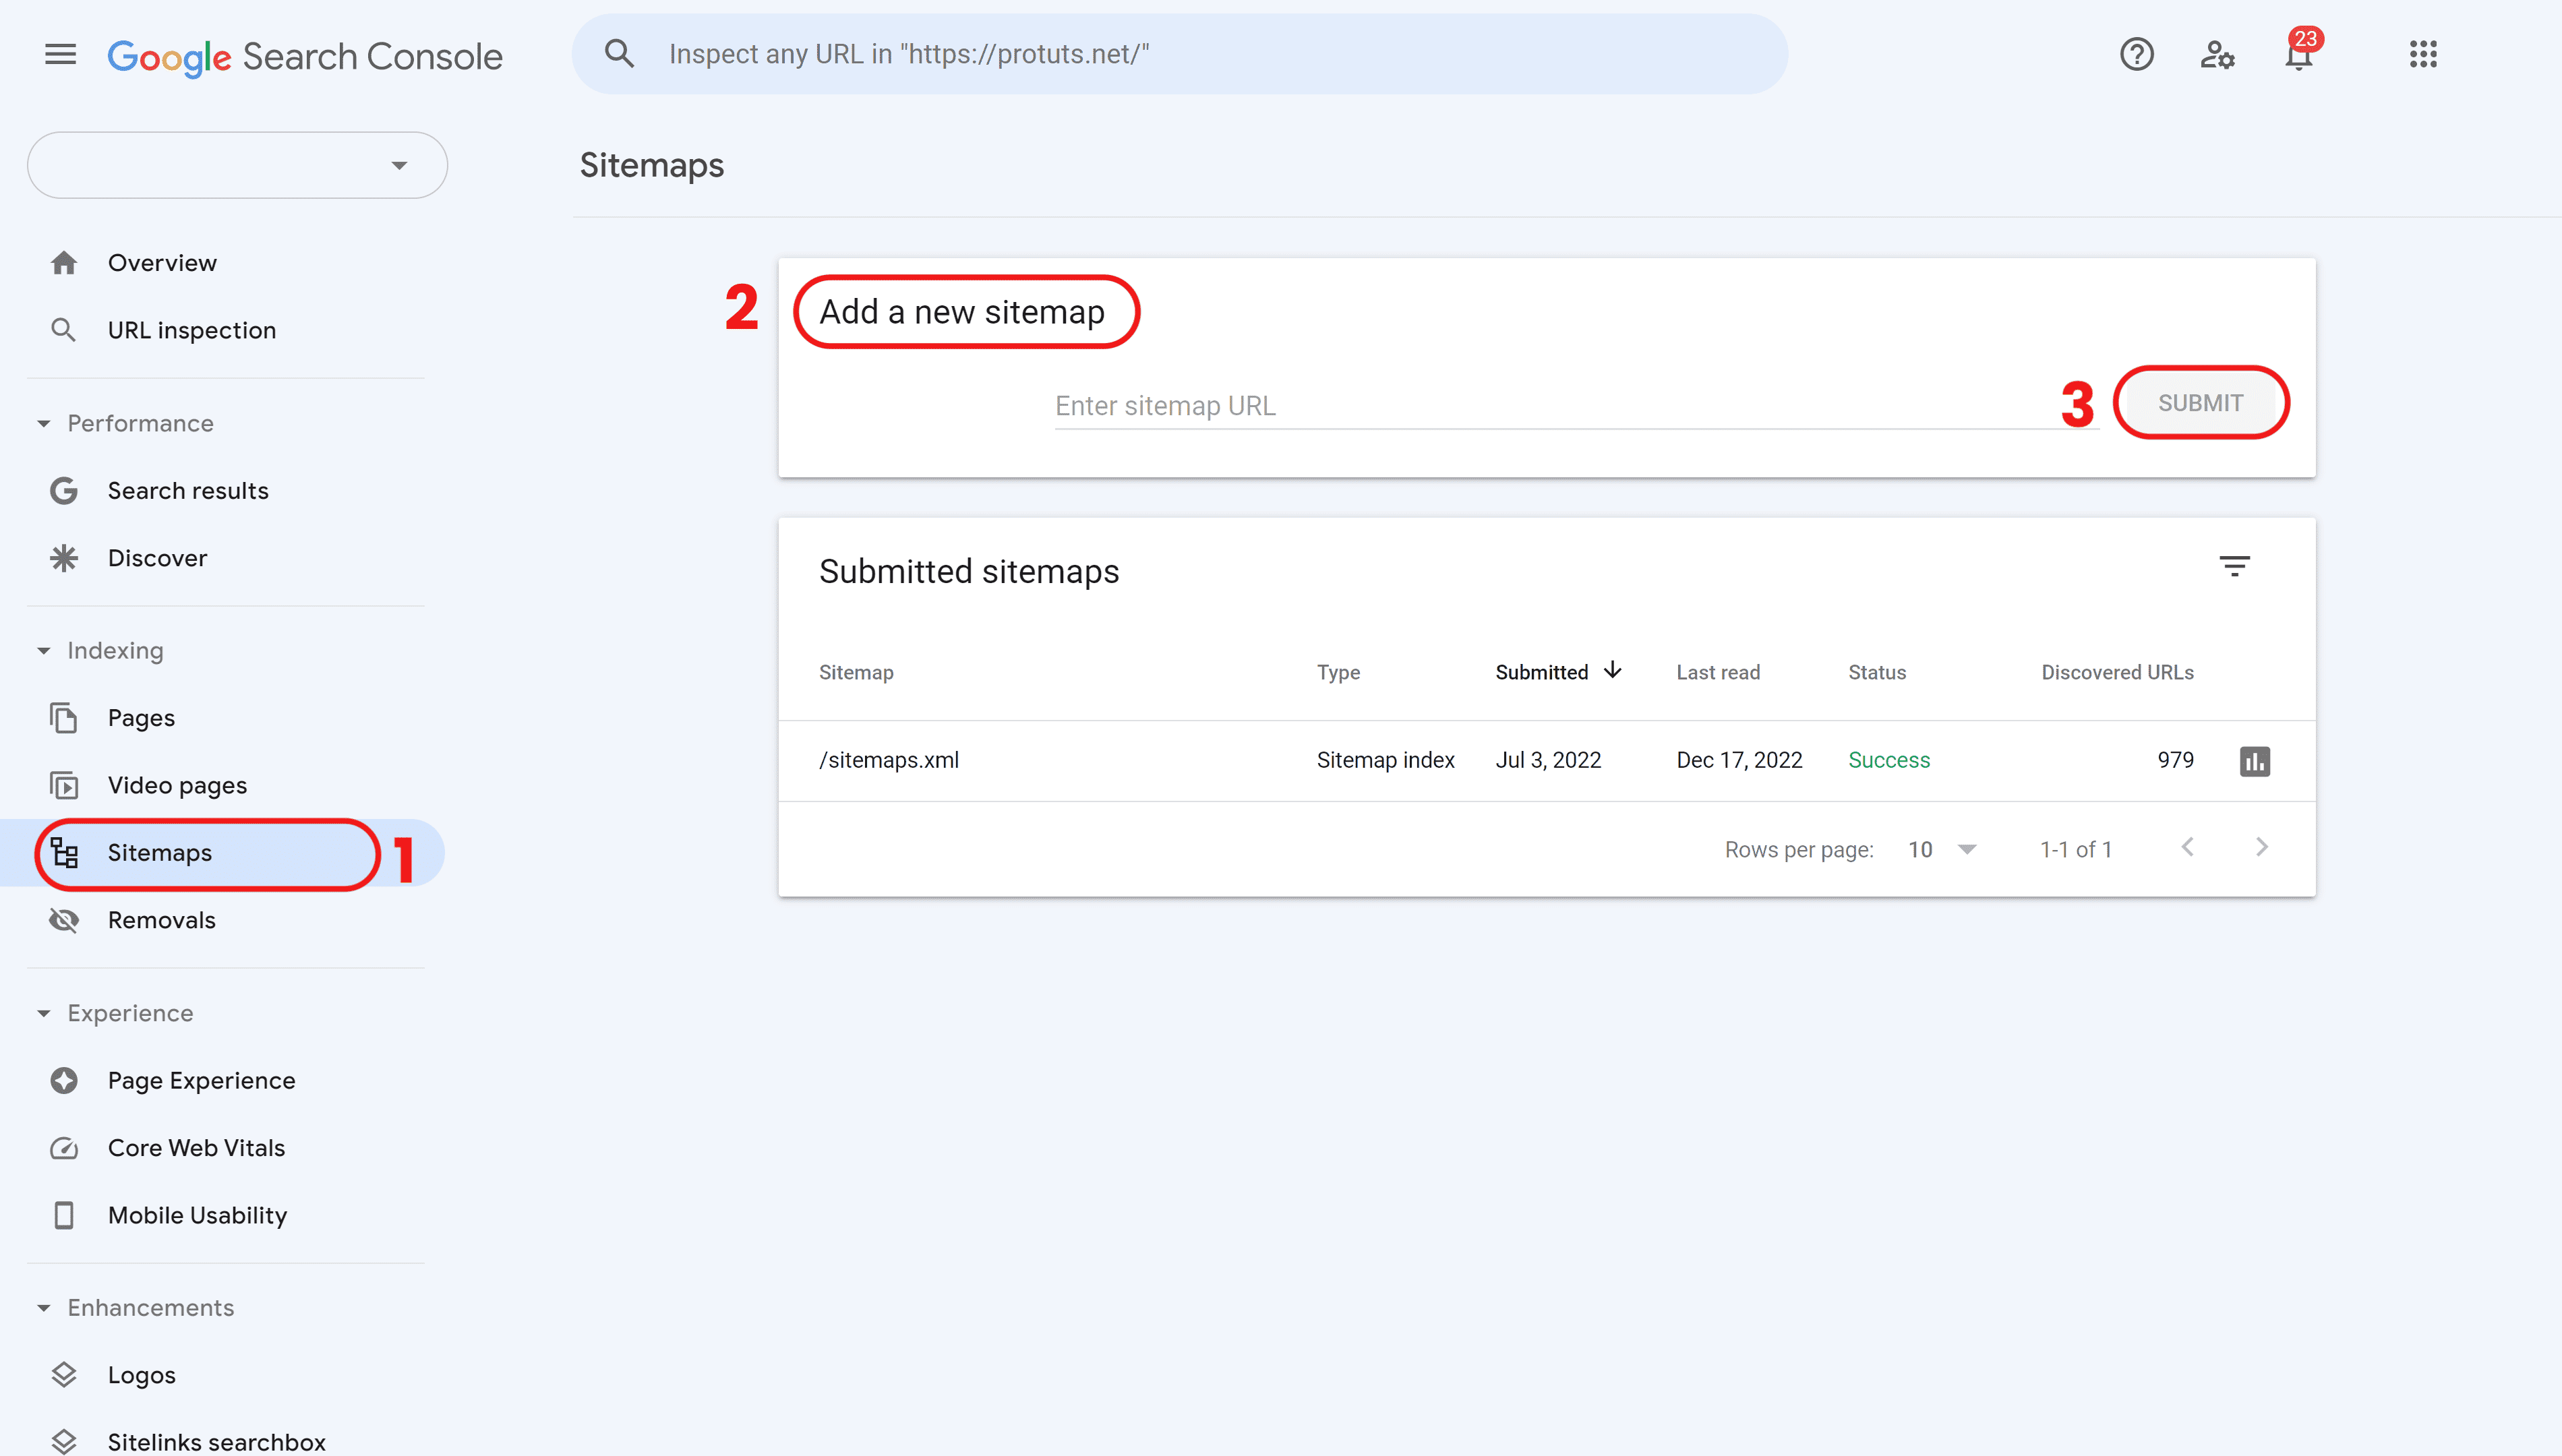
- Log in to your GSC,
- Go to Indexing on the left side menu, and click on the Sitemaps.
- Check if there are any outdated sitemaps to remove first.
- Then, go to the Add a new sitemap field, enter your sitemap URL (usually “sitemap_index.xml”), and click SUBMIT. That’s it.
Make sure the new XML sitemap is up to date and includes all the important pages like blog posts, product pages, landing pages, etc.
Note: If you have a very big website, then it might be best to create a couple of sitemaps. For example, one for blog posts (“sitemap_posts.xml”), another for product pages (“sitemap_categories.xml”), and so on.
It’s more work, but it improves crawlability and makes your site structure more organized.
3. Use canonical tags to avoid duplicate content
You know how some sites just have the same copy on different pages?
That’s essentially duplicate content.
Google tends to be pretty sensitive about this. It’s bad enough to tank your rankings, so you don’t want that. That’s where canonical tags can help you out.
Someone described canonical tags as little sticky notes you put up for Google that basically point out which page is a copy and which is the original. And it’s a good metaphor.
Source: Optizen AI
The best practice here is to avoid using the same content on more than one page. But it might happen sometimes either way, whether you like it or not. For example, when you have tons of product pages.
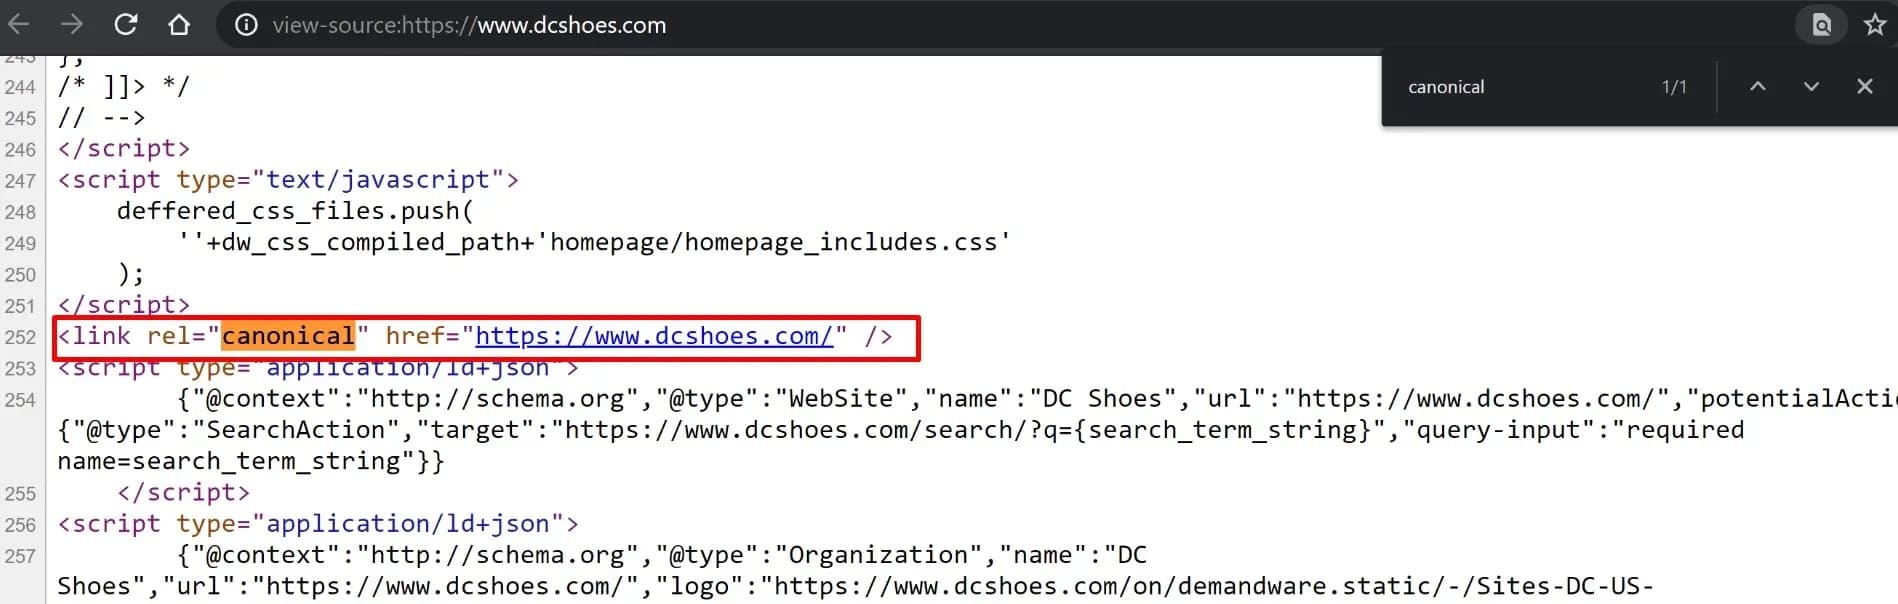
So, you will need to use the rel=canonical to tell search engines which page is the “preferred” original and which ones it should treat as a duplicate. Simply insert the canonical tag on each duplicate page. It should look similar to this:
< link rel=”canonical” href=”https://site.com/preffered-page”/>
Just try not to use more than one canonical tag on the same page. Sometimes, search engines can just ignore the page when you do this.
Wondering if this only matters for Google? The answer is no.
There are plenty of Google alternatives out there. And no matter which one you choose, you’ll need to prioritize technical SEO hacks like this since duplicate content is a problem everywhere.
4. Check your redirects
Redirects might not be the most complicated part of tech SEO. But they can get messy, especially when you have too many of them.
So, reviewing your redirects regularly is one of those best practices every tech SEO checklist should include.
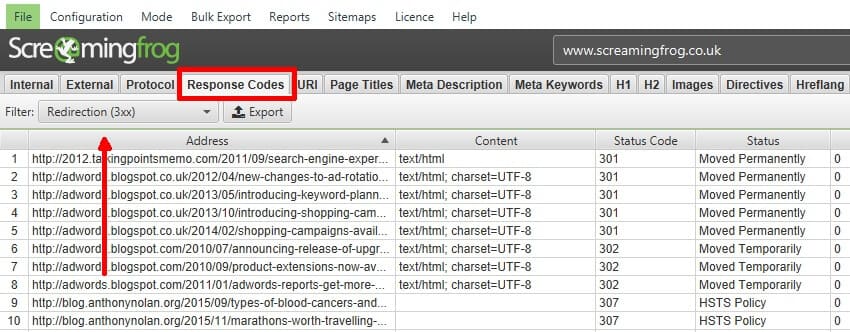
One of the best tools you can use for this is Screaming Frog. You’ll see many optimization specialists pick it, as it’s extremely versatile and comprehensive. Besides, it lets you do pretty much anything you might need.
Speaking of which, these are the things to keep track of:
- Check the redirect types. Particularly, you want to pay attention to 301 vs. 302. Go for 301 always when you want to permanently redirect any page.
Source: Screaming Frog
- Avoid redirect chains (link 1 > link2 > link 3). Search engines can follow these chains, but it will waste your crawl budget, so it’s pointless.
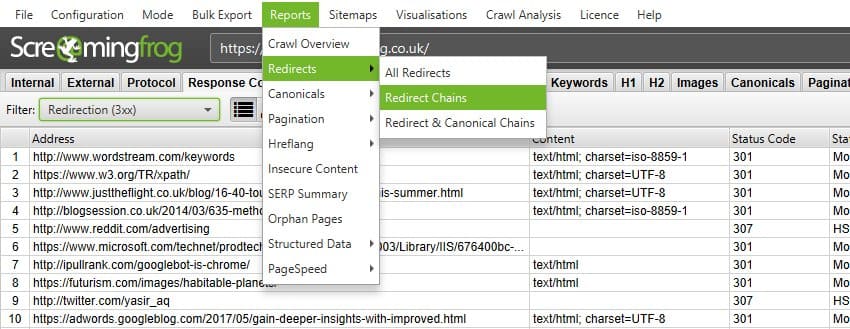
Source: Screaming Frog
- Avoid redirect loops (link 1 > link 2 > link 1). This is obviously a mistake. And most likely, it’ll hurt crawling.
- Make sure that your redirects and canonicals don’t contradict each other.
- Check response times. Ideally, redirects should take less than 0.3s.
Site architecture and URL structure
If crawling and indexing are about letting Google into your house, then site architecture is about how well the furniture is arranged. Yes, we’re feeling metaphorical today:)
A messy house might still be crawlable, right? But…no one’s going to sit there for a long time. Same with your site: your structure determines how easy it is for both humans and search engines to “move around”.
Source: Semrush
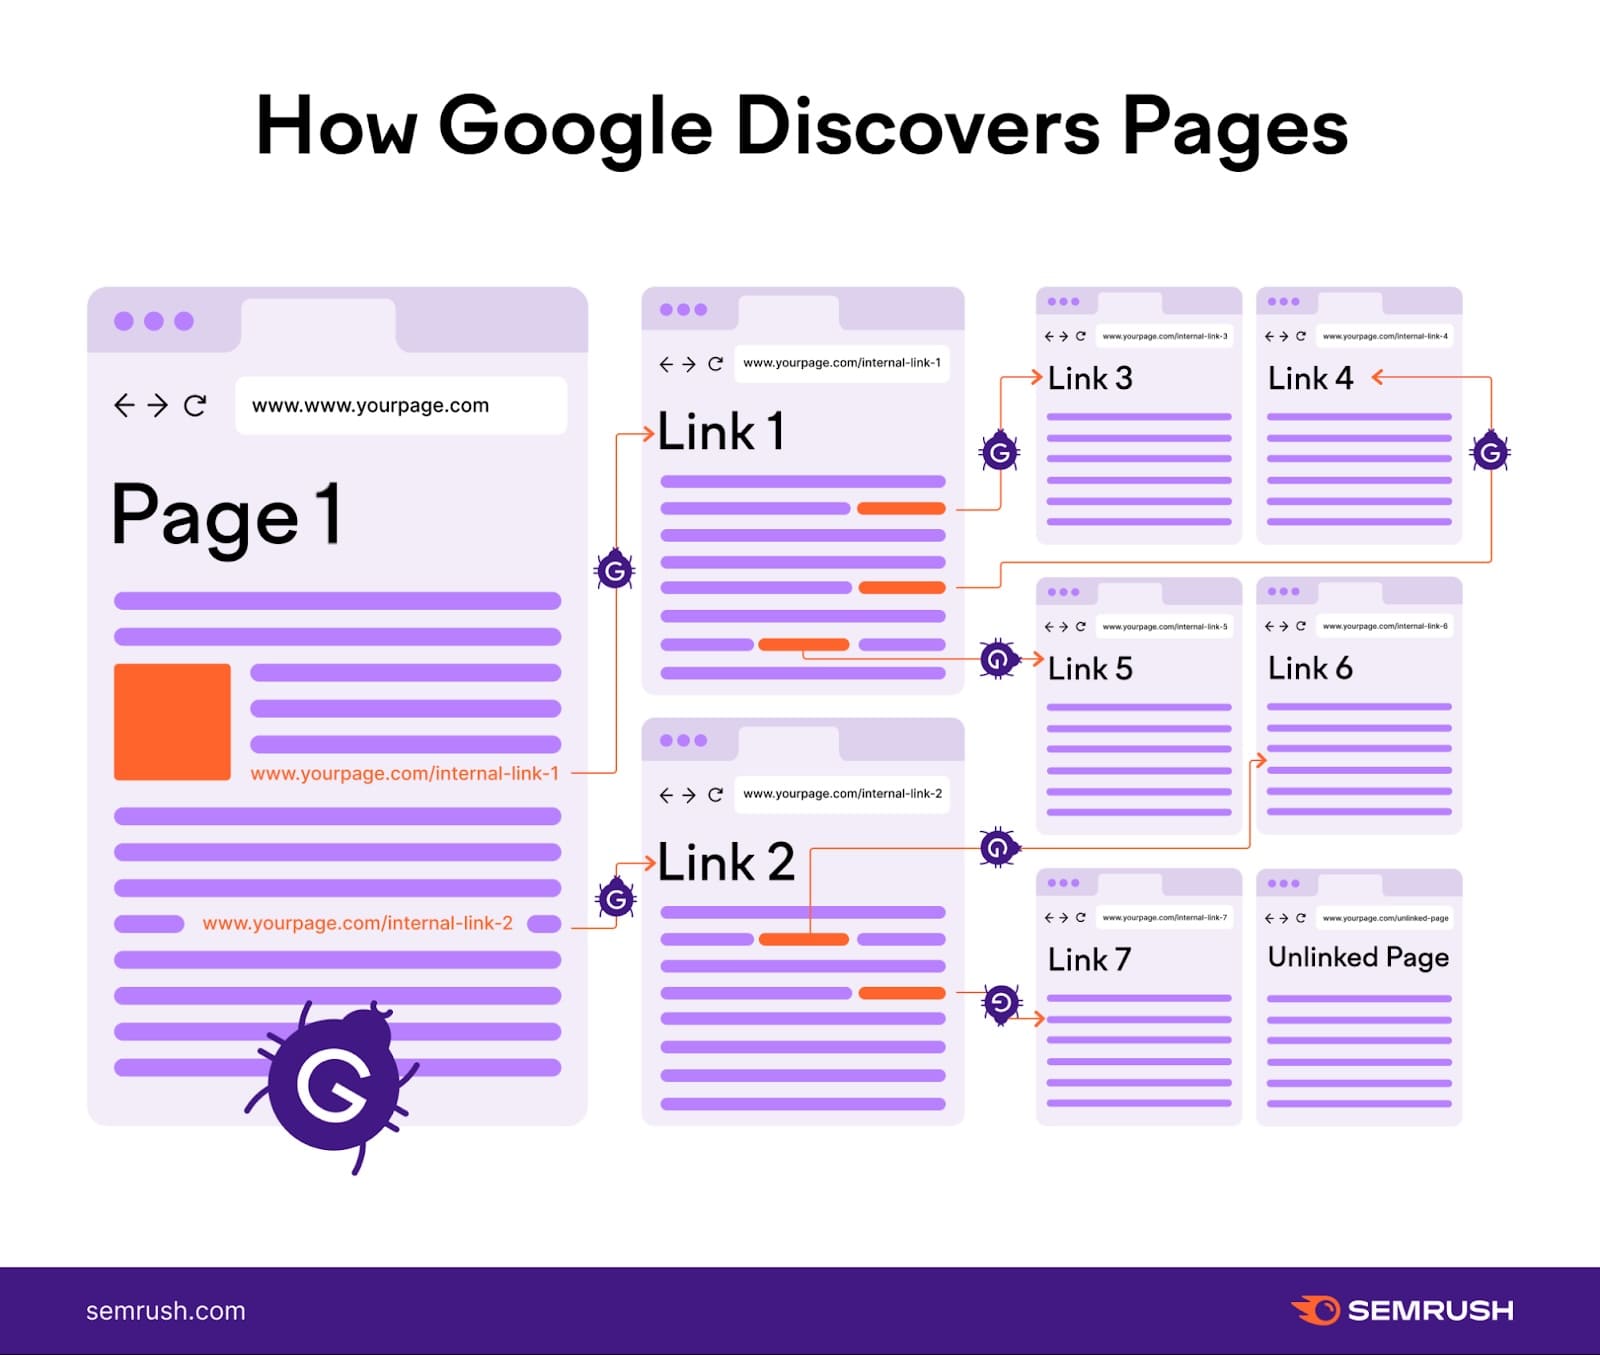
Search engine crawlers need your site and URL structure to:
- Make logical sense of your pages and find them more easily.
- Understand how your content fits together, which influences how it’s indexed.
- Distribute link equity effectively across your site through internal links.
That’s why pretty much every technical SEO checklist template PDF you download will have this somewhere high on its list.
Now, let’s see the exact things you can check:
5. Build a logical site hierarchy and internal linking
What does a really convenient website look like?
It looks logical and straightforward. That's what makes it easy to understand and crawl. So, the key point here is to simplify your site structure.
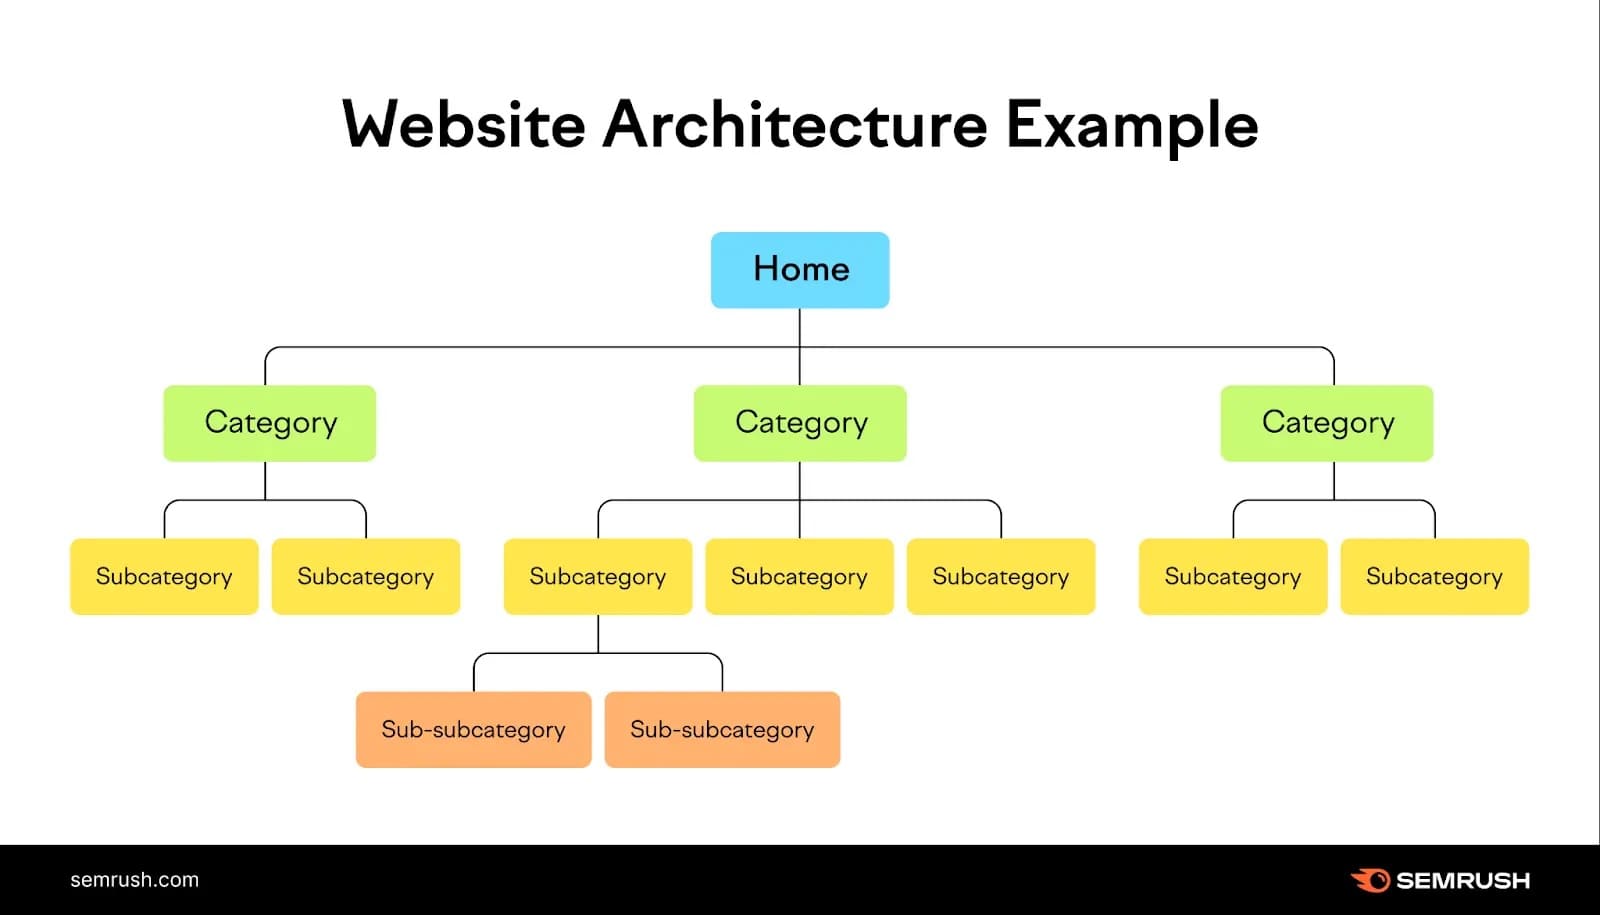
Source: Semrush
Create a neat, logical website hierarchy that makes it easy for people to navigate and find what they need. Preferably, make sure that it doesn’t take more than three clicks from the homepage to all your other key pages.
As for the practical advice, these are some simple things you could do:
- Link your category pages directly from the navigation menu and homepage to make it easier to crawl.
- Organize new content under existing category pages to keep your site structure clear and easy to navigate.
- Don’t forget to use internal links to interconnect your pages.
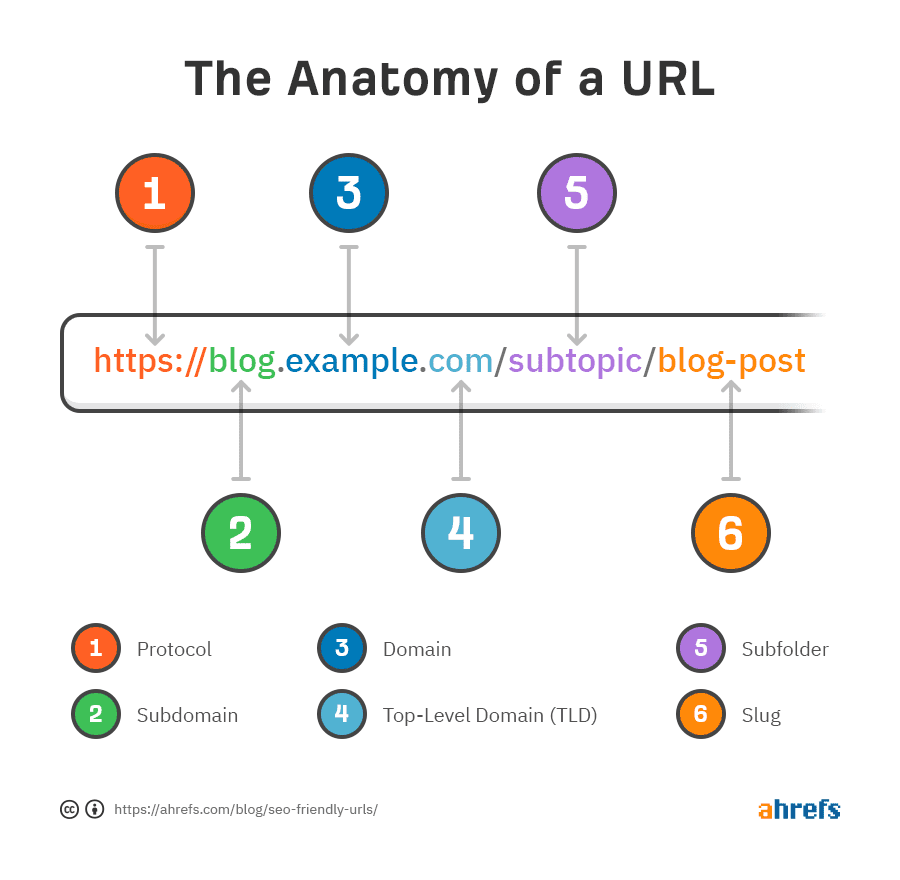
6. Create clean, SEO-friendly URLs
Ugly URLs are one of the quickest ways to seem fishy and unprofessional to your users.
And while search engines can still crawl them, a clean link is much easier to understand and rank. Maybe decades ago, it was okay to have “strange” URLs. But today… a link like this:
www.example.com/index.php?id_wca=827364&bobcat-
…is an absolute disaster that looks like some crazy spam.
So, what can you do?
Here are the best practices for SEO-friendly URLs:
- Choose URLs that are easy to read and short.
- Try to make them as descriptive as possible to help people and search engines understand your content better.
- Make sure that everything is written in lowercase.
- Avoid unnecessary symbols like “%$#*” and numbers.
- Make each URL follow a clear structure. For example, https://samplesite.com/category/subcategory/keyword-keyword.
- Try to stick to standard HTML links for navigation, as they are the most accessible ones (these are your typical <a href=""> links).
Doing all of this ensures that your URLs look clean and there is no confusion.
 Source: Ahrefs
7. Use breadcrumbs and navigation properly
First of all, what are breadcrumbs (just in case)?
These are navigational links that show a “user path” on a website (like in the example below):
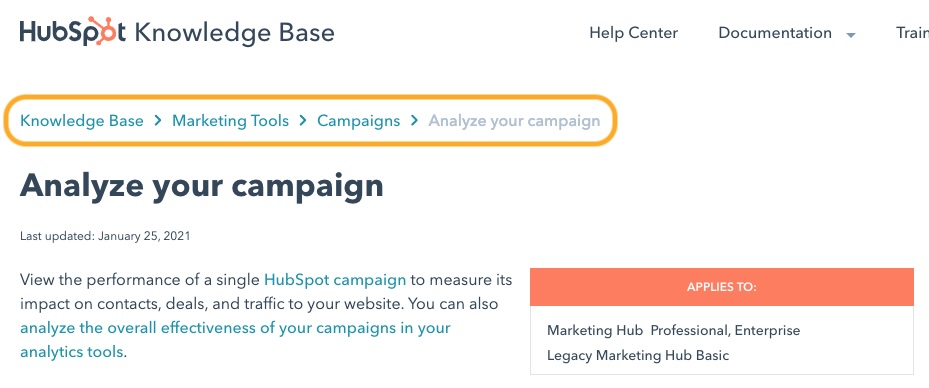 Source: HubSpot
Essentially, adding breadcrumbs helps your users jump between pages easily. Besides, it’s a great way to:
- Help your website visitors know exactly where they are on the site.
- Reinforce your site’s hierarchy for Google.
- Create extra internal links automatically for better navigation and link juice distribution.
Good breadcrumbs follow your site structure, like:
Home > Blog > SEO > Link Building
Naturally, the home page comes first, followed by the big categories, and then the page title. This reduces confusion and improves user experience, as it’s simple to go back to any point of your “journey”.
But keep in mind that breadcrumbs are meant to work alongside your main navigation, not as a replacement. And there are also slightly different types you could try.
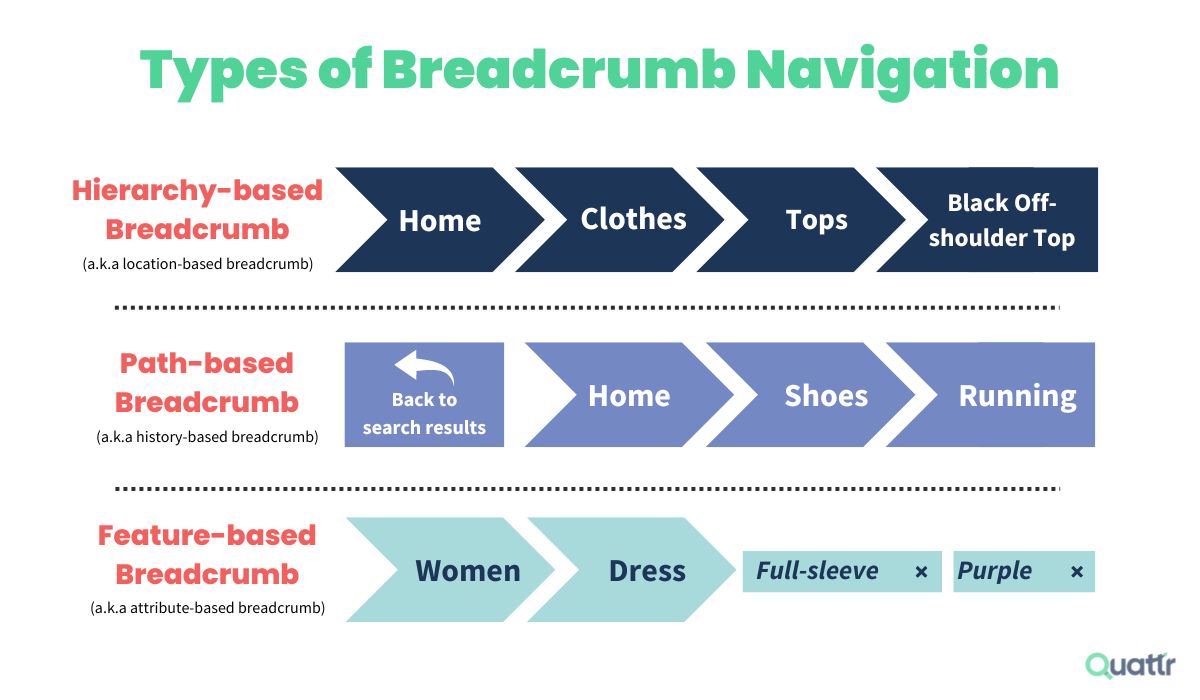 Source: Quattr
If you want to display your breadcrumbs in search results, make sure you use schema markup (BreadcrumbList).
 One more tip: You can add an HTML sitemap to your site for clearer organization of your categories and key sections.
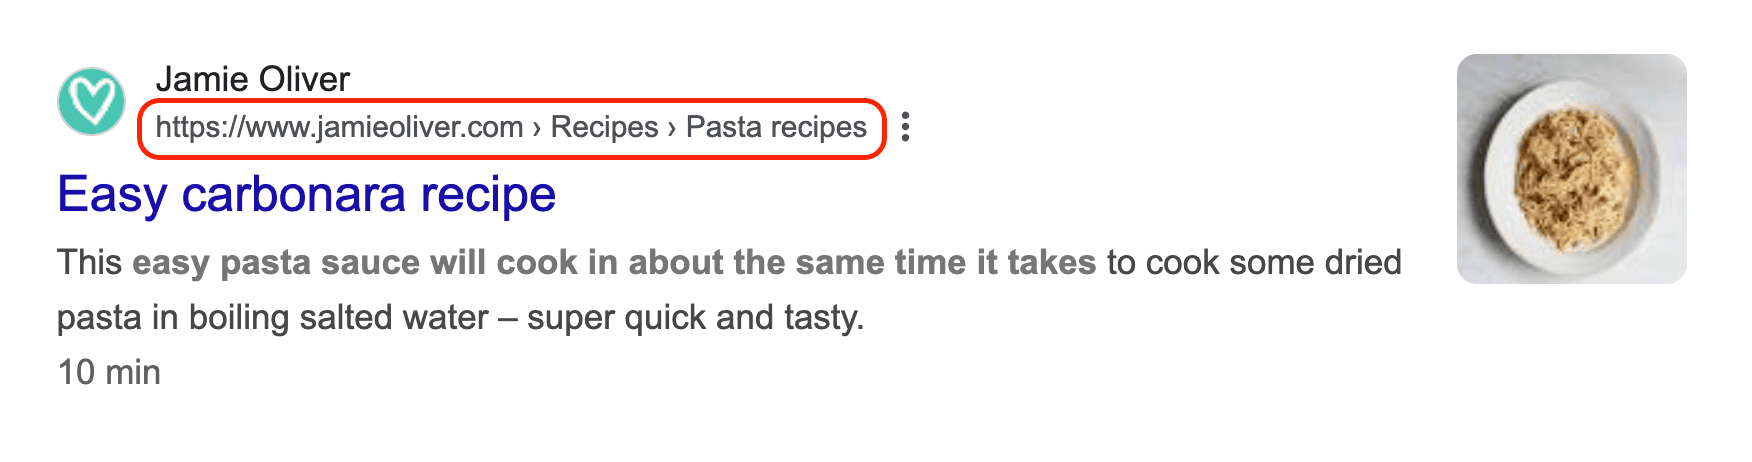
This isn’t the XML sitemap we’ve mentioned before. The XML one is for search engines, while the HTML one is for users to navigate more easily. Like in the Forbes example below:
Source: Forbes
Page speed and Core Web Vitals
It's no news that the sites that rank high in search engine result pages are those that load fast and have good Core Web Vitals metrics. So, this is one of those things that you have to check religiously.
While there are many potential fixes, try starting with the following:
8. Optimize PageSpeed Insights
On average, the best ranking sites load in less than three seconds. Anything longer could lead to a high bounce rate, which can reduce your rankings.
So, to optimize your page speed, you can start by looking at the three big Core Web Vitals metrics. To find them out, simply go to PageSpeed Insights (it’s free) and insert your link there. You’ll get a report similar to this one:
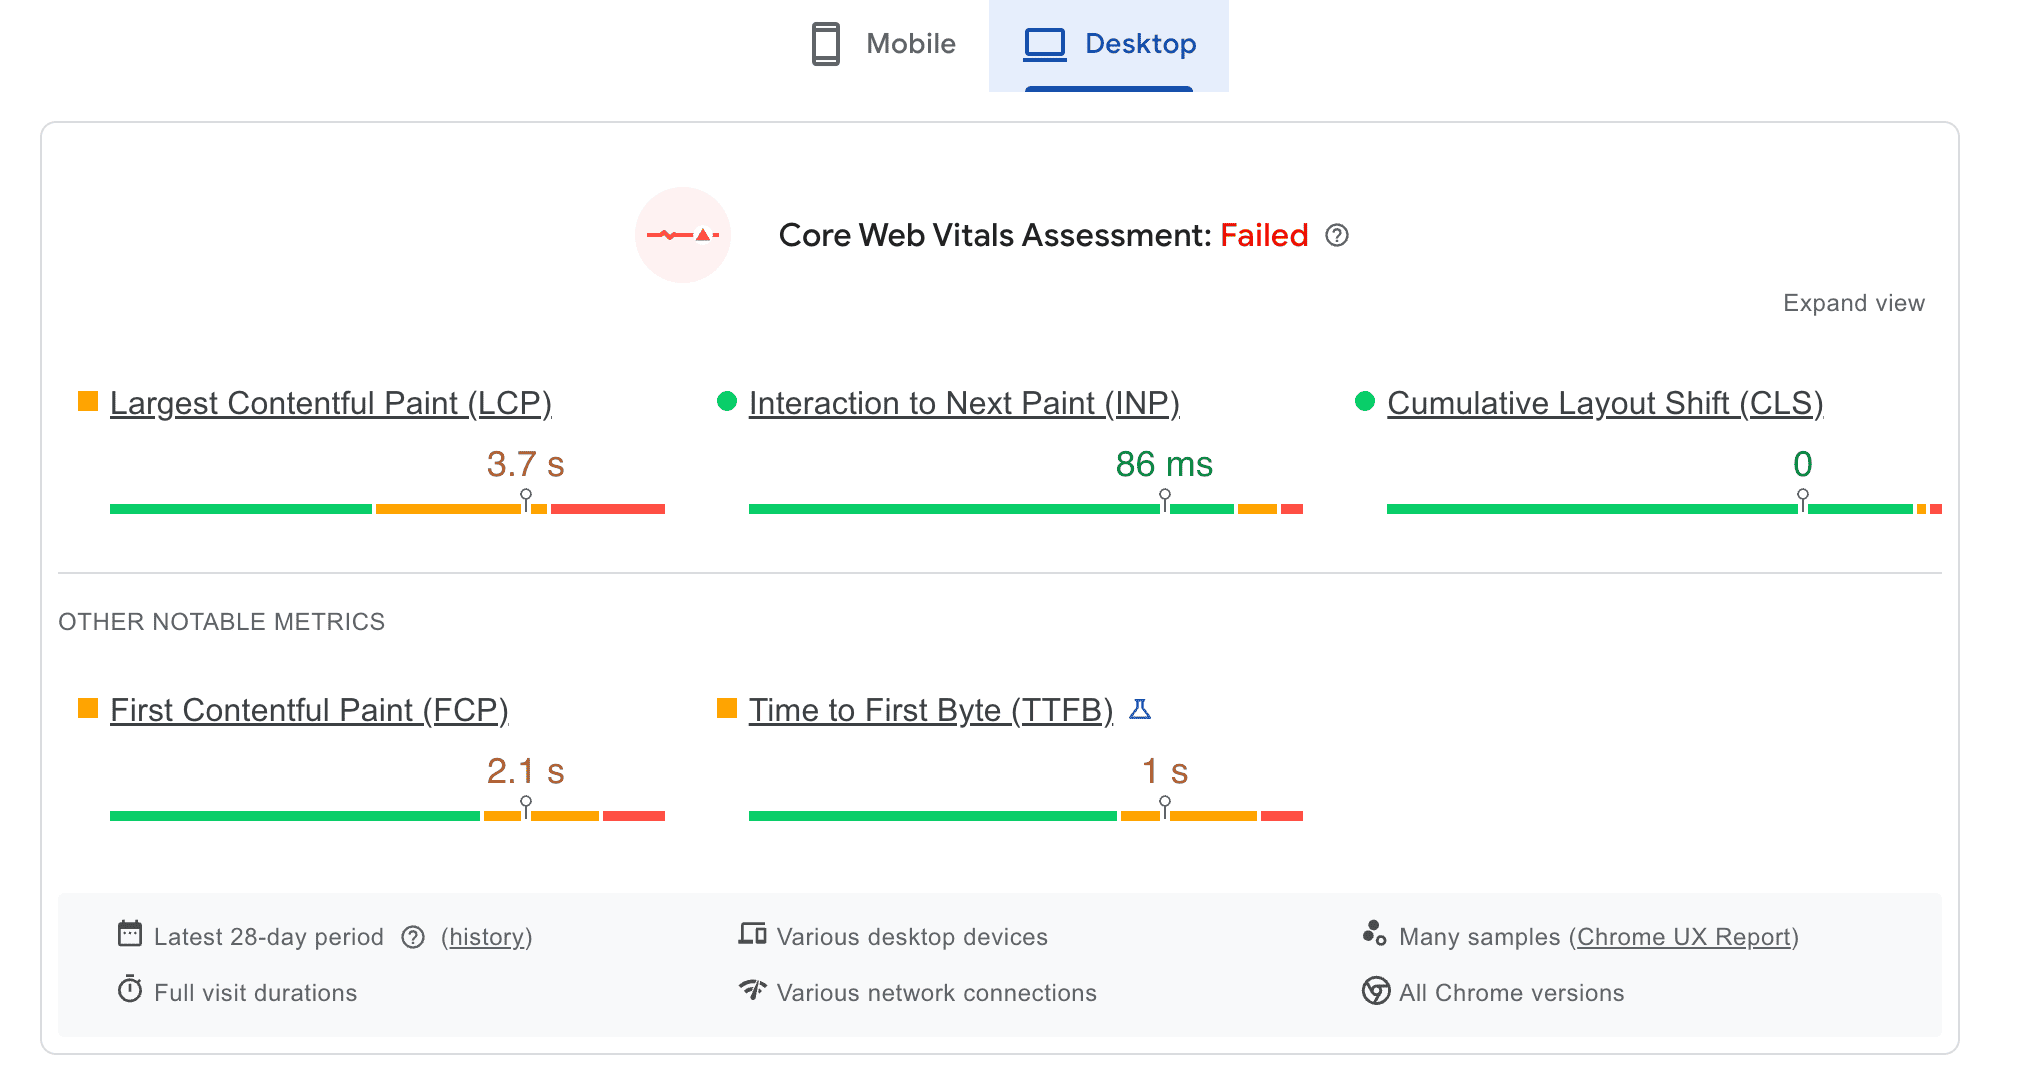
Source: PageSpeed Insights
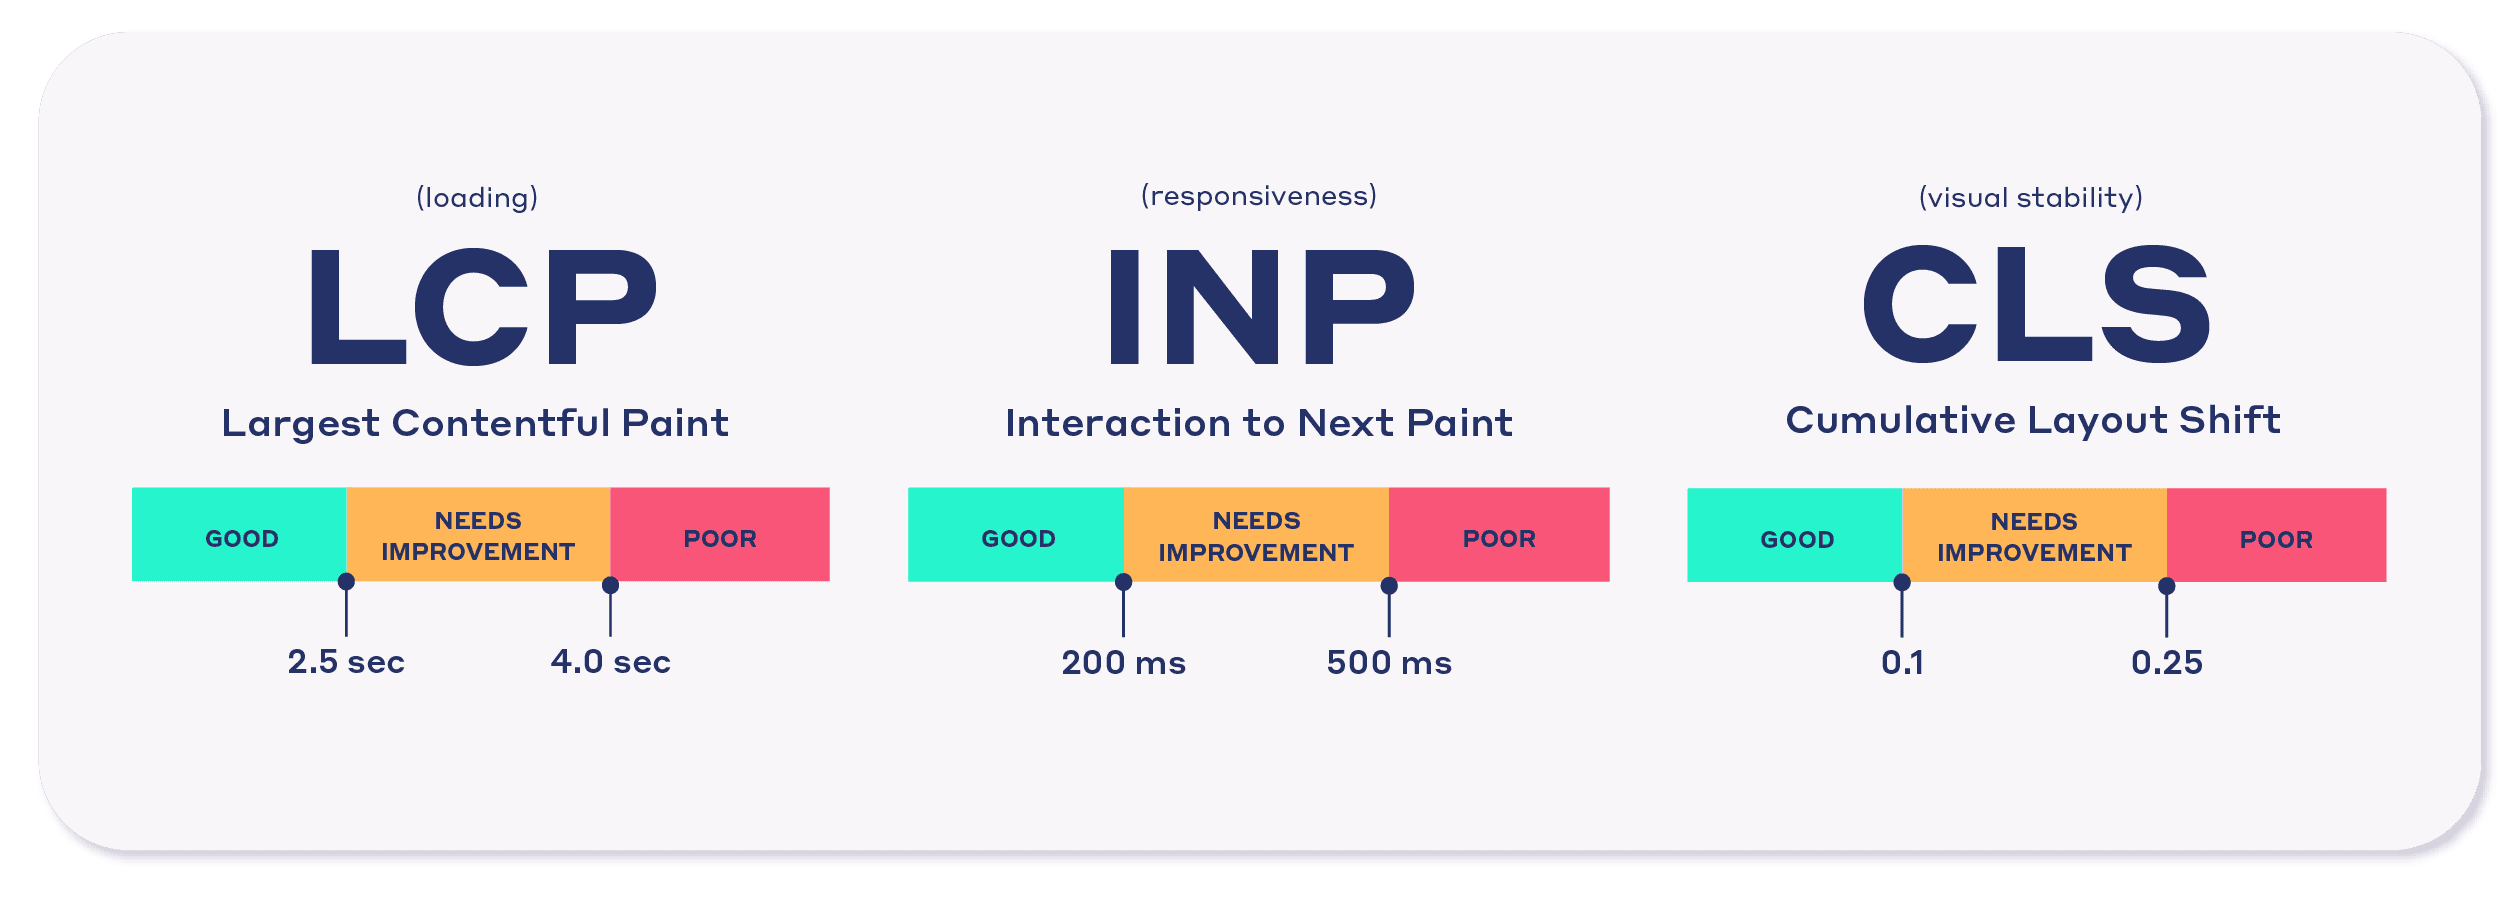
Largest contentful paint (LCP)
LCP helps you measure the loading performance of your web page. It should usually be within 2.5 seconds. If yours isn’t good enough, no worries! You can fix that.
To optimize this one, try the following:
- Make sure you pay attention to the fonts you’re using. The best thing you can do is pick modern formats, host fonts locally, and limit the number of font weights and styles.
- Minify your code, including JavaScript, CSS, and HTML.
- Optimize large hero images.
- Improve server response time (TTFB).
We’ll talk about all these in detail later on. So, if these sound like a foreign language for now, it’s okay.
Interaction to next paint (INP)
INP is all about your site’s responsiveness and should ideally be below 200 milliseconds. This metric, basically, shows how quickly your page responds to user interactions like a click, for example.
How can you optimize this website metric?
- Reduce long JavaScript tasks to avoid having big pieces of code run all at once. If your website is doing too many things at the same time, it sort of “freezes” and can’t respond quickly to any user activity.
- Do code-splitting to break up heavy code into smaller parts.
- Program non-essential scripts to load later. Some scripts (like your chat widget, for example) don’t need to load right away. So, you can postpone it. This way, your page will respond and show content faster.
- Keep your site’s reactions simple and fast by design. You see, when someone clicks a button on your web page, the code that reacts should be lightweight. If it’s too heavy or slow, the site will be unresponsive. So, avoid it in the first place.
Cumulative layout shift (CLS)
The CLS is about the visual stability of the pages on your website. Stability in this case means how “non-jumpy” your website elements are. Google considers a CLS score of 0.1 or less to be good.
To work on this metric, try the following:
- Make sure that you have size specifications for visual assets on your page (such as videos, images, banners, etc.).
- Avoid placing dynamic content (like some pop-ups, for example) above your main content.
- Optimize fonts to prevent them from shifting text as they load.
While Core Web Vitals sound quite technical at first, it isn’t that complicated when you understand it better. So, all you need is to optimize it once and then monitor regularly to catch and fix any new issues.
Source: NitroPack
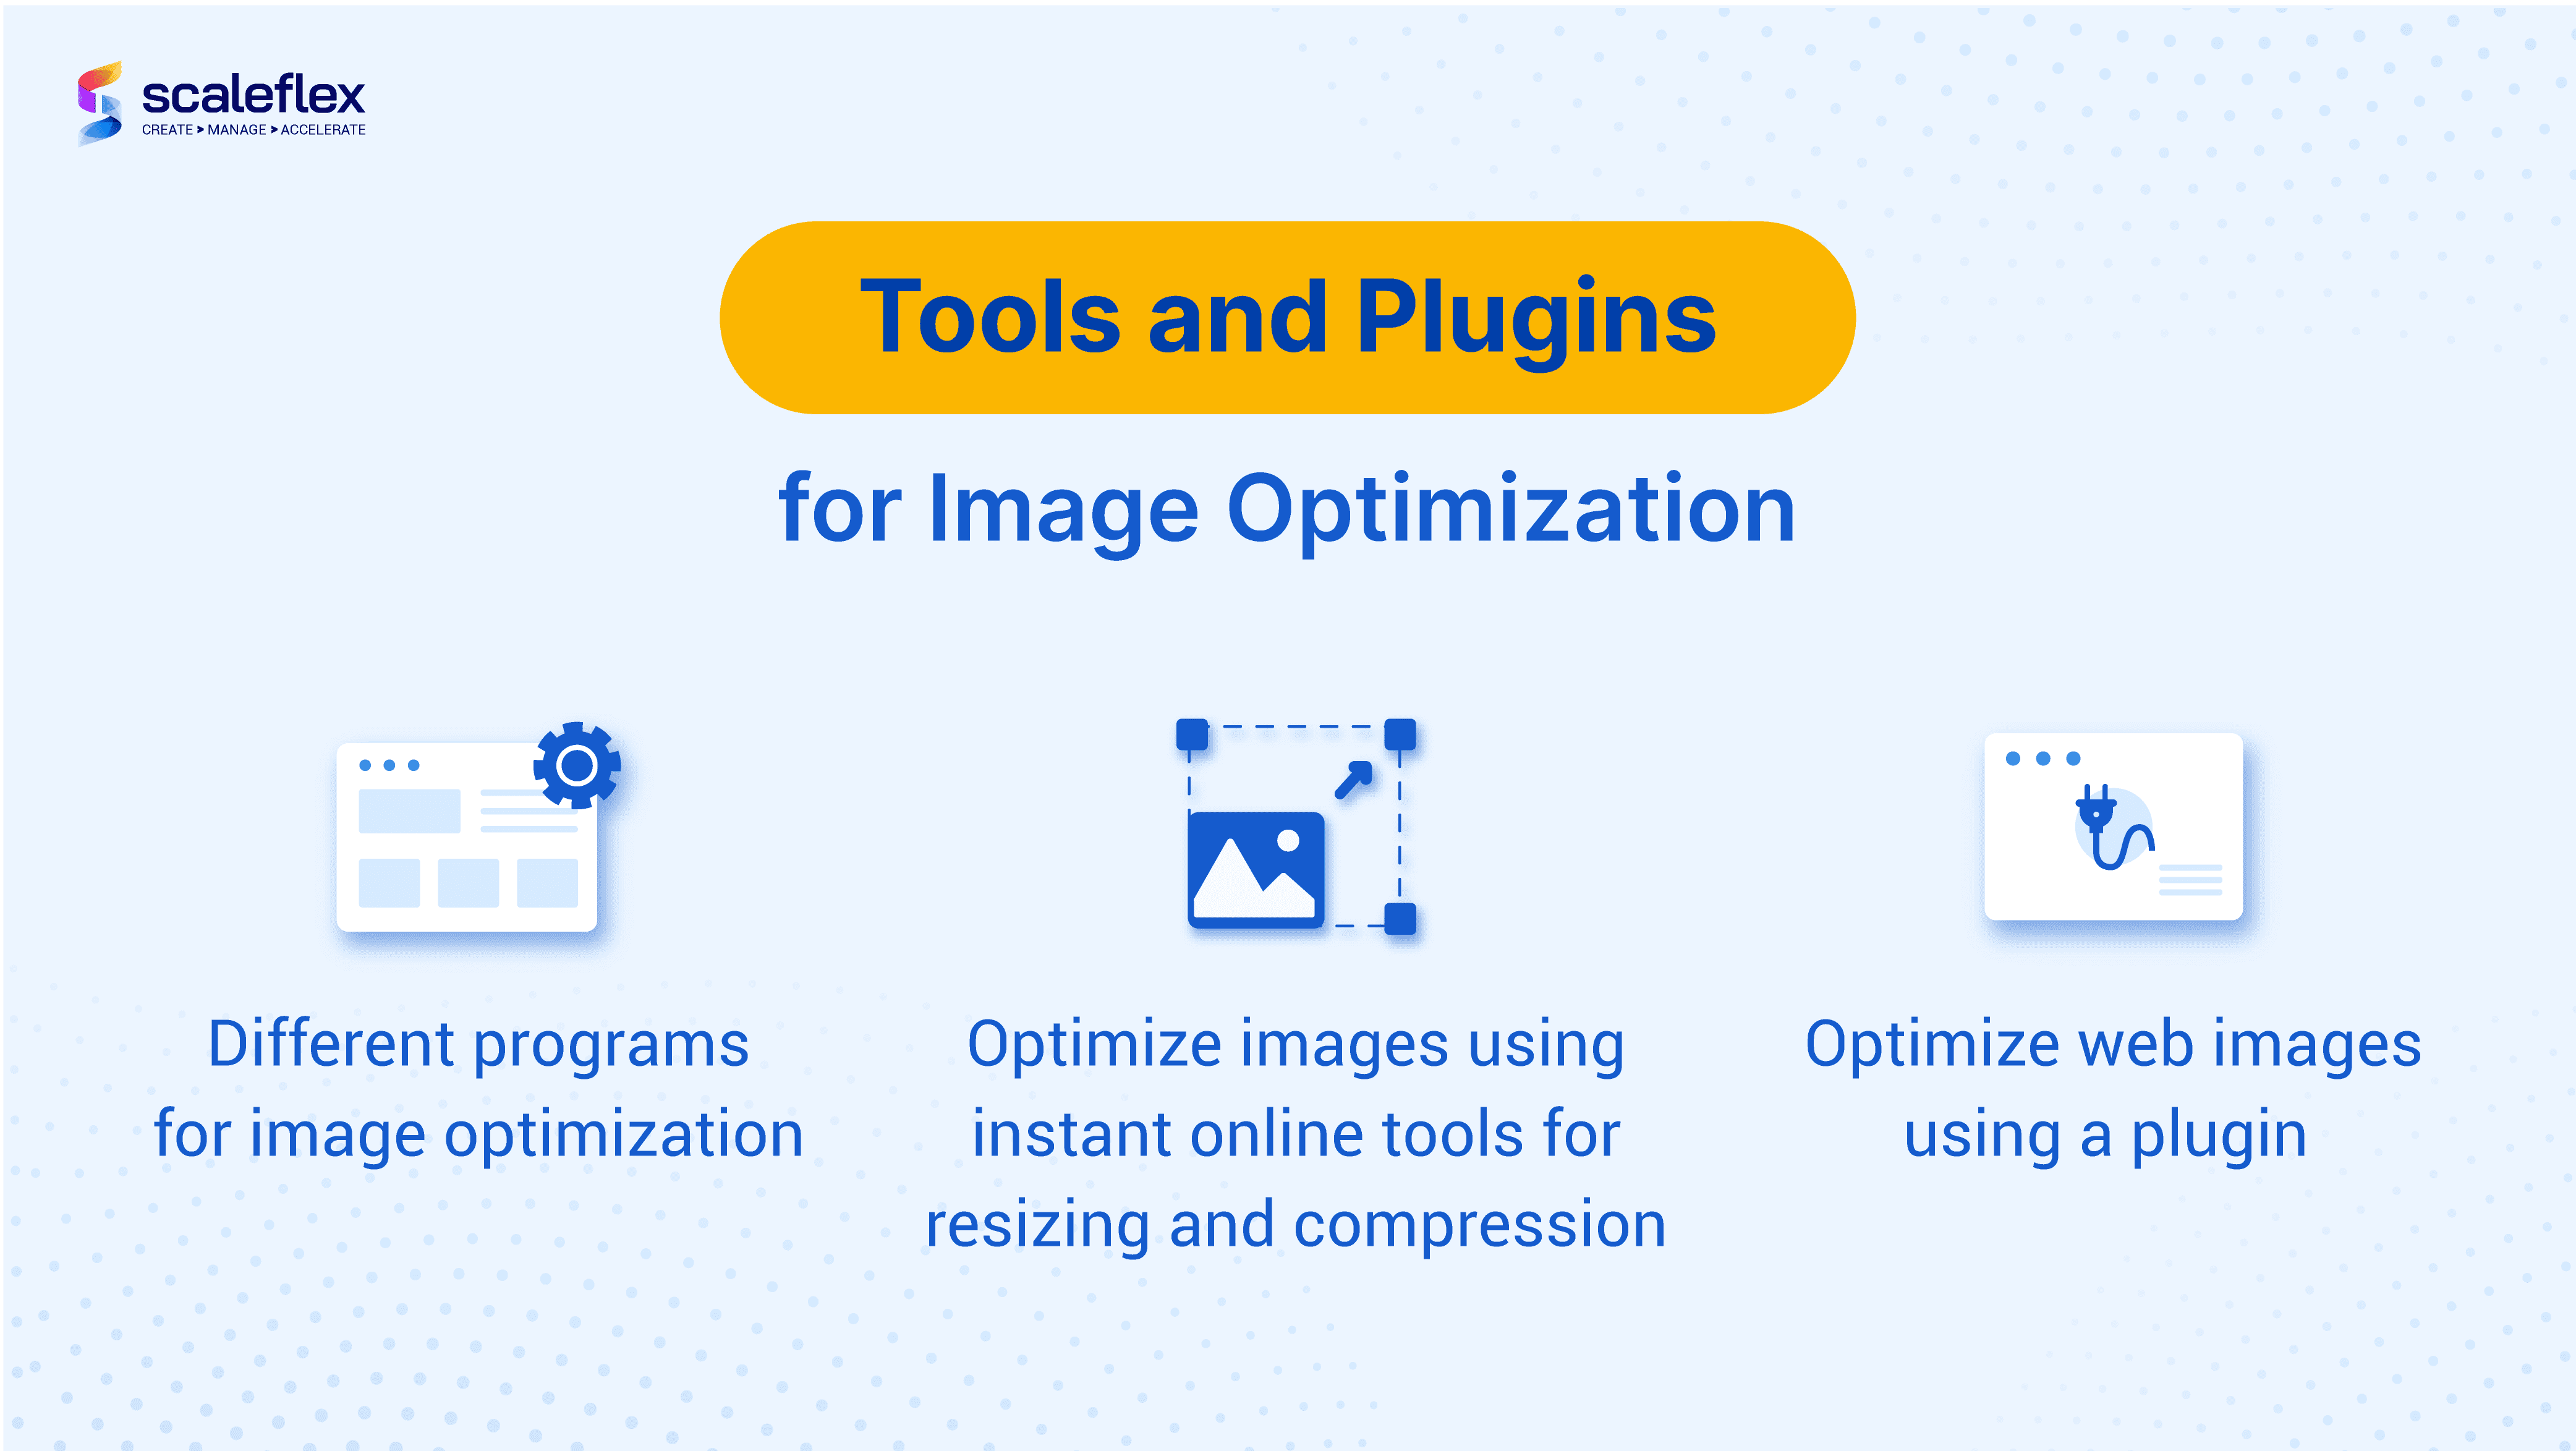
9. Compress and optimize images
This is basically a technical SEO checklist 101.
Simply because visuals are usually the heaviest assets on any page. And we all have heard about this at some point.
Still, doing a few things to optimize your images can go a long way:
- Use modern formats (WebP or AVIF) instead of old-school JPEG/PNG.
- Lazy-load images below the fold so they only load when users scroll.
- Resize properly. Don’t serve a 3000px-wide hero image to someone on a phone.
Source: Scaleflex
Some sites save 3-5 seconds just by running their entire media library through a compression tool. And those five seconds can be a game-changer for your SEO.
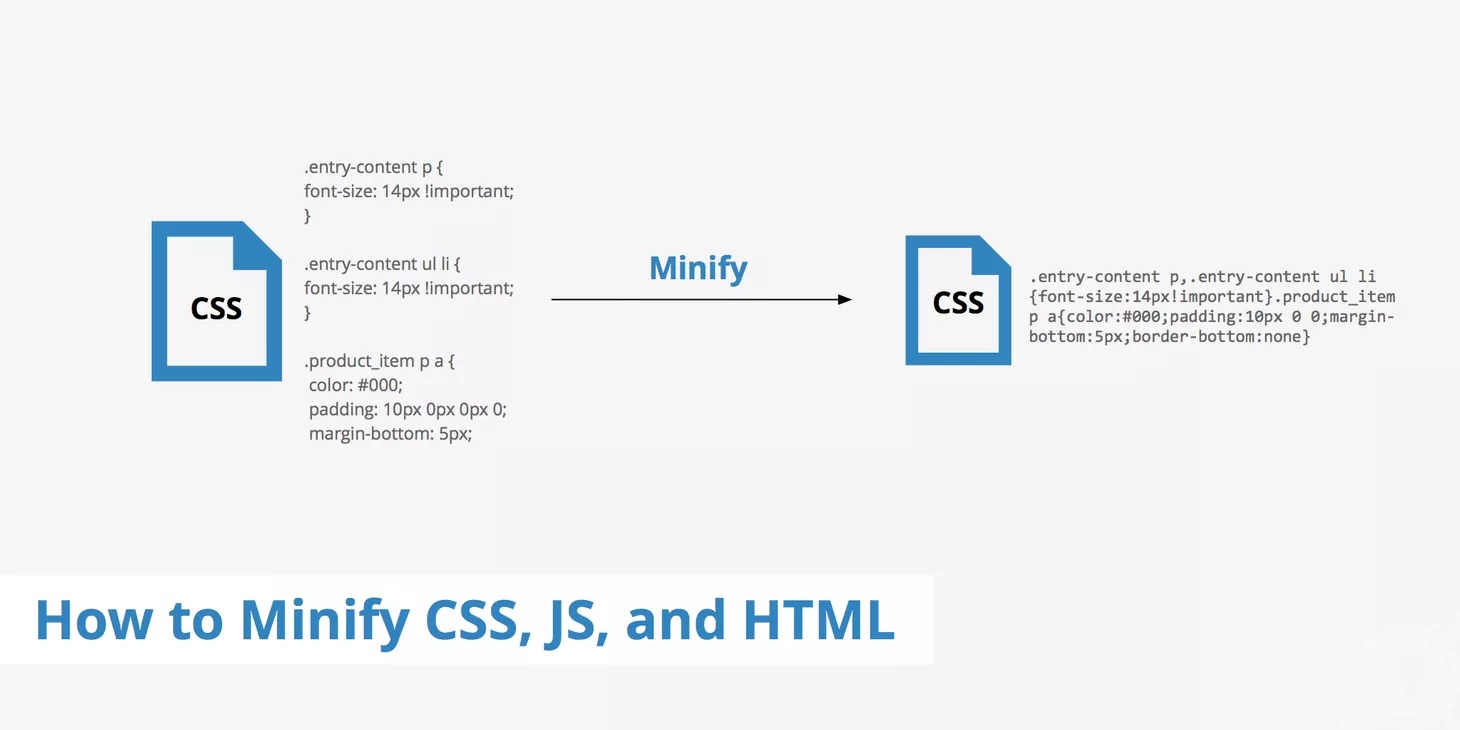
10. Minify CSS/JS and enable caching
One of the most overlooked items on a technical SEO checklist is front-end code optimization. Every unnecessary line of CSS or JavaScript slows down your site because browsers have to download more than they need.
Source: KeyCDN
But let's get to the more precise definition.
Minification is the process of removing redundant spaces, line breaks, and comments in your code. Search engines don’t care about human-readable formatting here. That's important to understand. They only need clean code.
Combine this with file compression (mentioned in the previous section), and your web pages become much lighter. For a large WordPress site, minification can reduce file sizes by 10–40%.
That's a lot.
One of the best things about using PageSpeed Insights is that it also shows you what you need to minify to improve loading speed.
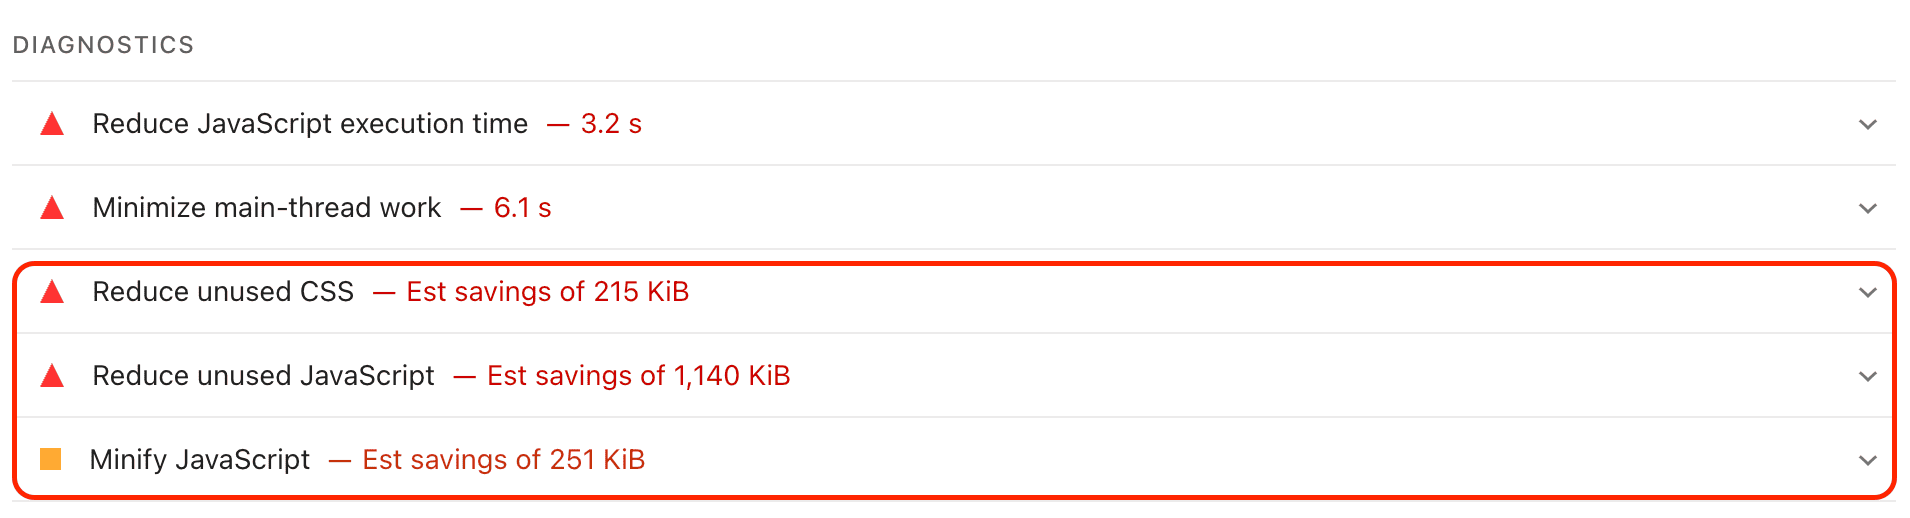
Source: PageSpeed Insights
How can you minify the code?
- Manually.
- Leave it to your CMS. If you use a CMS like WordPress, you will need a plugin. Something like Webflow has it built in.
- Find free software online to minify the code in seconds.
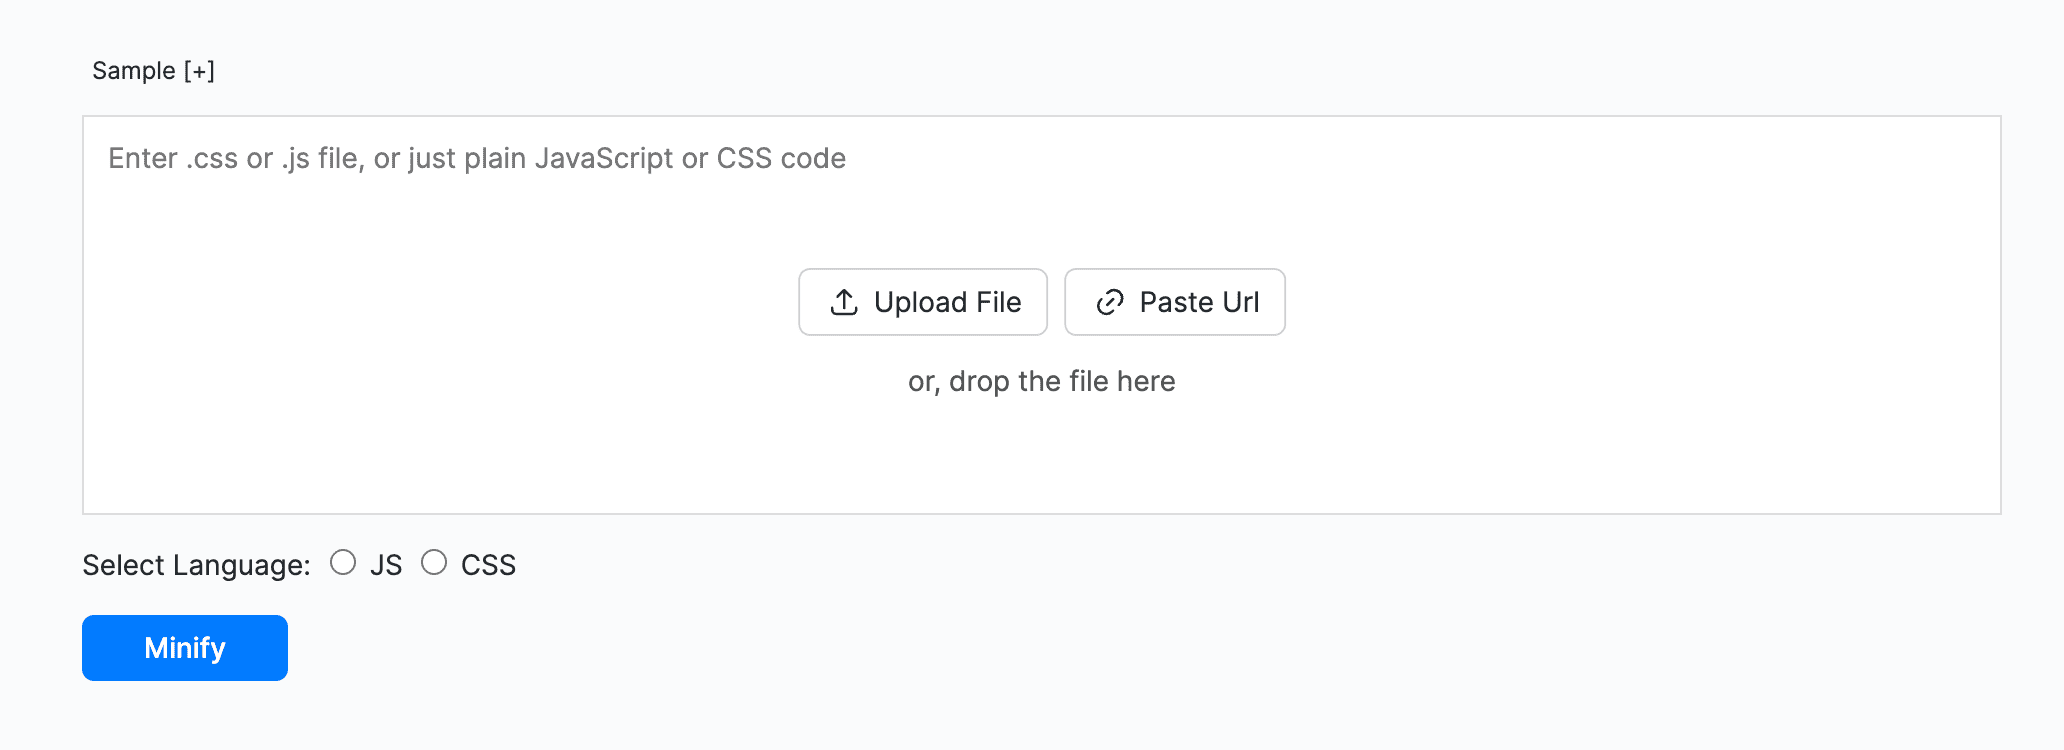
Source: Minify
And yet, it isn’t just about speed. Delivery matters as much, if not more. So, browser caching is the next point you have to improve.
When you enable caching, you’re telling browsers: “Don’t download the same stylesheet or logo for every request. Save it once and reuse it.” So, when a visitor returns (including search engine crawlers), there will be fewer requests and faster rendering.
That's why you’re letting your site re-use what it already knows. A site audit tool like GTmetrix or our favorite PageSpeed Insights will highlight whether you have any caching issues as well.

Source: PageSpeed Insights
11. Use a fast hosting provider and CDN
No matter how much you optimize, if your foundation is weak, your “SEO house” will always shake. Hosting is that foundation.
An overloaded shared server can lead to crawl delays and indexing issues. And these may hurt your visibility in search. That’s why server response time matters for both users and search engines.
It’s nearly impossible to find a good tech SEO checklist guidebook that doesn’t include this somewhere. And it is for a reason.
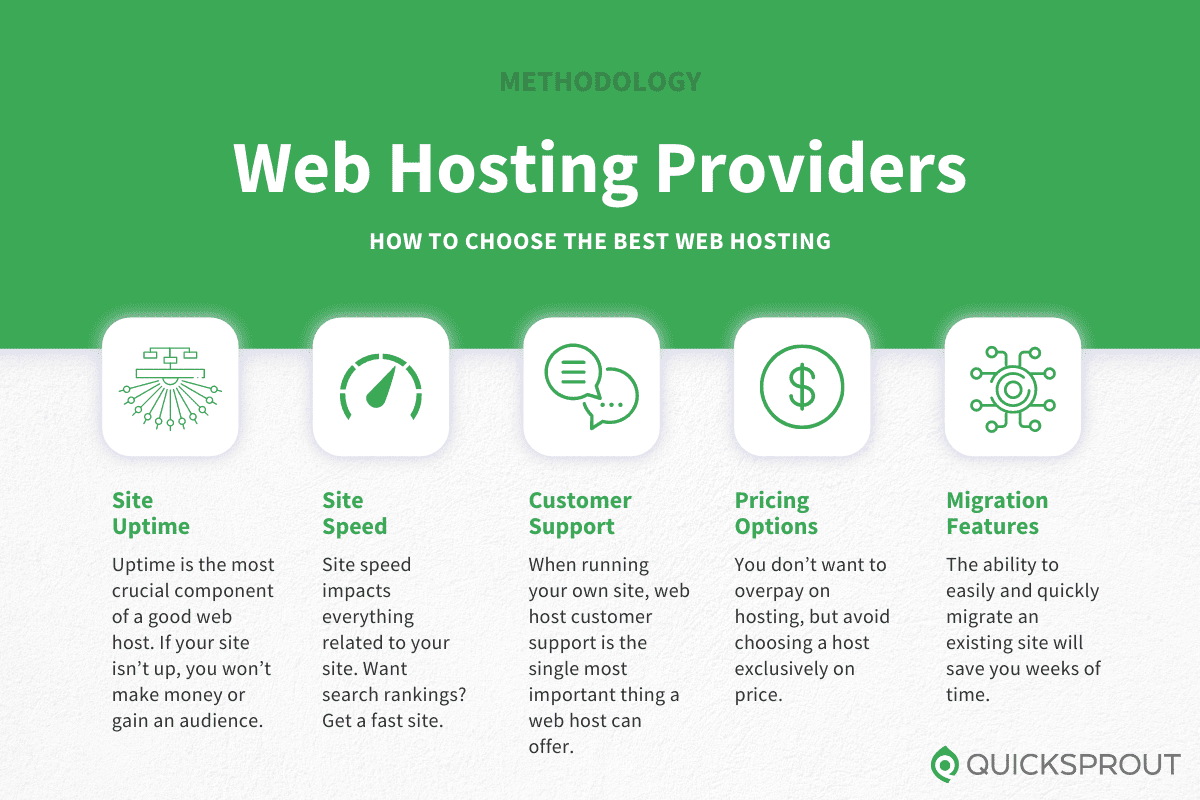
So, what should you look for in a hosting provider?
- It has to be fast. In technical terms, that means that the Time to First Byte (TTFB) should be less than 500ms.
- It needs modern SSD or NVMe storage that allows much faster data access than HDD.
- It simply must have high uptime guarantees and reliable infrastructure. Because it has to be available and stable.
Of course, you also want to check their pricing, migration processes, growth opportunities, and even customer support. But first, focus on performance to shortlist the best options.
Source: Quicksprout
But hosting is only half the story. Another thing to consider for better performance is a CDN, especially if you have an international audience.
CDN is a Content Delivery Network. In simple words, it makes copies of your website and stores them on different servers around the world. It then serves your visitors these copies based on the server closest to their location.
So, your website visitor in Tokyo, for example, isn’t waiting for content from a server in NYC.
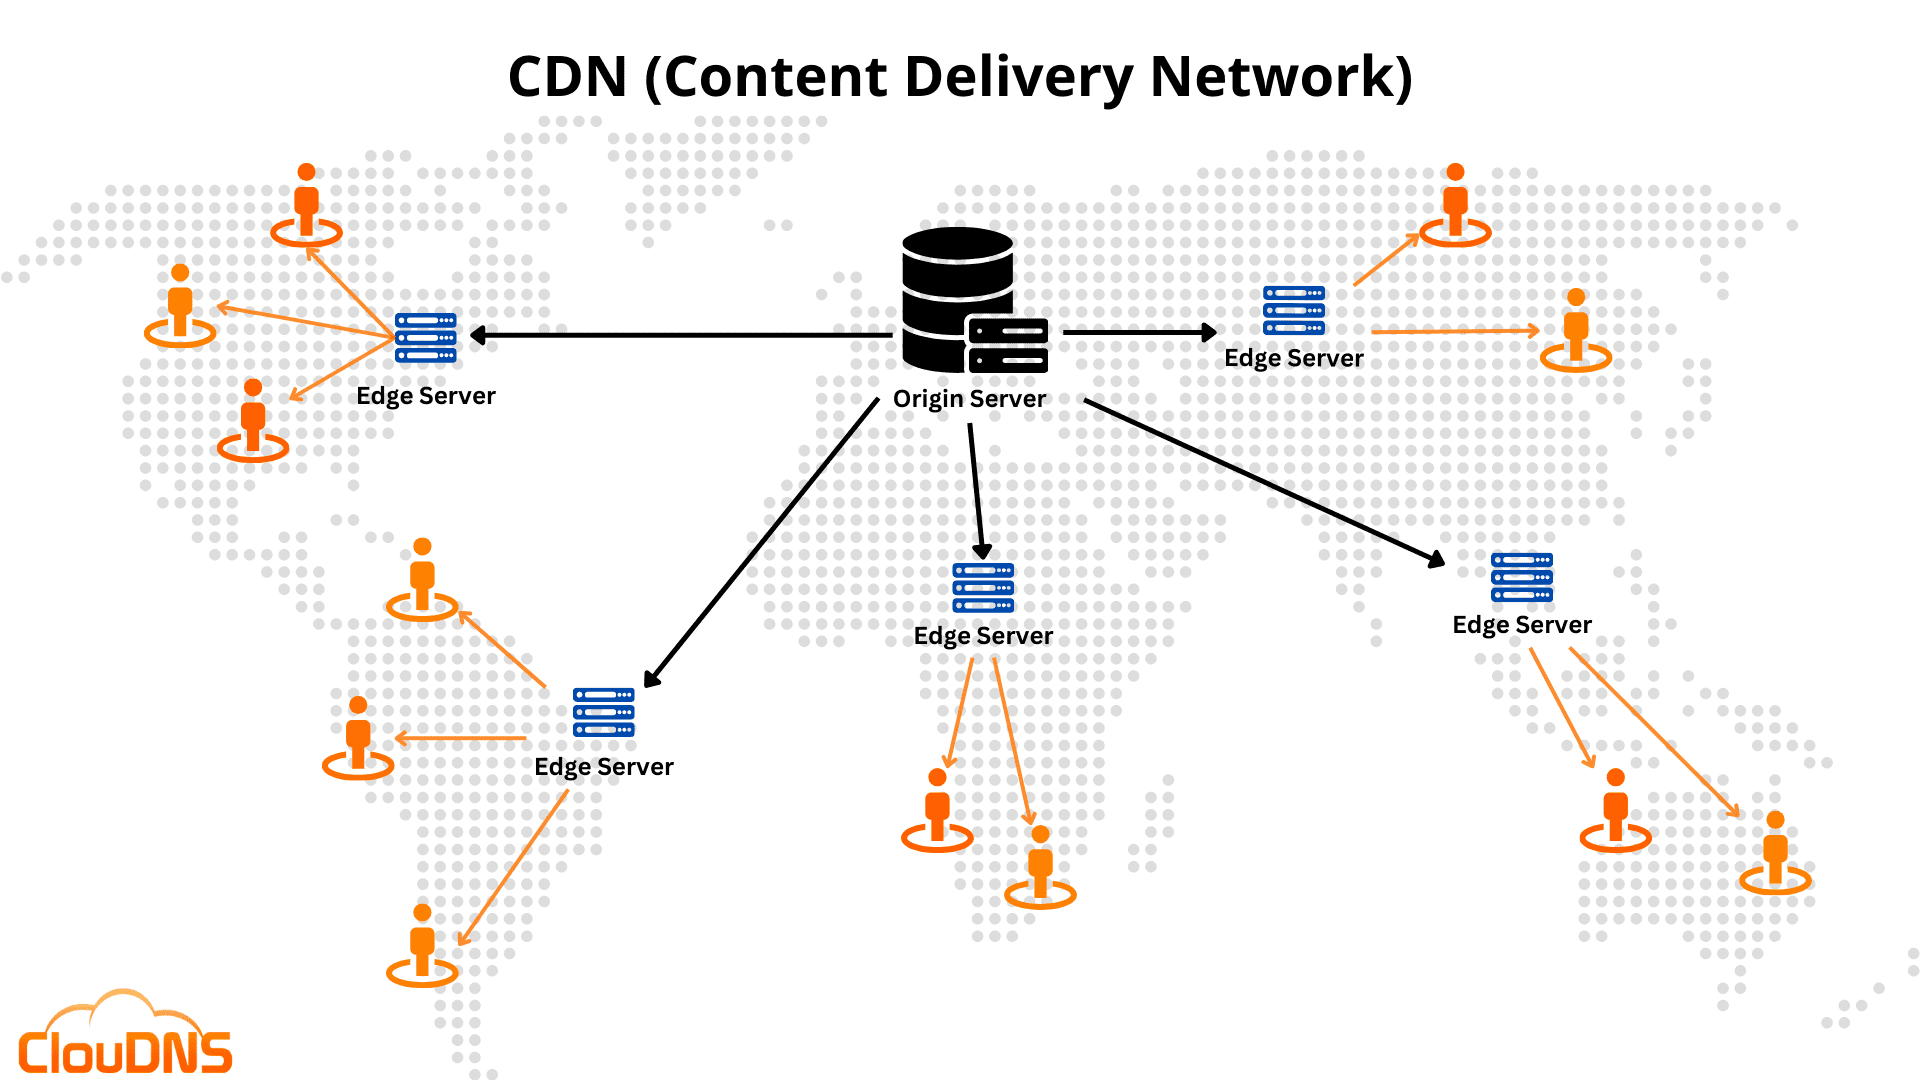
Source: ClouDNS
CDN has more benefits than it seems, as it:
- Gives you a higher website speed.
- Reduces server load, as it's split between different locations.
- Provides an extra layer of security against DDoS attacks.
So, as a result, this simple solution can significantly improve your website performance.
Mobile optimization
Mobile optimization should be the basic thing in your technical SEO plan.
After all, it’s no secret that mobile devices account for 63% of all internet traffic.
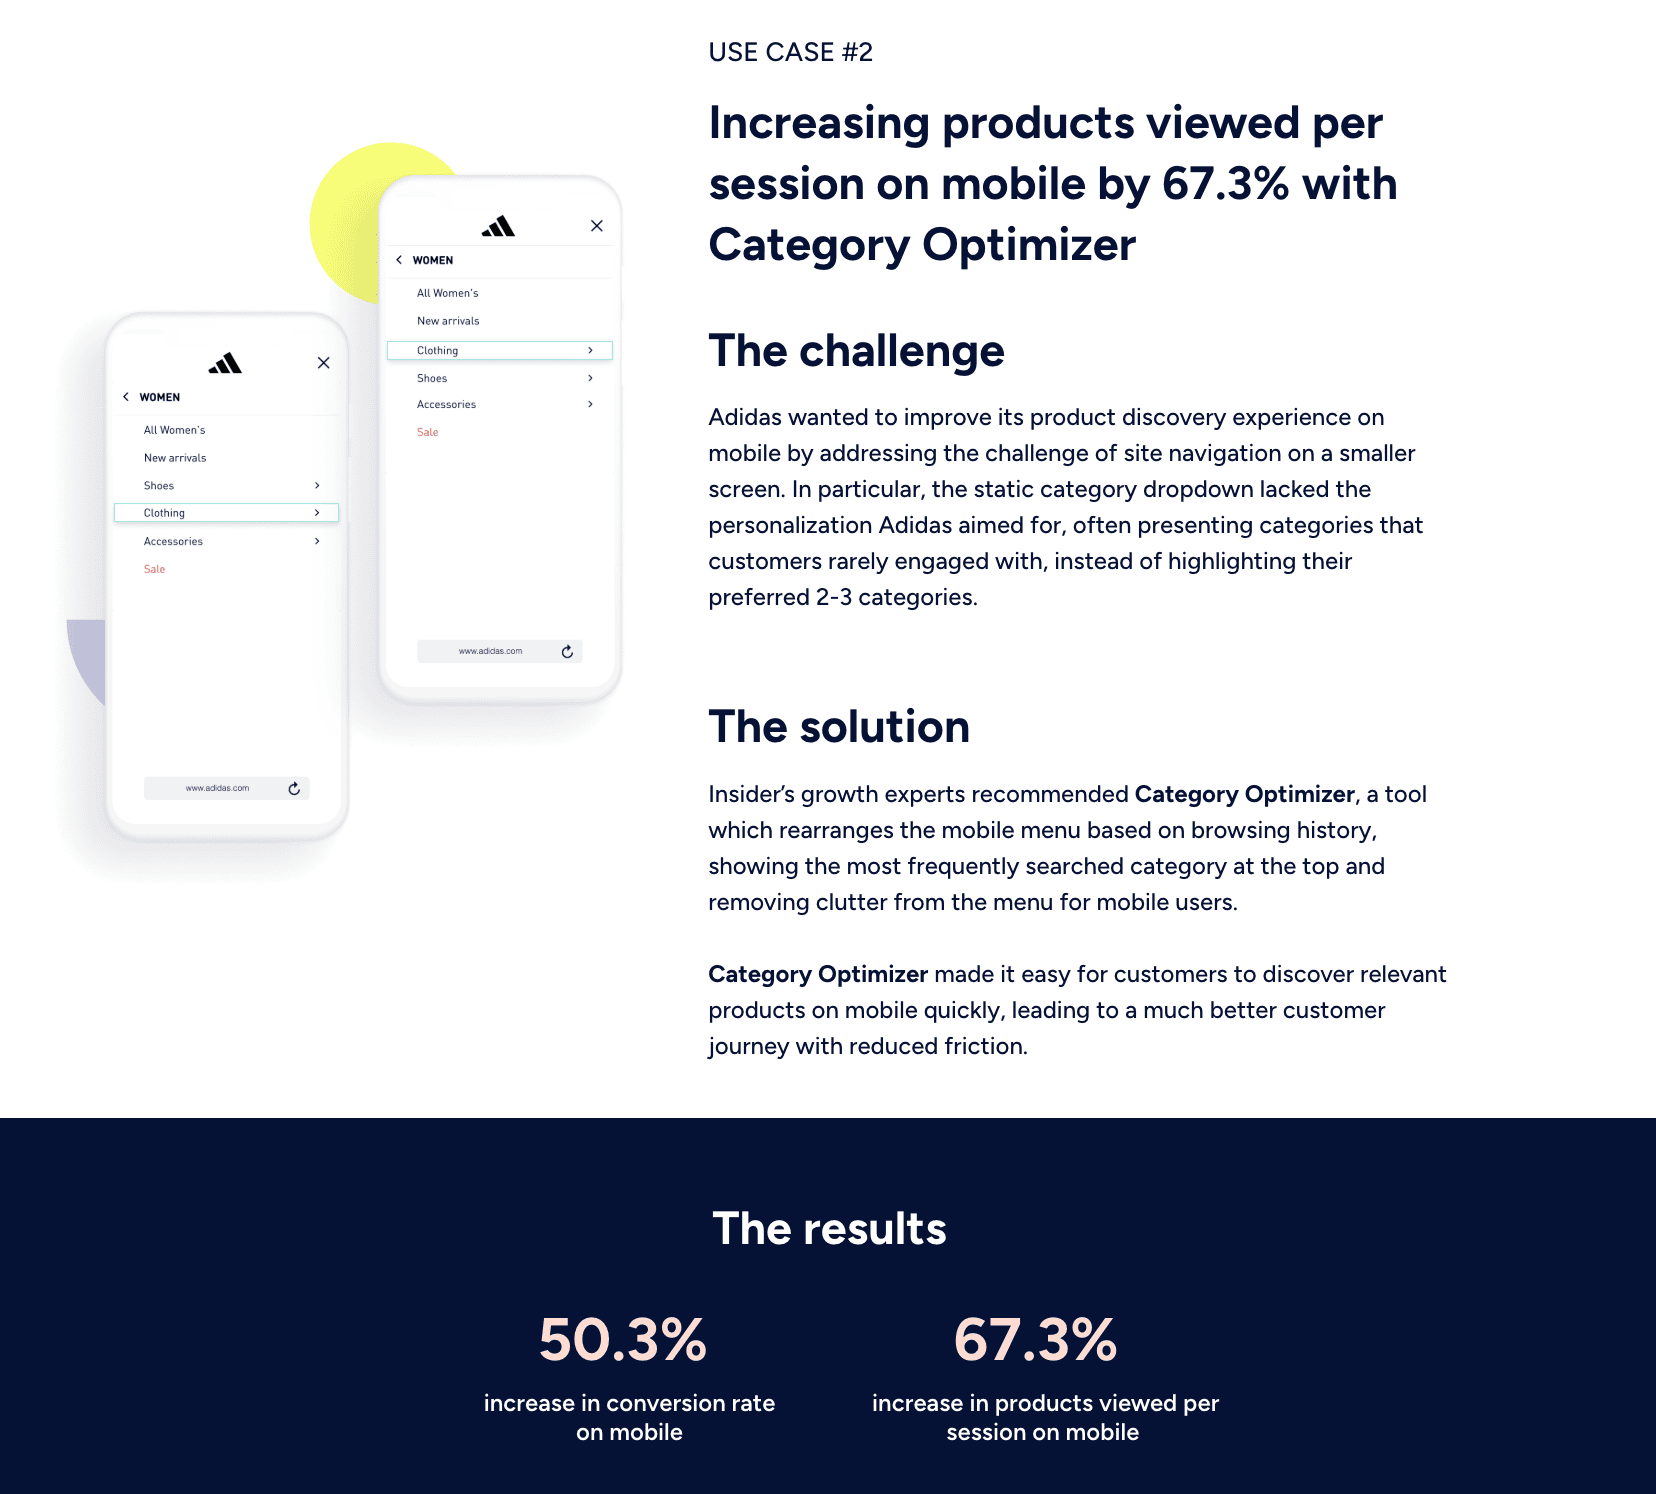
If you still think that it can’t be that important. Take a look at the Adidas case. They increased their conversion rates by 50.3% by simply fixing their mobile menu.
Isn’t this crazy?
Source: Insider
So, here’s how you can optimize your own mobile experience as well:
12. Test mobile-friendliness
By now, you understand how important mobile-friendliness is. But what are the easiest ways to test your mobile performance?
There are a couple of them:
- You can use any “mobile-friendly test” you find online.
- You can go to PageSpeed Insights (yes, again) and check the Mobile tab.
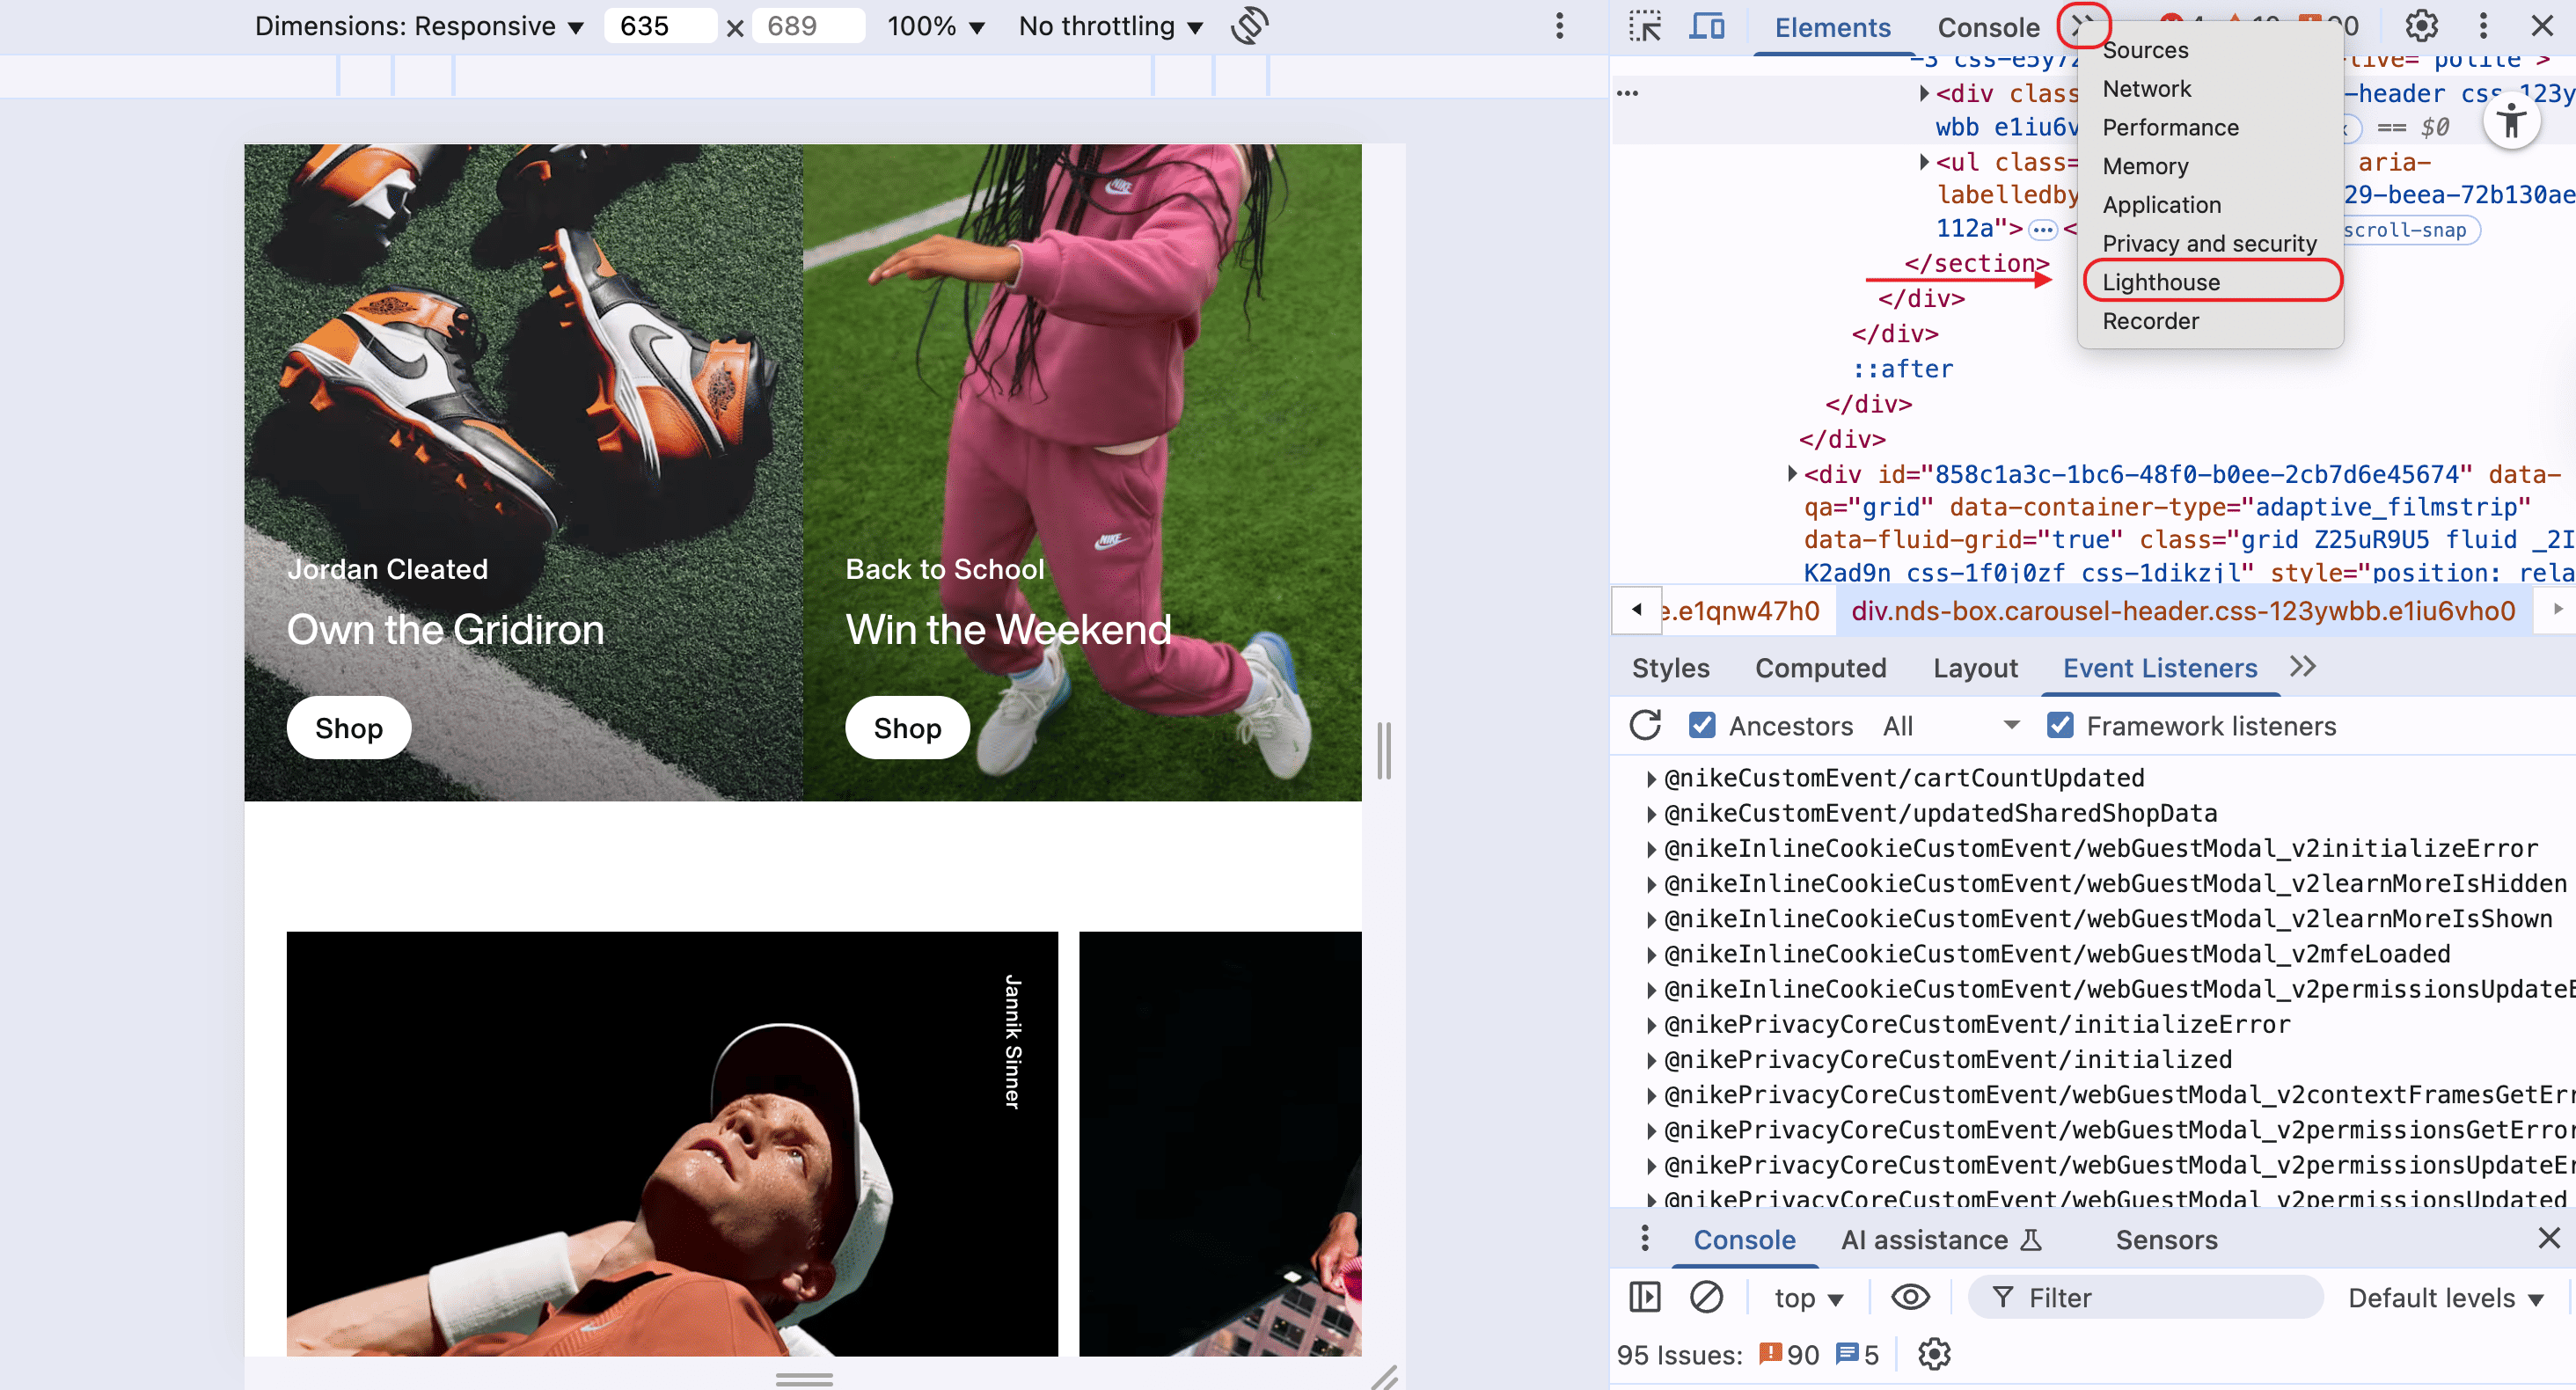
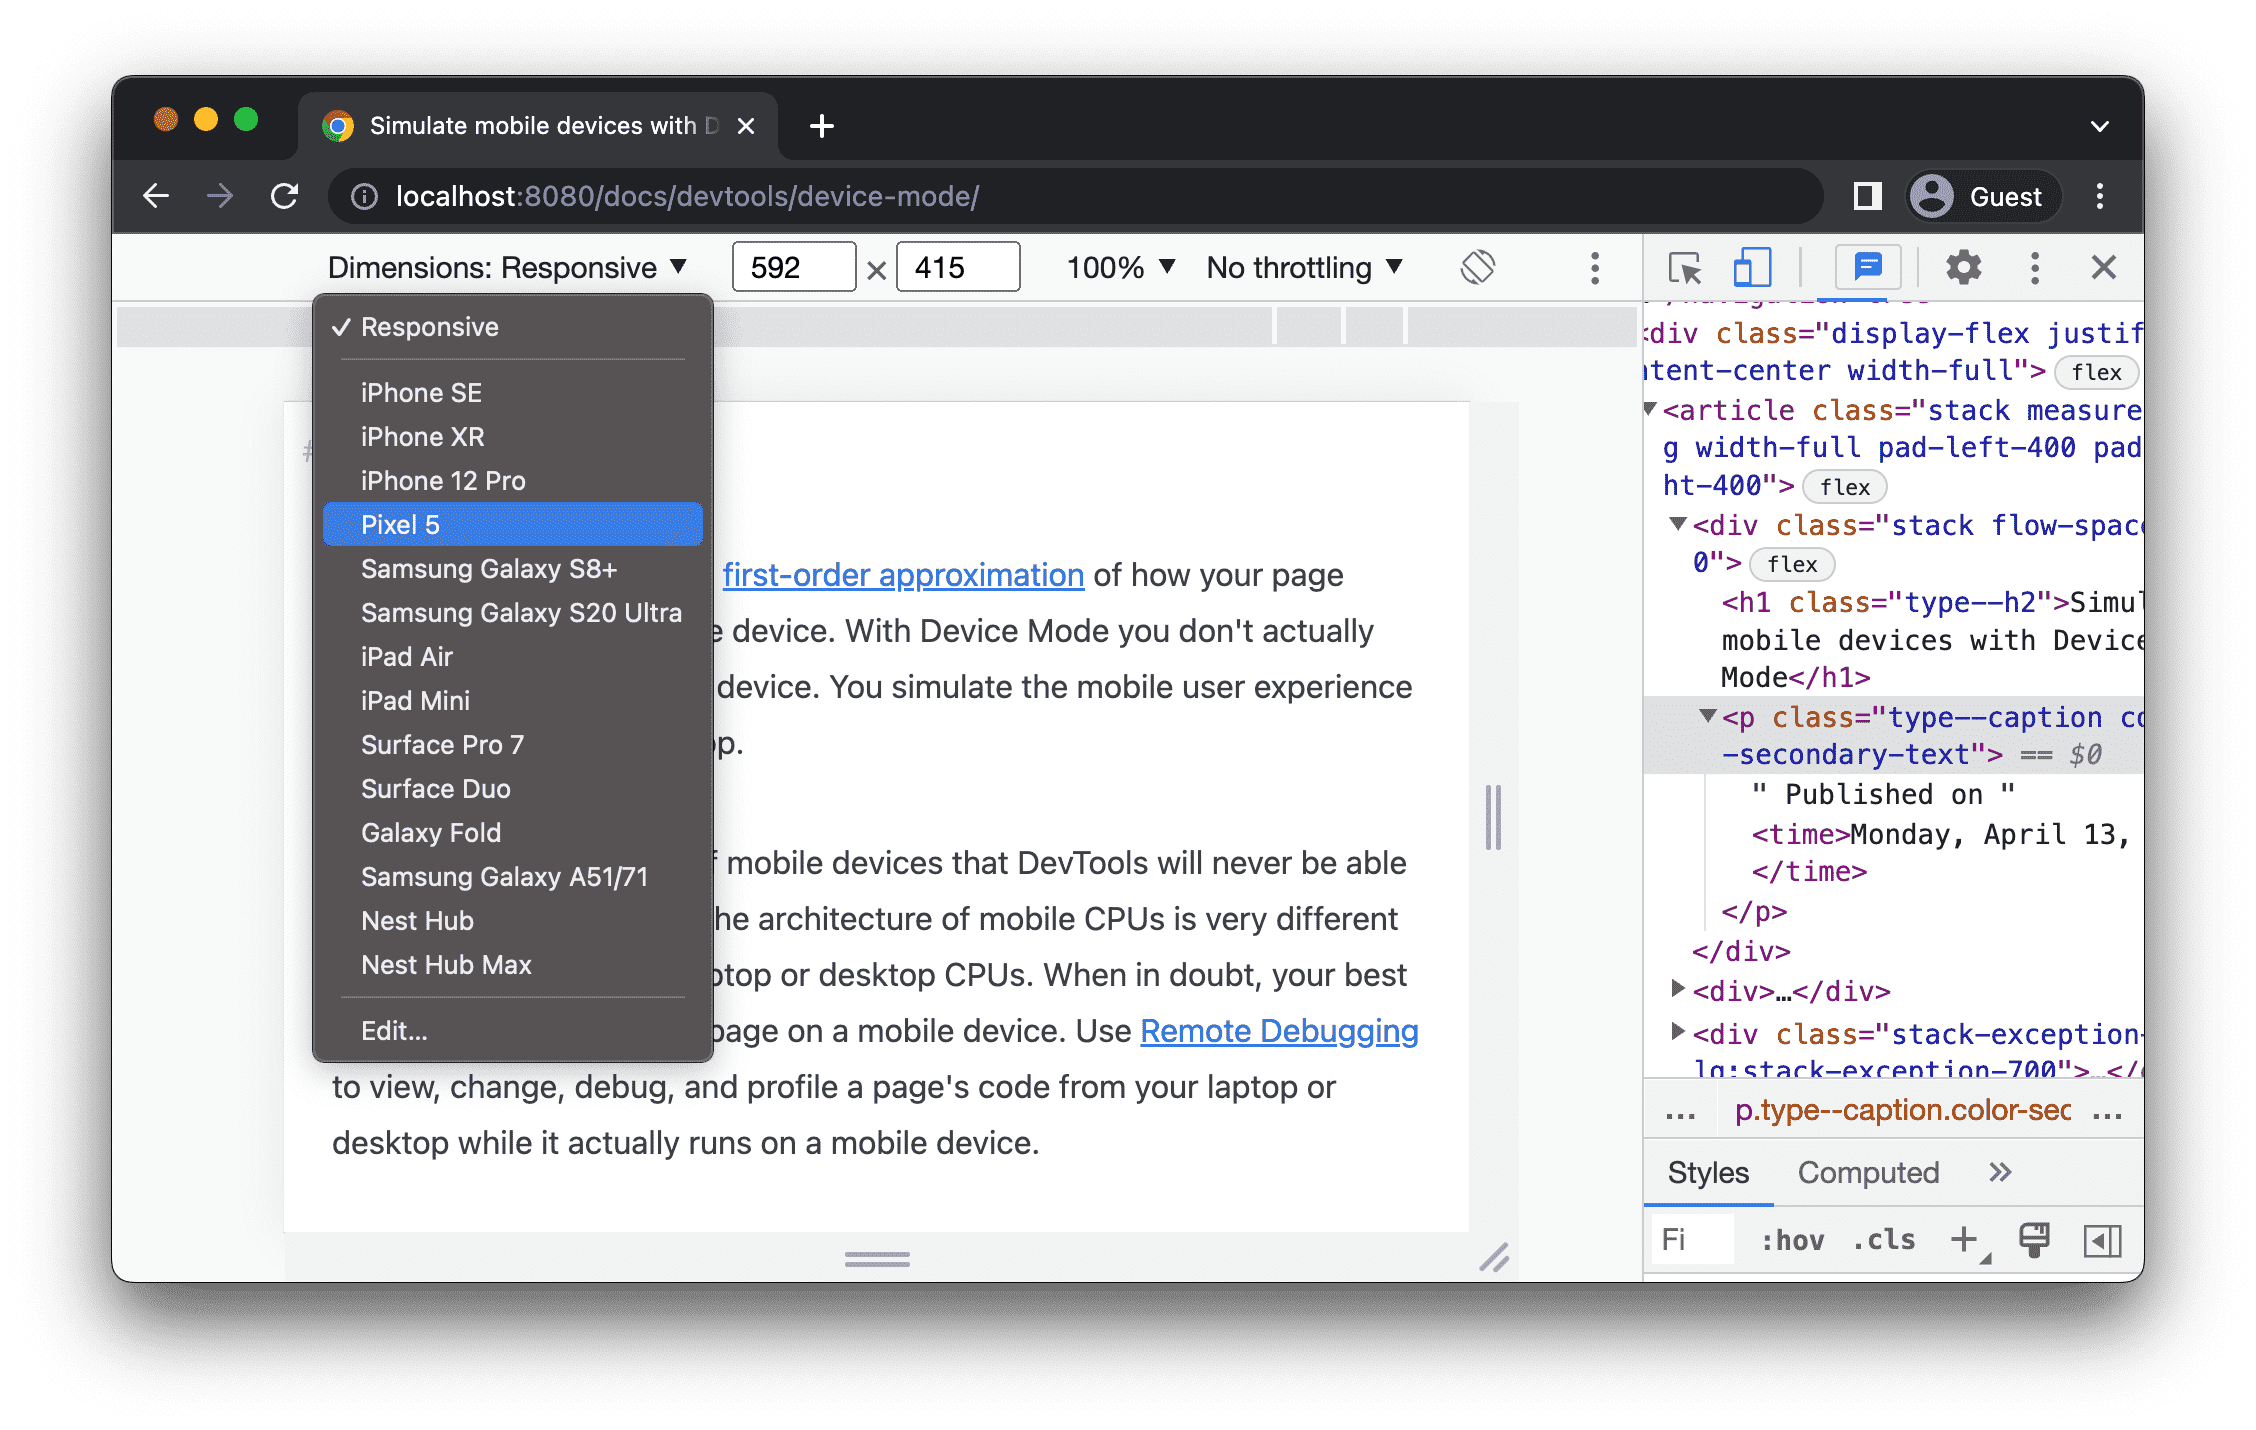
- Or you can use another free Google solution called Chrome Lighthouse.
Now, let’s see how you can work with the last one step-by-step.
Open DevTools by right-clicking on your web page and selecting Inspect (Cmd+Option+I (Mac) or Ctrl+Shift+I (Windows)).
From there, click the Lighthouse tab (if you don’t see it, open the » menu to find it).
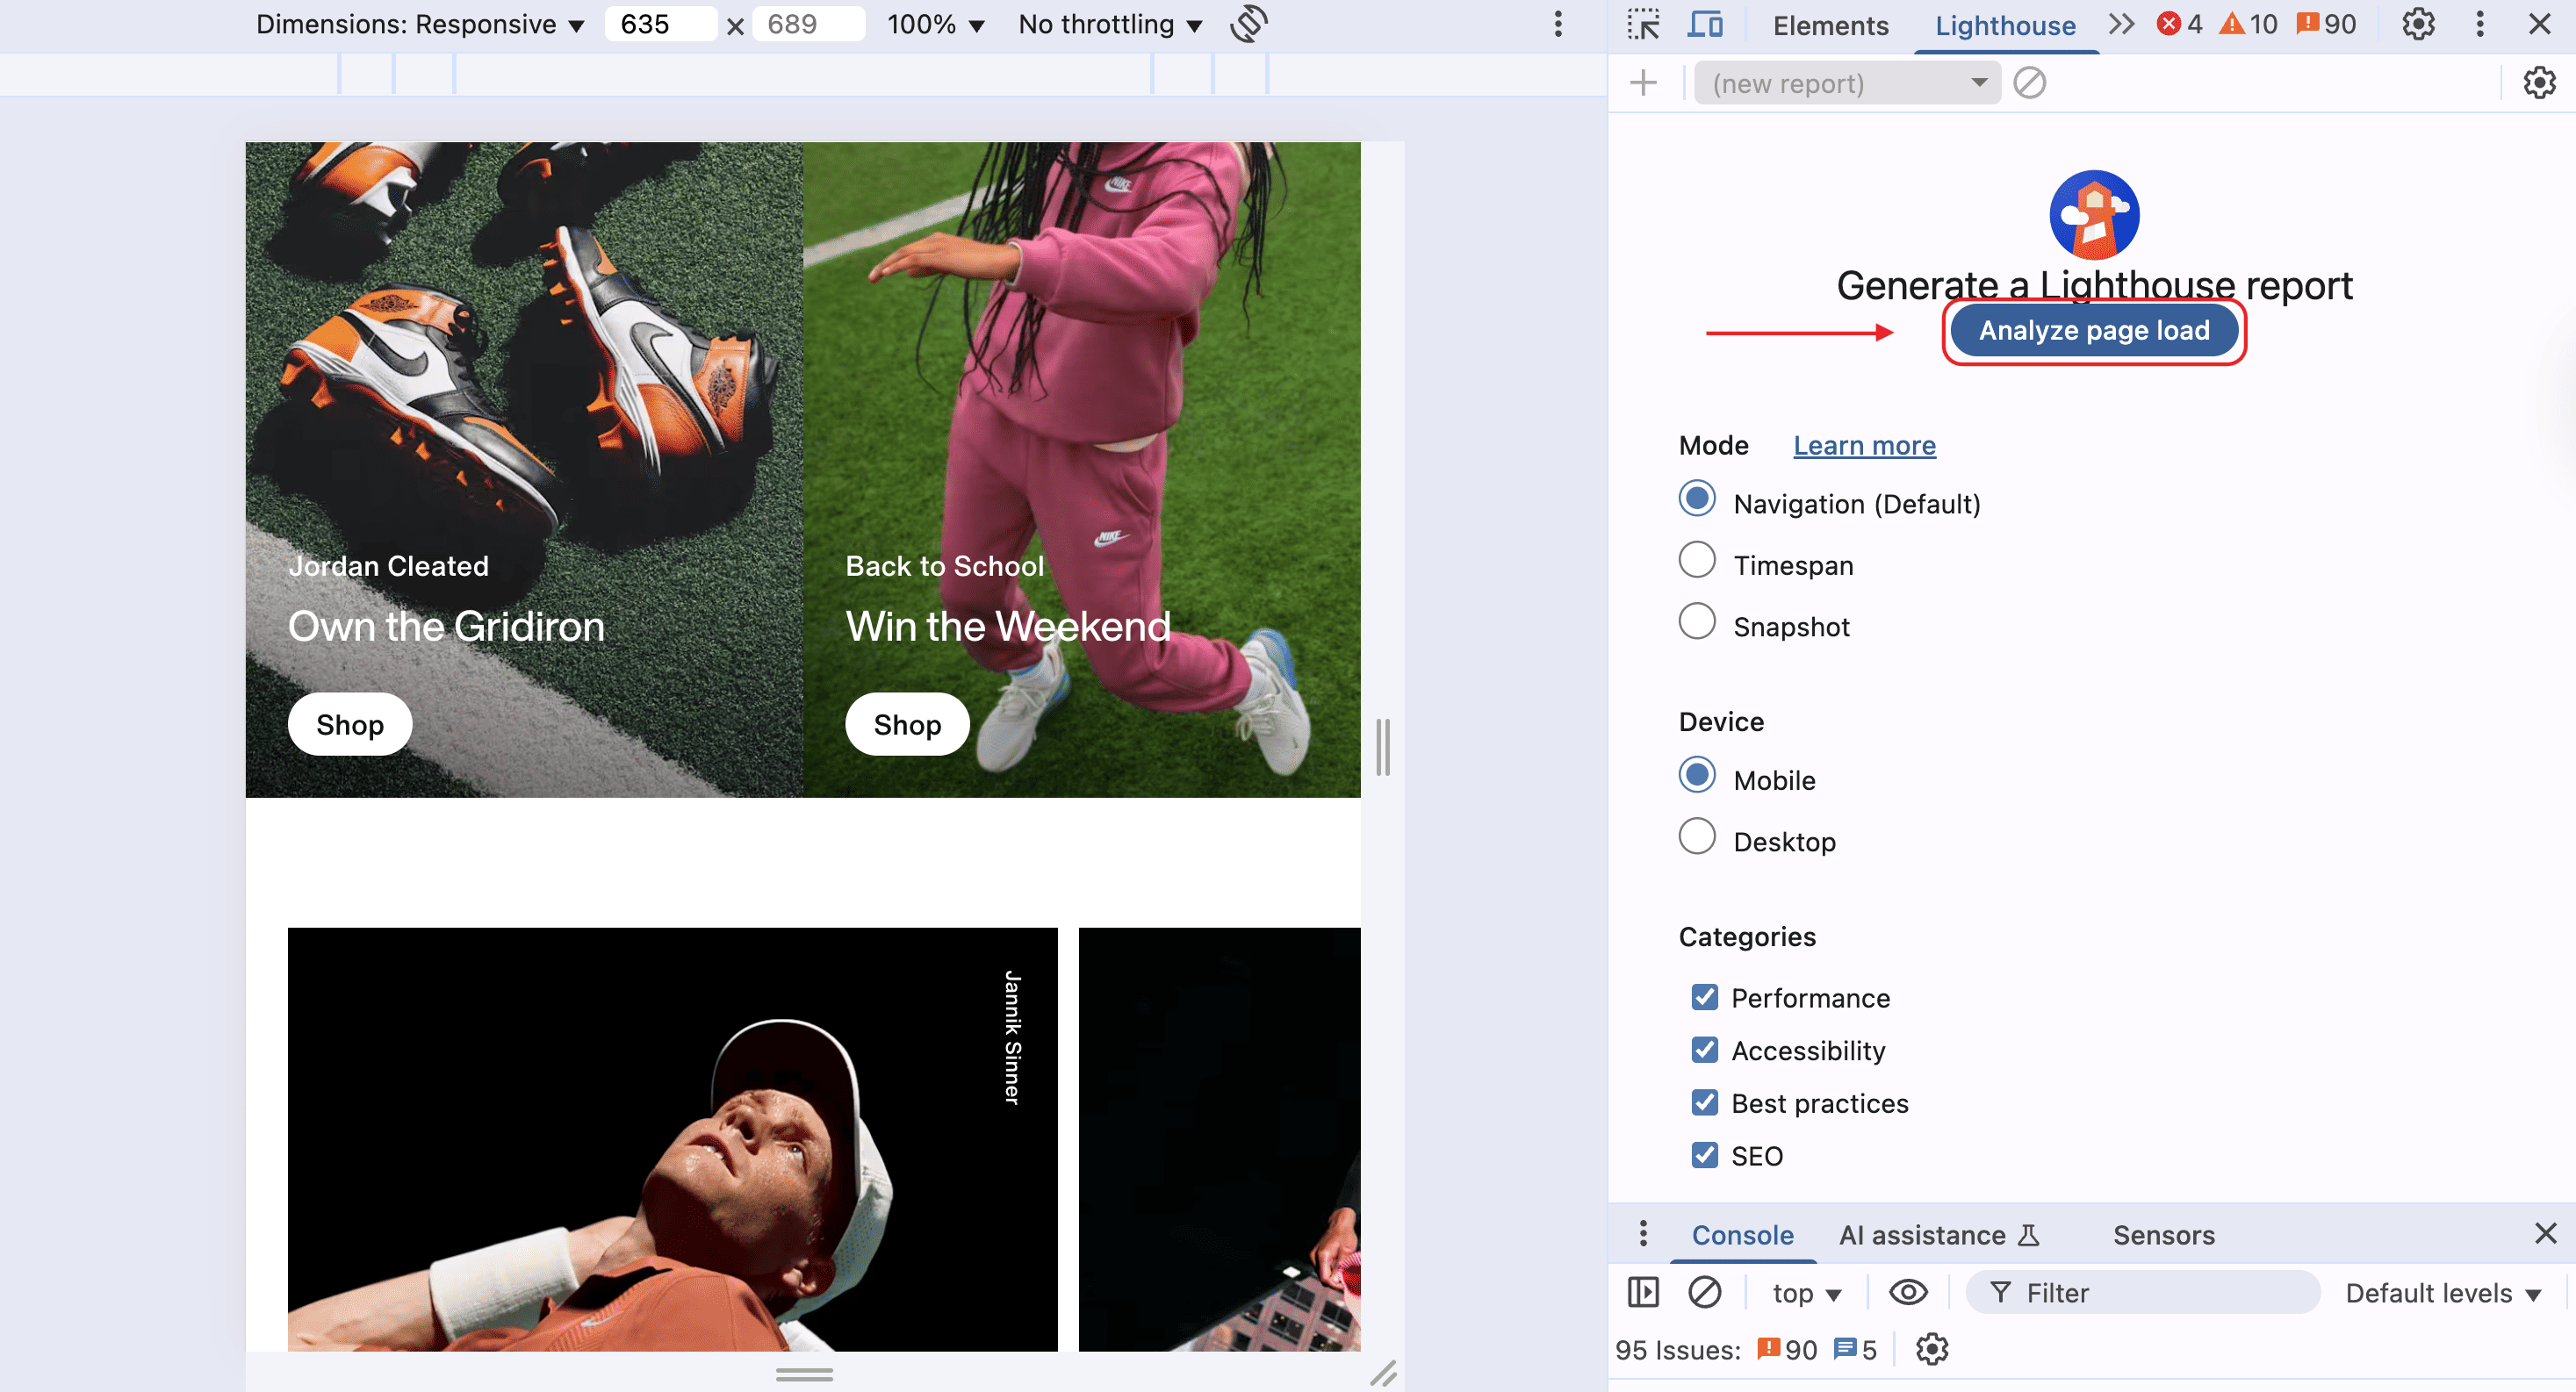
Click the Analyze page load and wait for a bit.
And here you have your report:
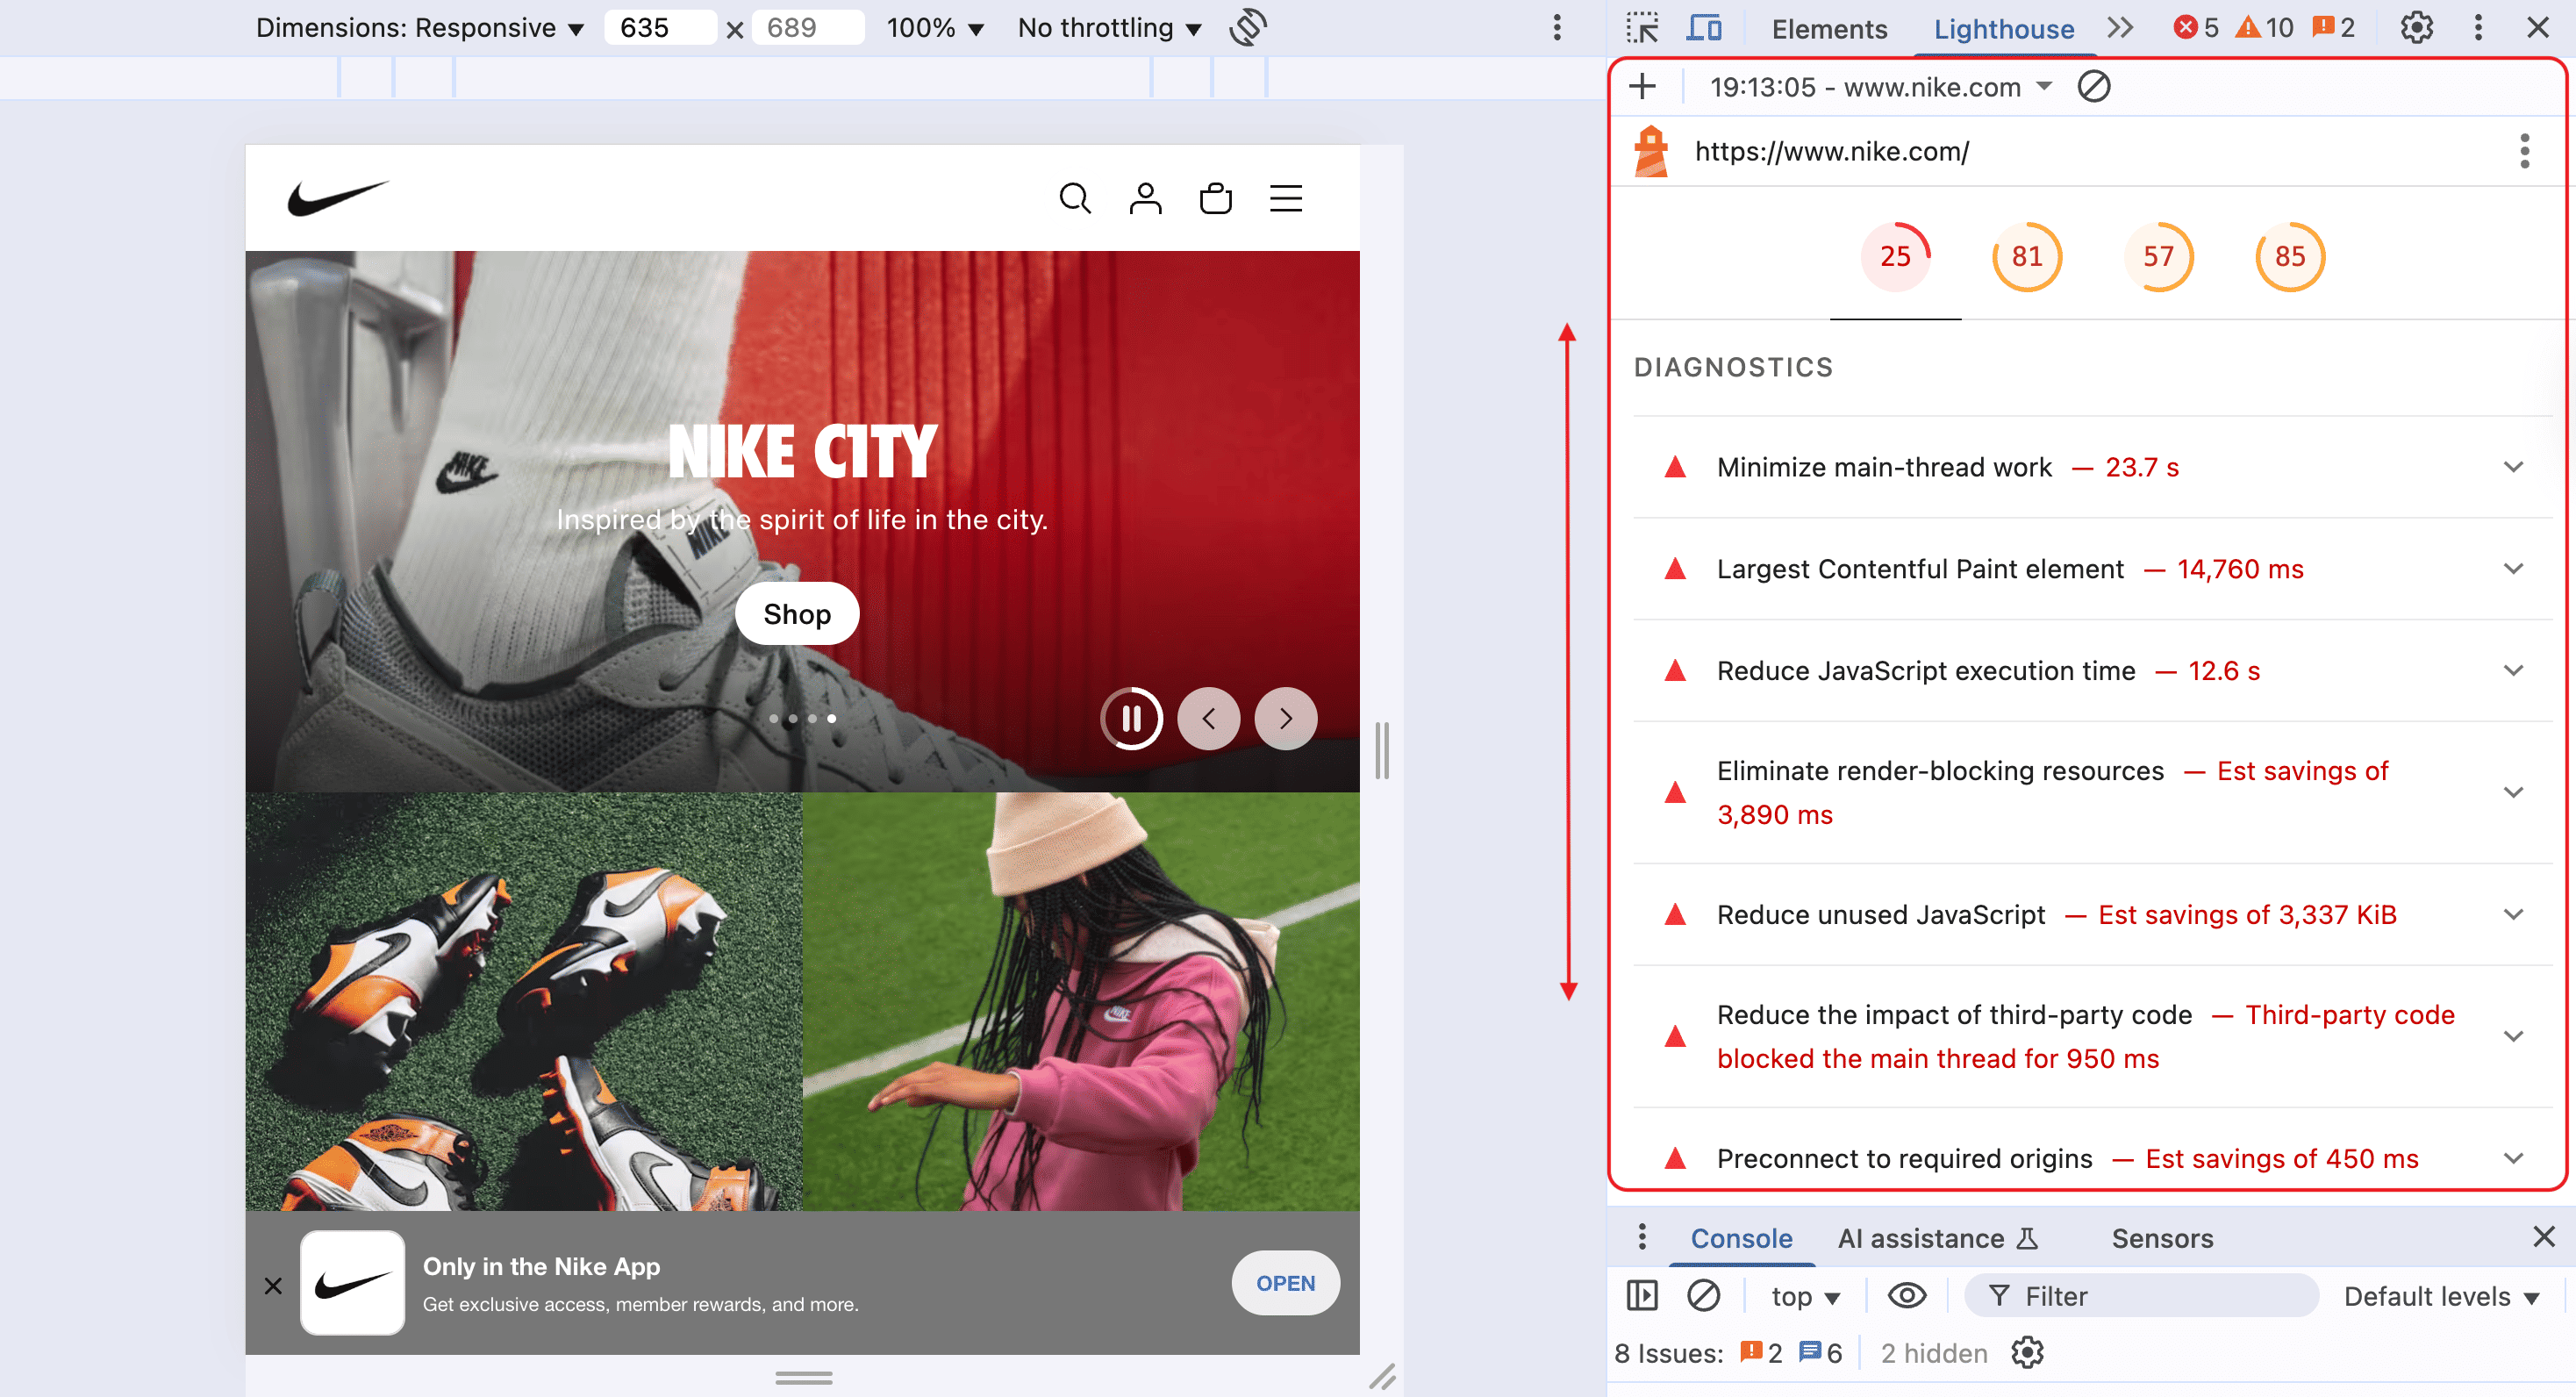
These are the common issues you might see come up:
- Text too small to read.
- Links (tap targets) too close together.
- Content wider than the screen.
- Slow site speed on mobile.
What do you do if you get a bad result? Well, you can start fixing it all by using a responsive design (we’ll talk about that next).
13. Ensure responsive design
Responsive design used to be optional. But today, it’s an absolute necessity.
Sure, we all know the old-school “m.example.com” approach. Yet, it’s time to forget about that, as Google much prefers a responsive structure.
But what does it even mean?
You know those sites that make you scroll side to side when reading from your phone? Well, those aren’t responsive.
A responsive design means one that adapts to different screen sizes.
Also, don’t confuse it with adaptive design. And when it comes to SEO, choose responsive design over adaptive (when possible), as it simplifies crawlability and indexing a lot.
If you have a really large site, adaptive can also work. It isn’t bad, but adaptive is preferred.
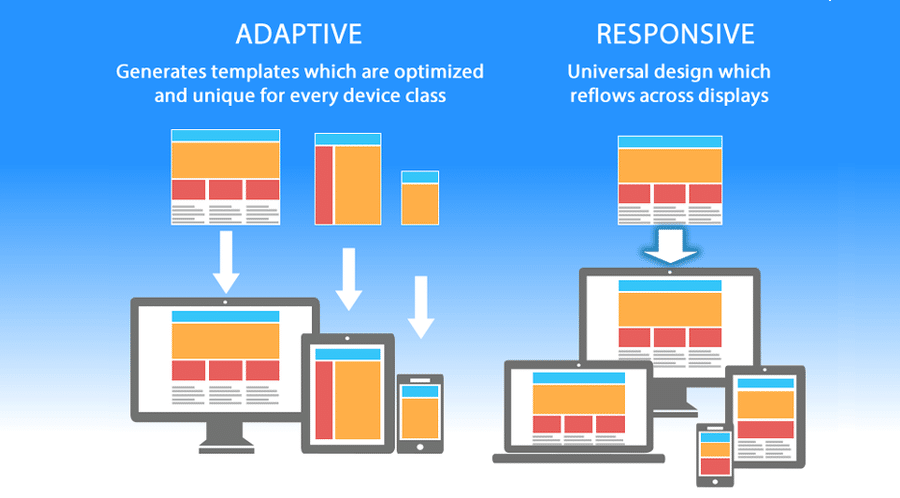
Source: Kinsta
How do you achieve that? Well, you can find a knowledgeable web designer:) But apart from that, you can do the following:
- Use flexible grids and layouts that automatically adjust.
- Test on real devices (not just shrinking your desktop browser).
- Make sure you don’t have any important hidden elements on mobile. Sure, it’s okay to adjust some parts of the design. But if you show different content on mobile and desktop, this confuses both search engines and users.
You can use BrowserStack or Chrome DevTools to simulate multiple devices and scenarios. Start by using the free DevTools solution. Here is a very detailed guide on what you can do. And you can add on any other software from there (if needed).
Source: Chrome for developers
But nothing beats holding an actual phone and testing navigation yourself.
If users can’t easily move through your site, it likely means that search engines won’t be able to do that either, which will definitely influence your SEO in a bad way.
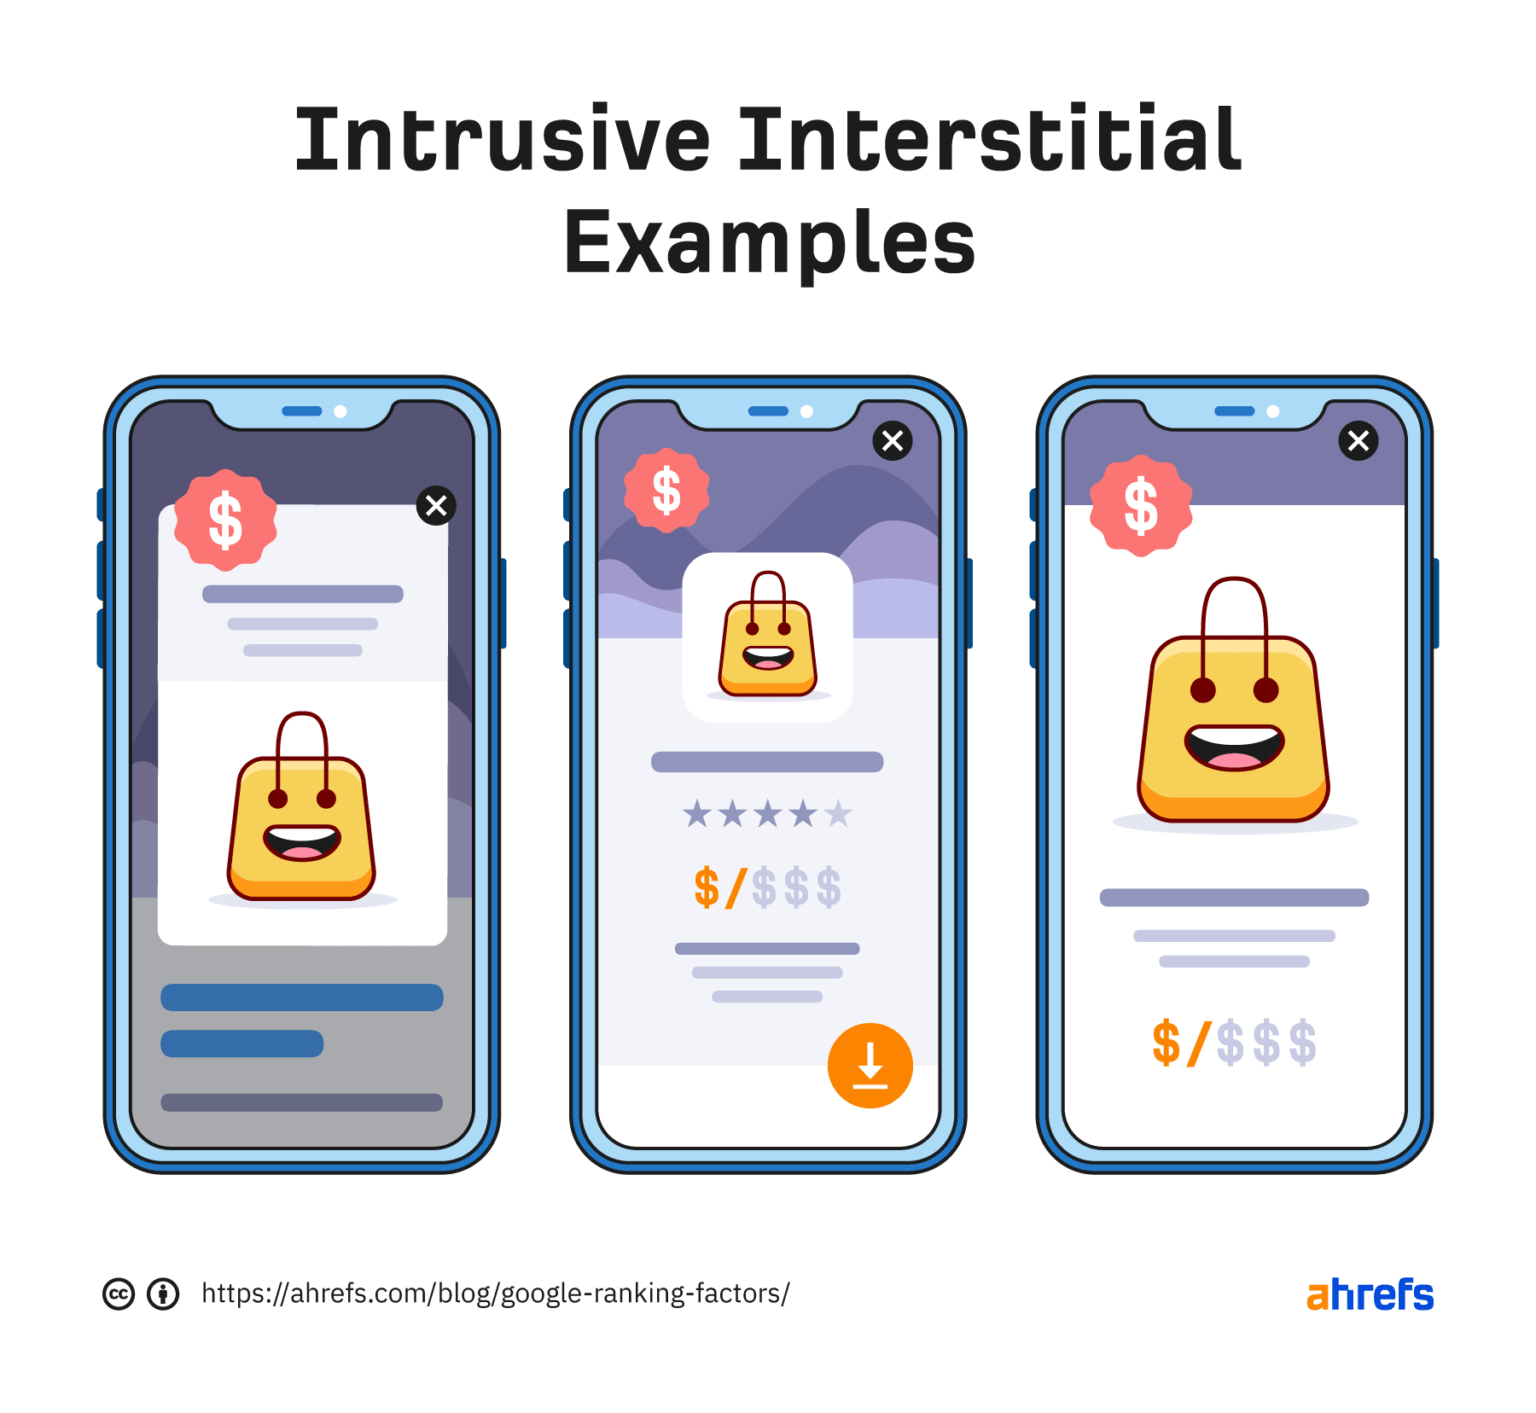
14. Avoid intrusive pop-ups
It’s very easy to ruin user experience with a simple, generic move. Just add a giant pop-up covering the screen before the content even loads.
Google, by the way, considers those intrusive, spammy pop-ups harmful for mobile search engine optimization. But it’s not that surprising. When you see a pop-up that blocks content on the page, can you really call it… not harmful?
They're bad enough on large screens, but they are especially frustrating on mobile.
Some of the harmful examples you’ve definitely seen online are:
- Full-screen email capture pop-ups.
- App install banners that push content below the fold.
- Sticky ads that cover navigation or search bar access.
Source: Ahrefs
But.
This doesn’t mean you can’t use them at all. Smart, well-timed pop-ups can still work without ruining your SEO performance. You can use them for exit intent or cart abandonment, for example.
The key is to make those pop-ups seamless and easy to dismiss.

Source: OptiMonk
Besides, you likely know that some pop-ups are absolutely necessary, like:
- Legal-related ones, like cookies.
- Age verification (for certain product/service groups).
- Log in window for paid content, etc.
Mobile optimization is all about balance, after all. You have to respect the fact that mobile users are impatient. But if your site works well on phones, it helps search engines understand your content better and keeps visitors around longer.
Security
These days, people are very concerned about online security, and so are search engines.
Google has explicitly stated that HTTPS is a ranking signal. While it’s only one of many factors, secure sites will always have an edge over those that aren’t.
Here's what you need to do to keep your web page security on point:
15. Ensure your site uses HTTPS
You’ve definitely seen one of these symbols next to different URLs when googling.
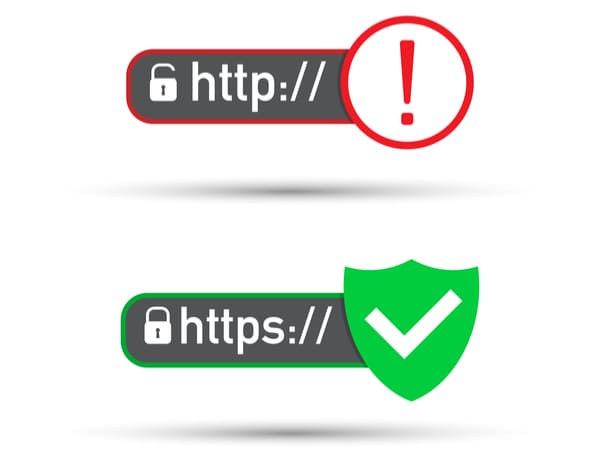
Source: Yellow Head
These show whether a site is secure. And if it isn’t, you’ll get that "not secure" message.
Did you know that 84% of users abandon a purchase once they find out that their details are being sent over insecure connections? And in reality, these numbers can be even higher because who wants to enter their payment details when a website isn’t safe.
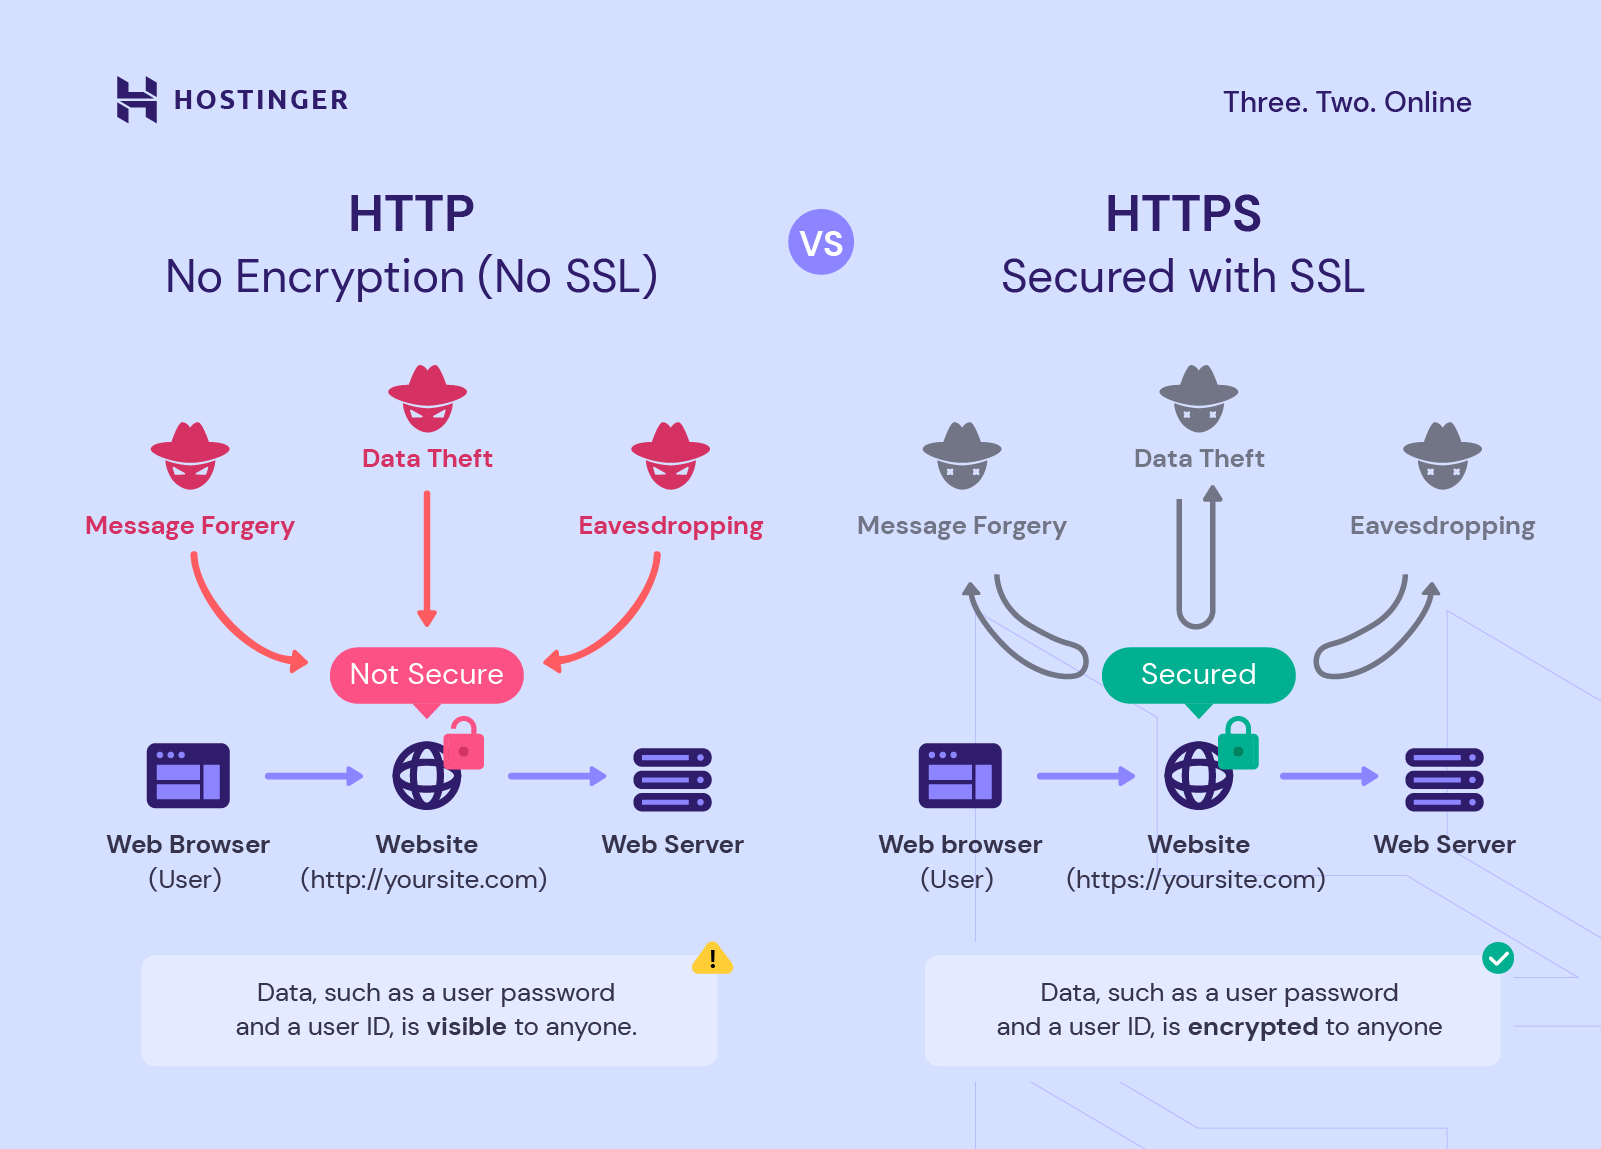
Why does this even matter, though? Because HTTPS:
- Encrypts the data between your server and visitors.
- Protects login credentials, payment details, and other sensitive information from being stolen.
- Builds user trust and improves your brand’s credibility. Besides, it is a good addition for building trust with Google.
Source: Hostinger
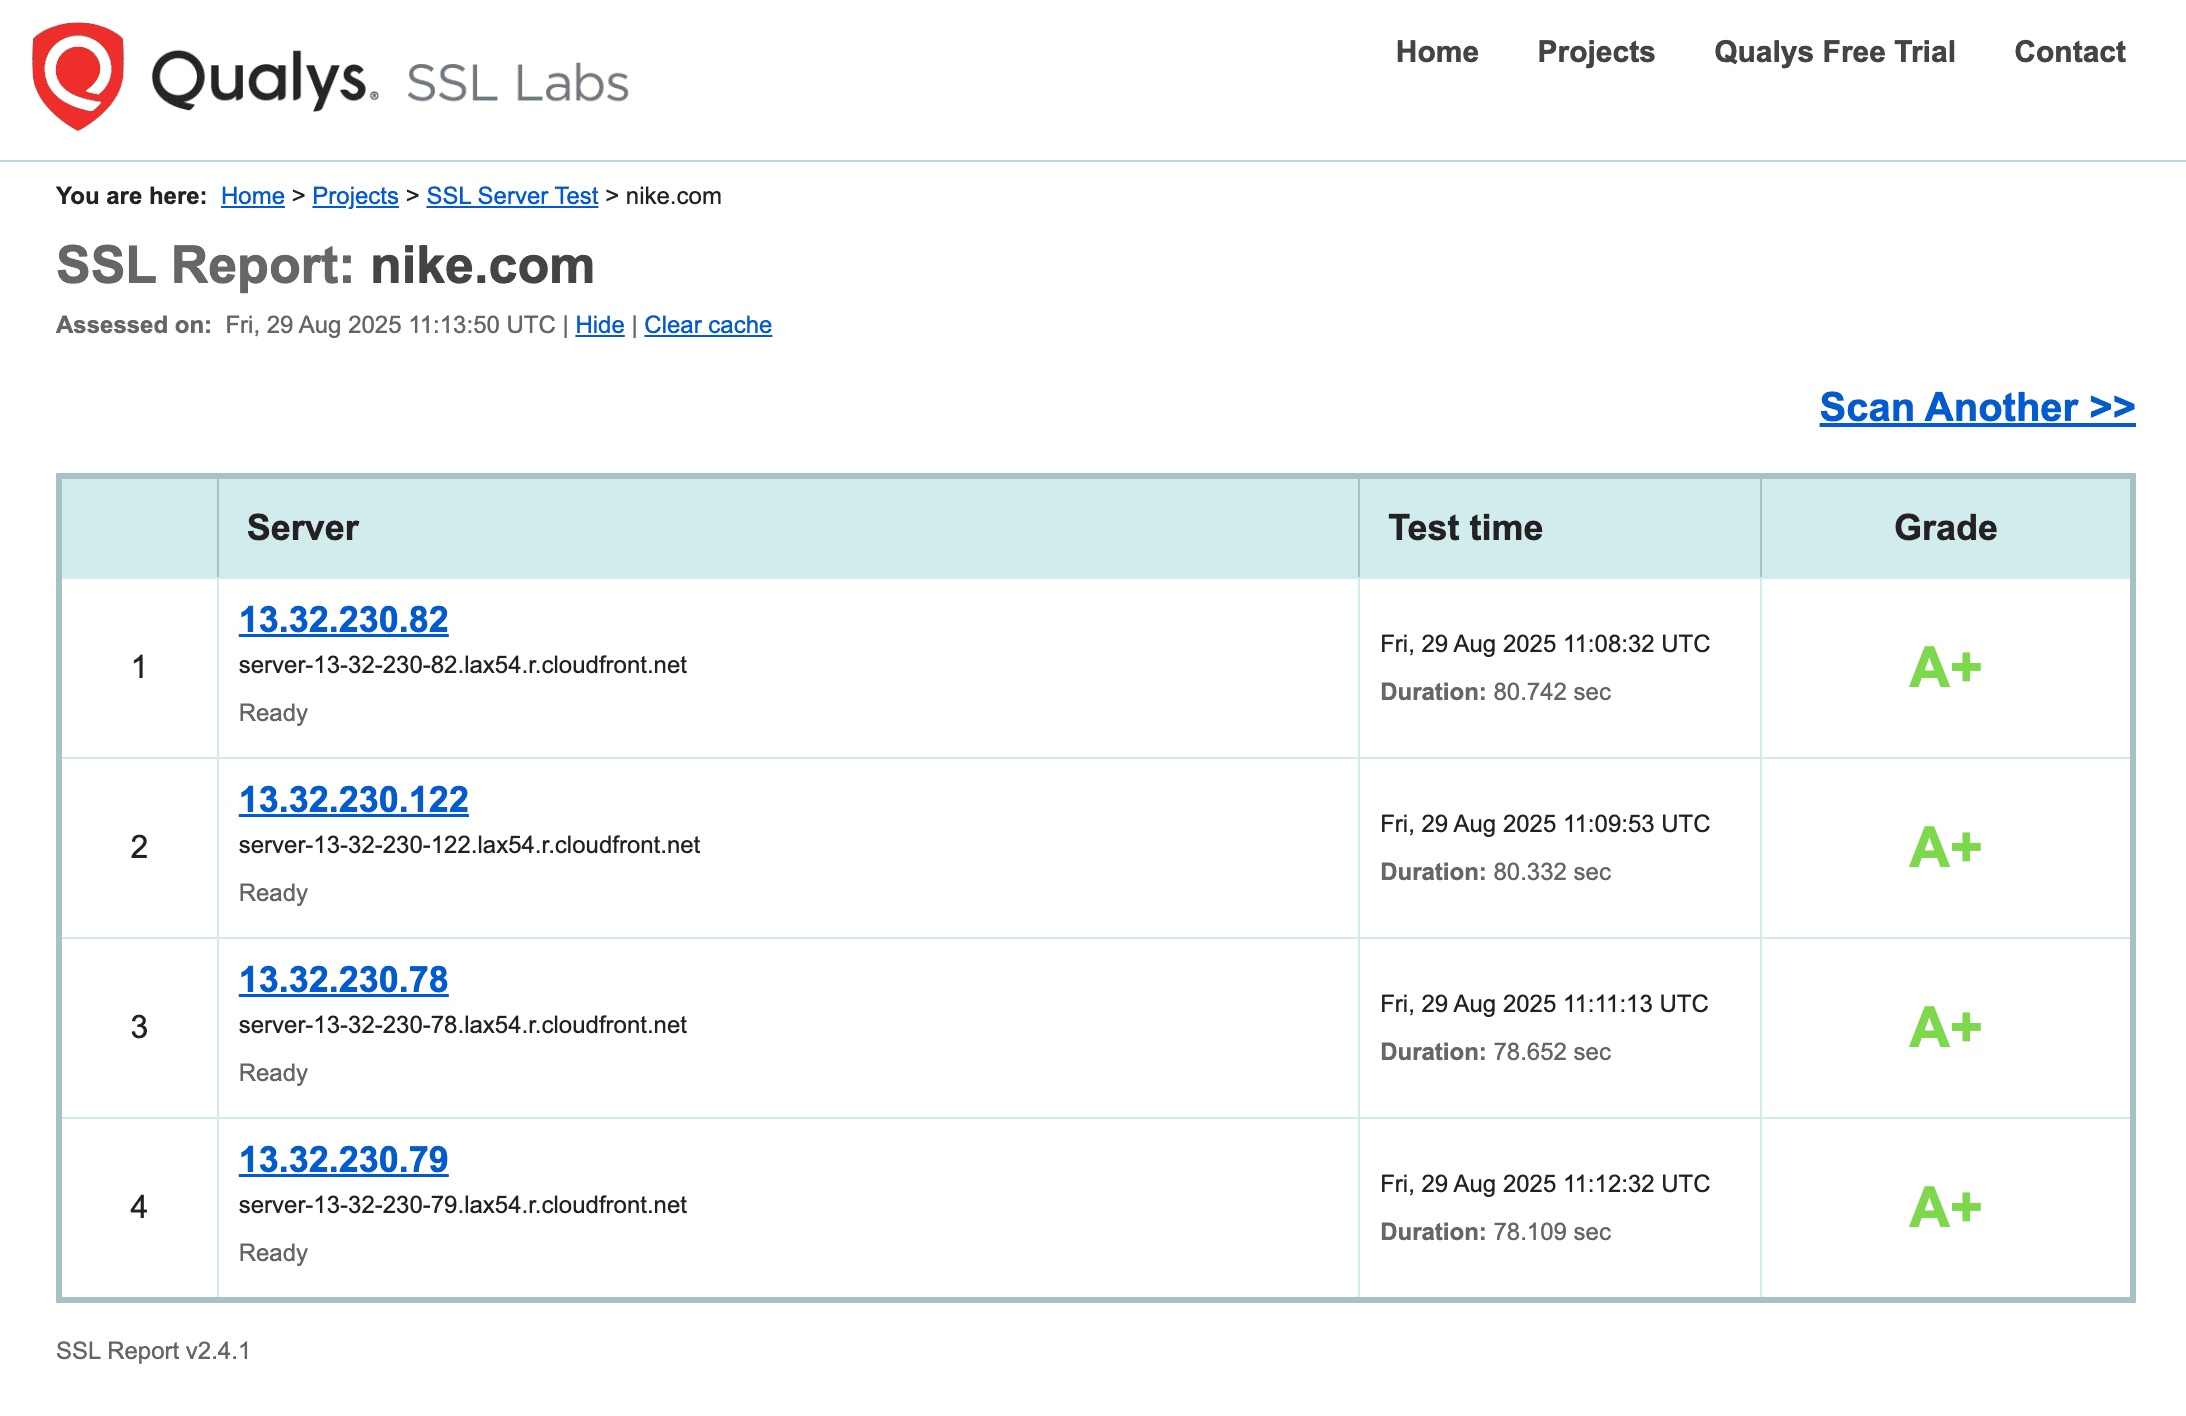
How do you get an SSL certificate for HTTPS?
These days, you don't really have to buy an SSL certificate. Usually, your server provider will have it included as a standard.
But if you want to double-check how your web security is doing, you can use the SSL test from Qualys (or anything similar). If your score is “A” or better, you’re in great shape.
Source: Qualys
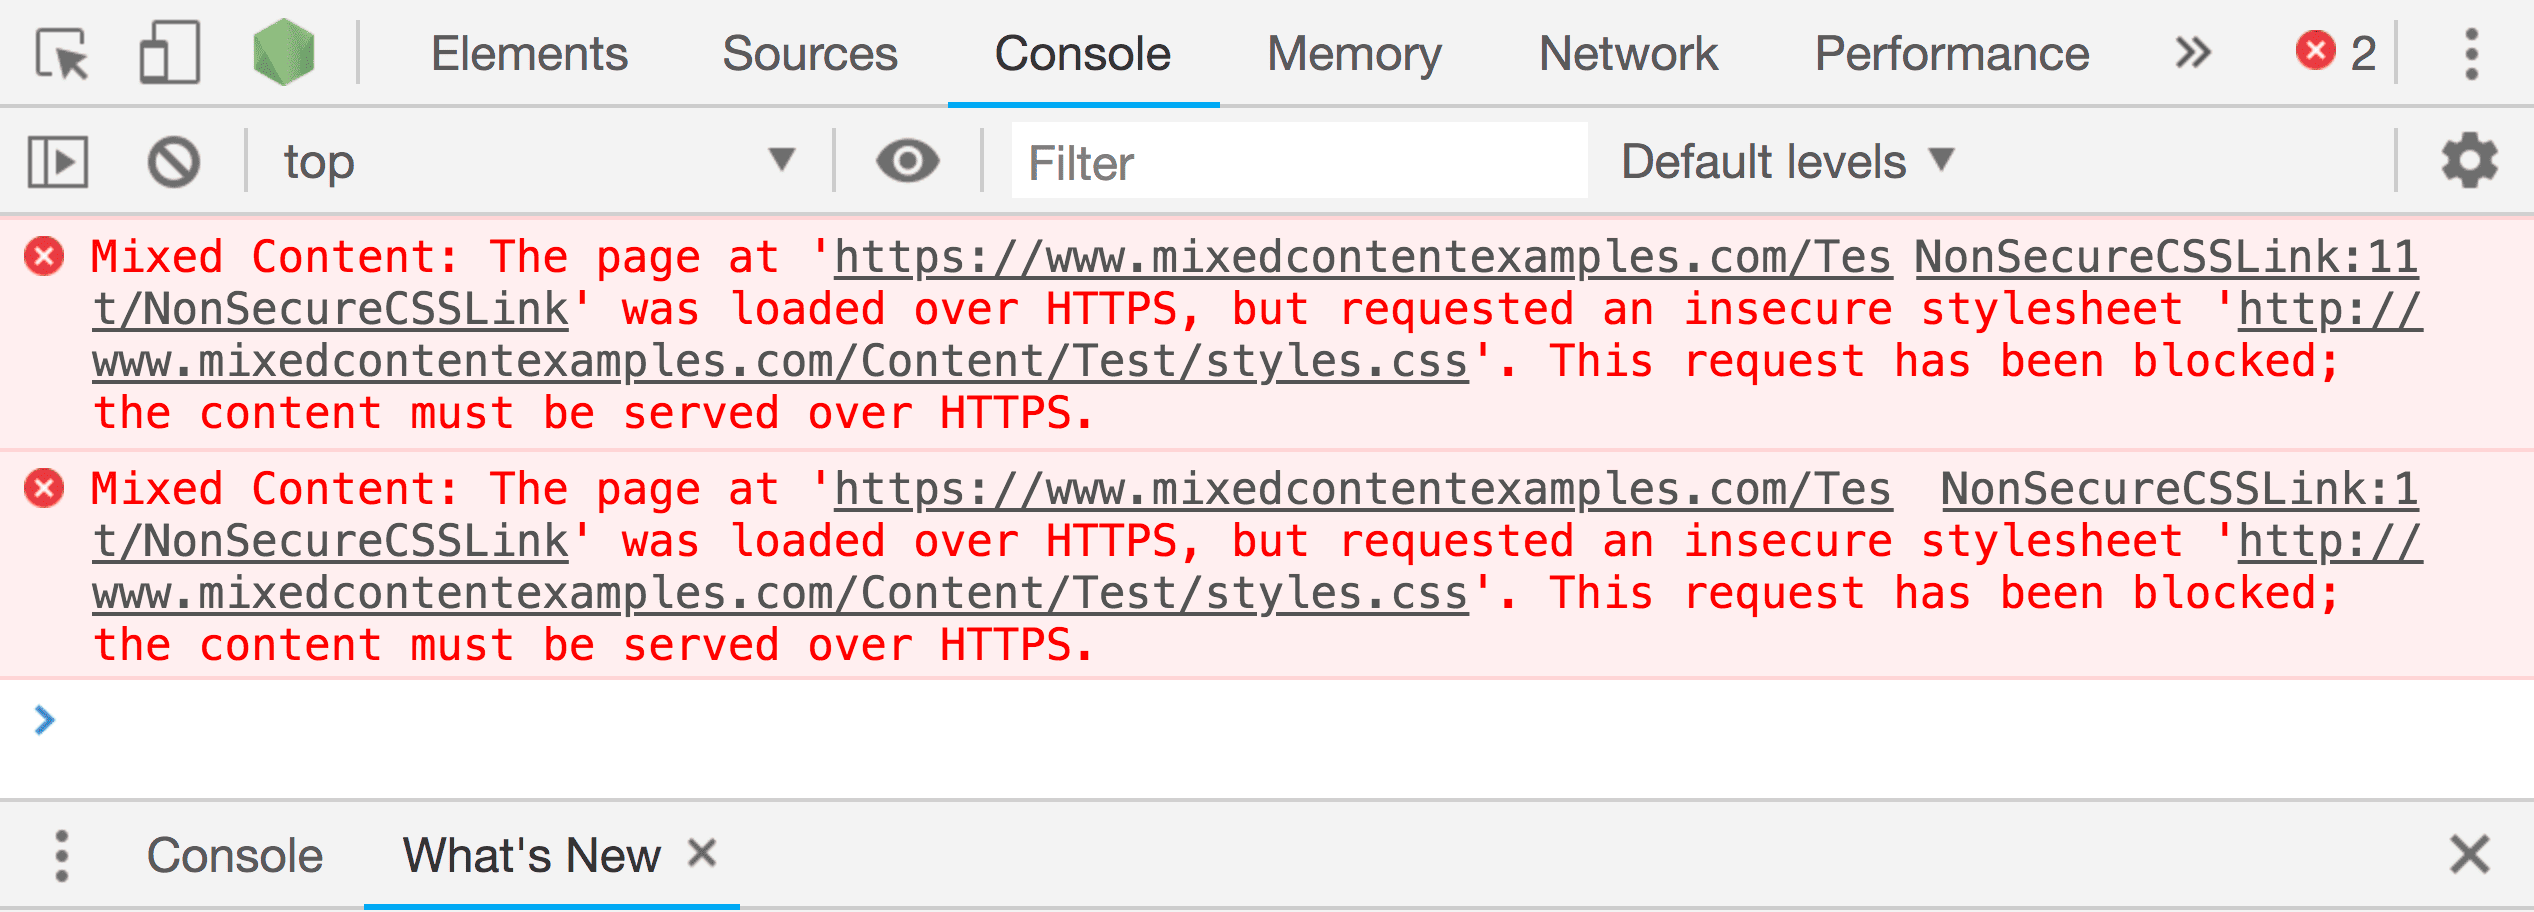
16. Fix mixed content issues
Even after you install HTTPS, some sites accidentally serve elements (could be images or scripts) over HTTP. This is called mixed content.
It’s a problem because browsers often block insecure resources. This, in turn, can break functionality or layout and hurt user trust. As for SEO, it can confuse search engines and may even impact your performance metrics if key resources fail to load.
How can you fix this issue?
- Use a site audit tool or browser console. If you have this issue, you’ll see the warnings for mixed content.
- Update them to https://. You can do this by manually reuploading visuals, updating your server settings, using plugins to force HTTPS for all resources, updating scripts externally, etc. (depending on your issue).
Source: Cloudflare
17. Make sure your plugins and CMS are updated for security
Outdated plugins and themes are one of the most common ways hackers break into websites. Besides, from an SEO standpoint, a hacked site can tank your search engine rankings pretty much overnight.
Apart from the risk of getting broken pages, spam links, or even cloaked redirects sending users to other sites, you might get an extremely unpleasant surprise. Google may flag your site as unsafe and show a warning like “Visiting this website may harm your computer.”

Source: Sucuri
Well, SEO aside, this doesn’t look that good, right?
So, it's crucial to make sure that your plugins and CMS are always up to date. Most updates are designed to fix security issues. And as a bonus, you’ll often get new features, performance improvements, etc.
This is something you should prioritize, even if you are only a small startup or business on a budget. The initial investment pays off in big ways that make it that much easier to grow your brand and attract the right audience.
On-page technical elements
On-page is a whole different part of search engine optimization. So, you might wonder what it’s doing in the technical SEO checklist article. You’re right. On-page is different.
But there is part of it that’s slightly technical. So, we’ve included it here to help you get a really good result after reading this guide.
18. Make sure your meta titles and meta descriptions are optimized
Know those clickable headlines that appear when you do a search online? Those are meta titles.
Then, right below that, you get a meta description, which is a summary of what the page is about. They’re important because their structure can and will affect your rankings.
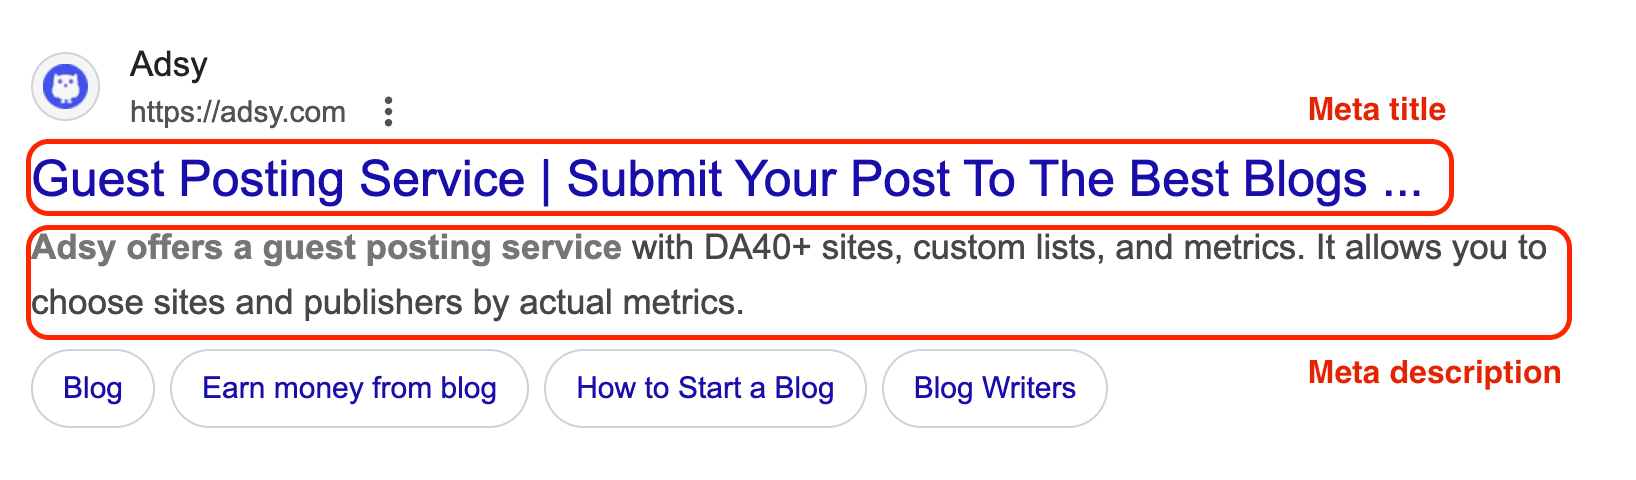
The good thing is that it’s really easy to create SEO-friendly meta titles and descriptions. Simply make sure that both include your target keyword and are descriptive.
- The title should be no more than 60 characters.
- And meta descriptions should be below 160 characters.
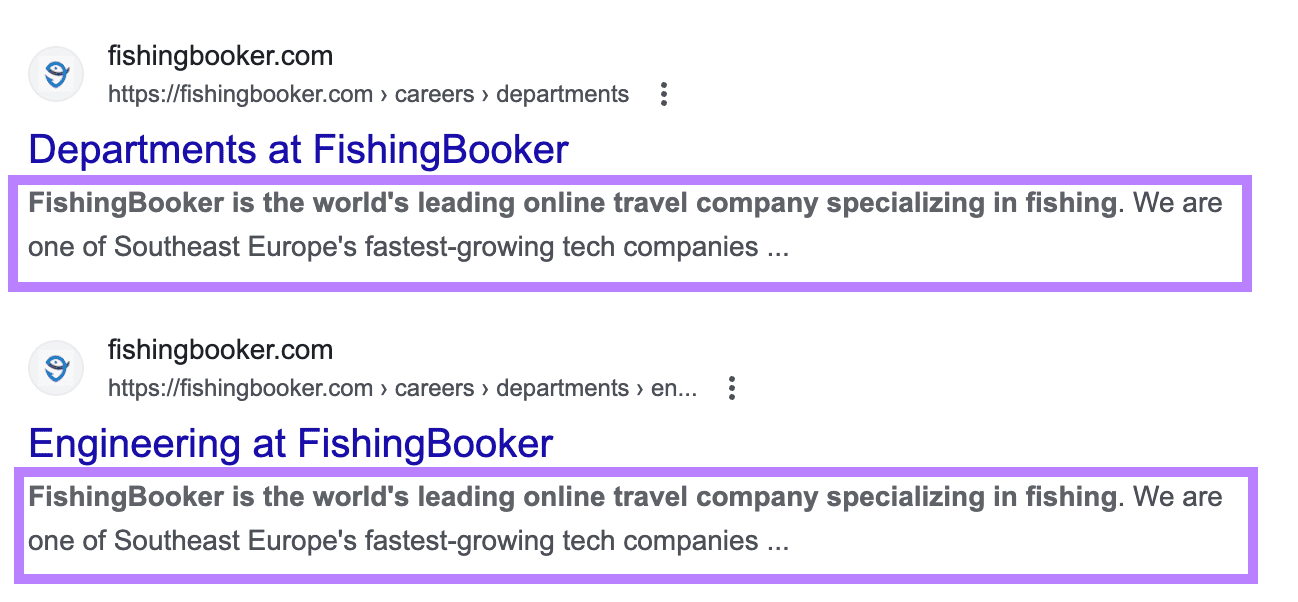
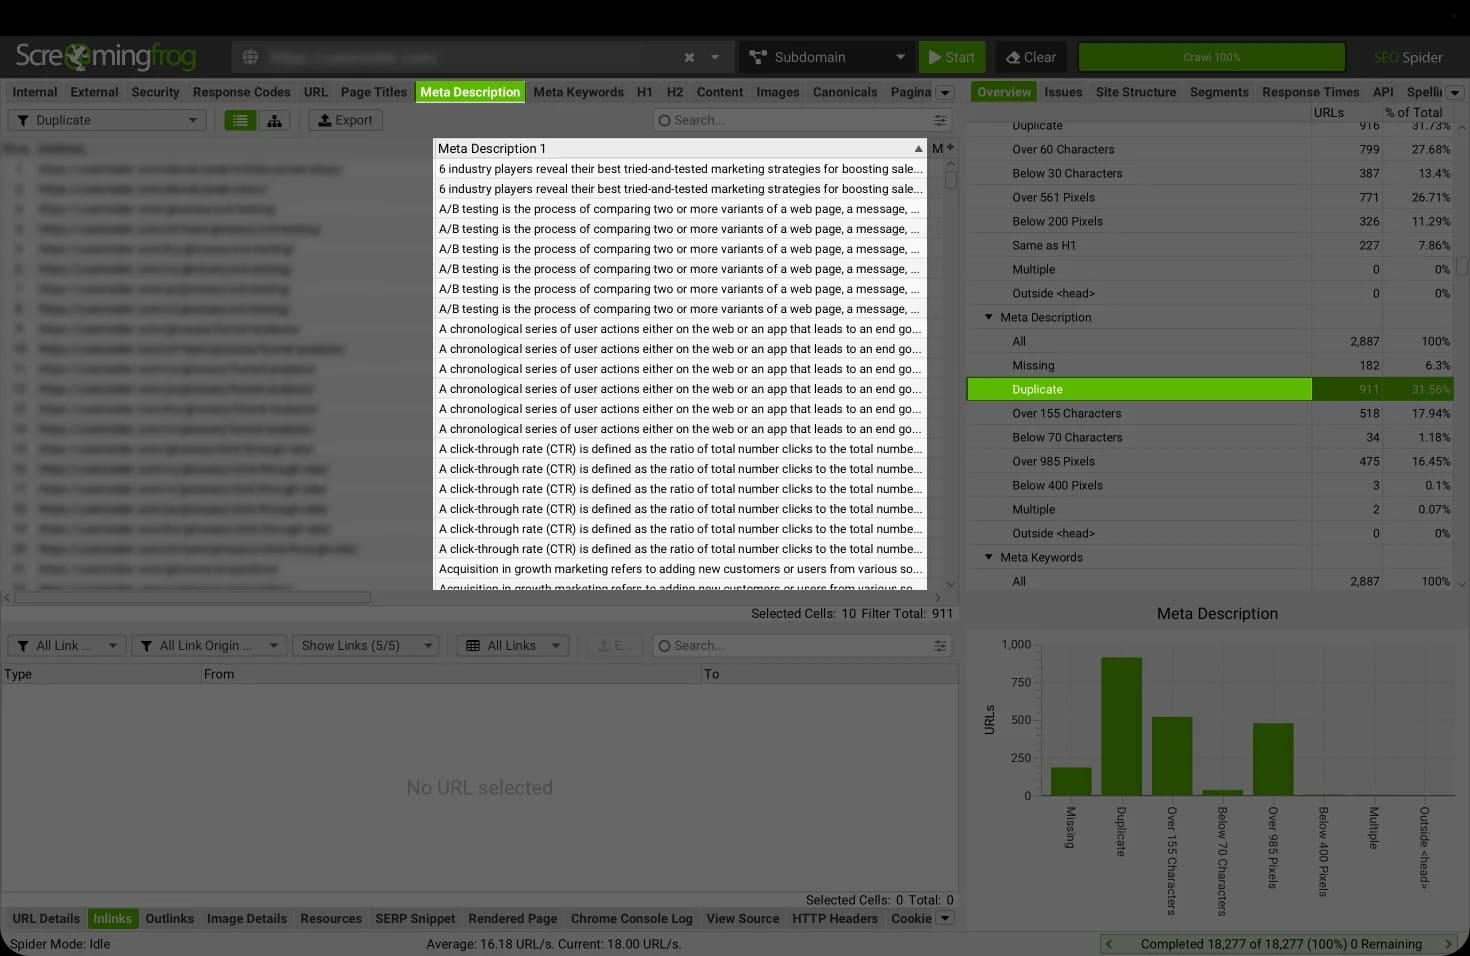
19. Check for duplicate meta tags
Creating unique meta titles and descriptions seems logical. Yet, sometimes:
- Your CMS can generate the same meta tags for different pages.
- If you have lots of product pages, you can get the same issue.
- Some websites simply have identical meta tags by default.
Source: Semrush
Of course, it goes without saying that this isn’t good. It confuses both users and Google bots. Besides, it can make cannibalization issues worse, since Google won’t know which of your pages to prioritize.
But it’s quite easy to track and fix this.
Simply use Ahrefs, Screaming Frog, or any other tool you prefer, analyze your website, and rewrite your duplicates.
Source: Saynine
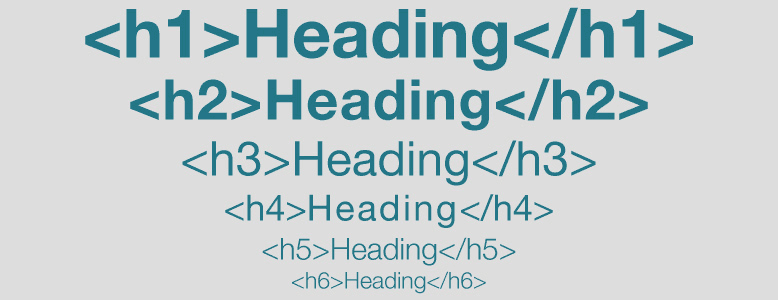
20. Use H1, H2, H3 hierarchy properly
It’s also important to use proper heading hierarchy for your content, as it helps your content structure.
Source: Mightybytes
The proper order is to use:
- H1 for the title, and there should be only one H1 per page.
- H2 for subheadings that serve as section breaks, just like chapters in books do.
- H3 is for more subheadings under H2. Try to use one H3 for one topic/point (or a couple very closely related ones).
- You also have H4 and H5. People rarely use these, but there is nothing wrong with them. In fact, we used a couple of H4s in this article.
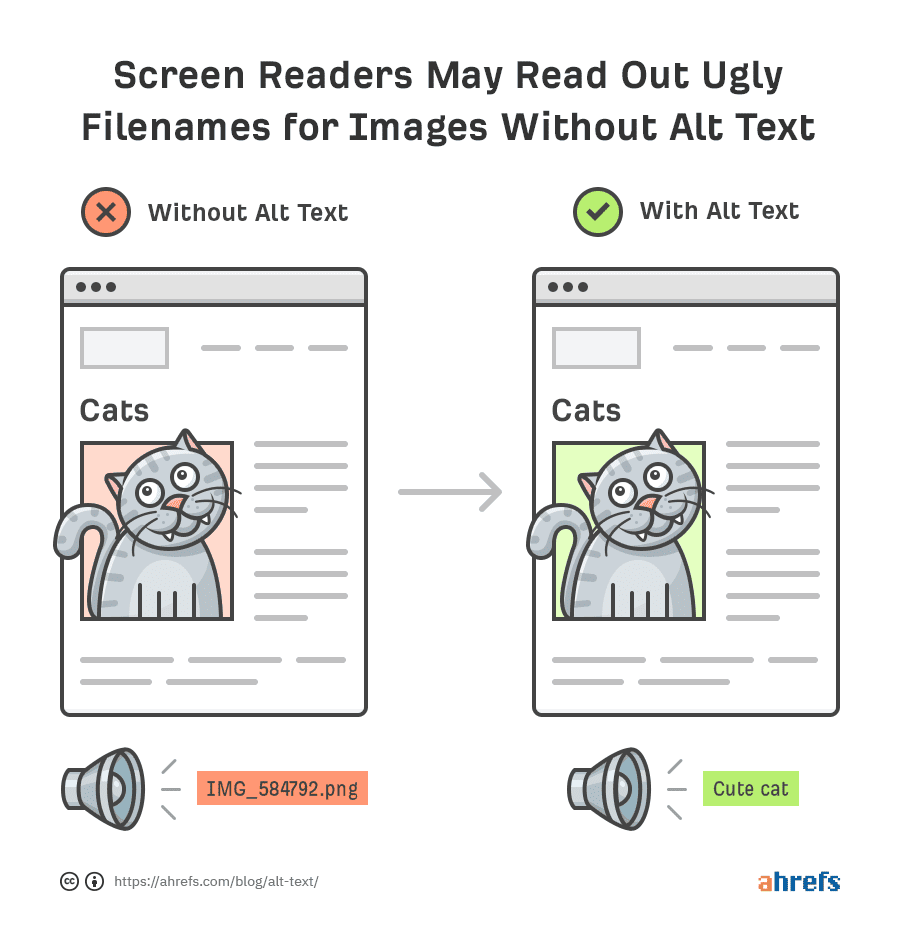
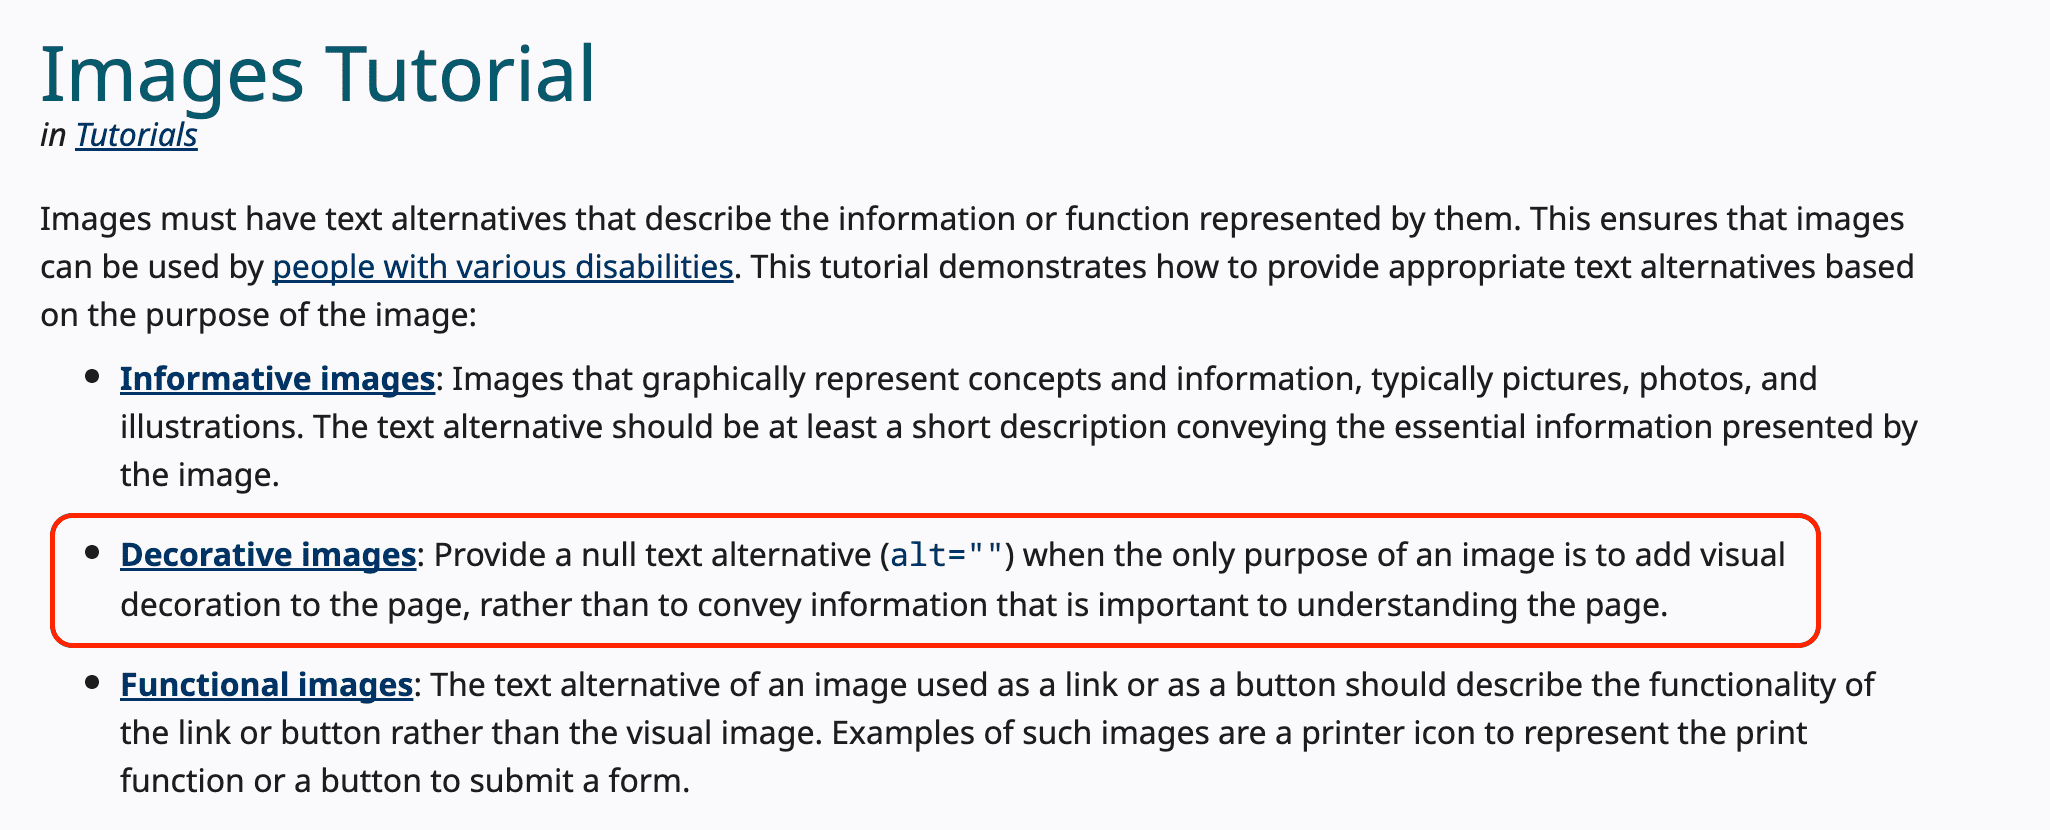
21. Add image alt text for accessibility and SEO
You’ve probably heard of alt texts by now. This is basically a description of the image that search engines use to understand it.
But even more importantly, it’s essential for accessibility. Screen readers rely on it to make your site accessible to visually impaired readers.
Source: Ahrefs
And according to Web Accessibility Guidelines, every image needs a description, except for purely decorative ones:
Source: W3C
As for the best practices you can rely on, keep these ones in mind:
- Keep alt text descriptive and concise.
- Use relevant keywords naturally.
- Avoid keyword stuffing (Google can tell).
It’s a simple thing to do, but it can be really effective. Optimized visuals can even appear in Google image search, driving another stream of organic traffic for your website.
Conclusion
Technical optimization is one of the most complex parts of SEO. Yes. But it’s also one of the most predictable and clear ones.
When it comes to content or link building, you can’t know for sure what results a particular article or backlink will bring. But with tech tweaks, it’s simple. Just fix what’s needed and see your website performance improve.
Hopefully, this technical SEO checklist will be an easy(-ish) starting point for you. We’re sure you’ll nail it. Good luck:)
All trademarks, logos, images, and materials are the property of their respective rights holders.
They are used solely for informational, analytical, and review purposes in accordance with applicable copyright law.